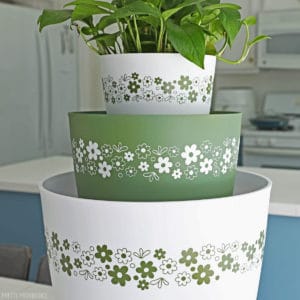
Vintage Pyrex Inspired Plant Pots
Make some DIY plant pots inspired by vintage pyrex bowls for your mid-century modern decor!
Makes 1 planter
Cost $20
Equipment
- 1 Cricut cricut maker, maker 3, explore air 2, 3, or cricut joy
- 1 StandardGrip Mat https://amzn.to/3X8aoYC
- 1 Weeding Tool https://amzn.to/462vYC2
- Pair of Scissors
Supplies
- 1 Plant pot white or green
- 1 roll Vinyl green or white (contrast color of your pot)
- 1 roll Transfer tape
- 1 can Rustoleum spray paint Eden
- 1 can Rustoleum spray paint Moss green
Instructions
- Open the daisy pattern in Design Space. Re-size the patterns to how you'd like them to be on your planters. (See below for notes on the sizing I used.)
- Put vinyl face-up on your mat and load it into the Cricut machine. Follow the instructions in Design Space to cut the vinyl.
- Weed out the inside pieces of the flowers, dots, etc.
- Peel the outside vinyl off slowly, leaving just the pattern visible.
- Cut the vinyl design into strips, then cut transfer tape to fit the strips and press them onto the vinyl designs. Burnish (aka rub) the transfer tape onto the design very well.
- Peel the white backing paper off, slowly separating it and leaving the design stuck to the transfer tape.
- Press the design onto the planter and burnish (aka rub) the outside of the transfer tape to adhere the design to the planter.
- Slowly peel the transfer tape away diagonally. If a piece of the design comes with the transfer tape, press it back down and burnish more. Try peeling the transfer tape away again. Slow and steady wins the race.
Video
Notes
Vinyl Craft Pro Tips:
- Using permanent vinyl will work best for this project. It adheres more easily to the plastic.
- The plastic pots are a slicker surface than I usually use for vinyl projects. Go slowly when you are pulling the transfer tape off. You may need to use one hand to pull the tape, and another hand to stick some of the more stubborn pieces onto the planter while you are removing it.
- If you aren't familiar with transfer tape, here is a complete tutorial: How to use Cricut Transfer Tape