Have you seen a pretty face planter and thought it would be fun to make one? Grab some vinyl and make this EASY craft!

Okay first let's get this out of the way. 'Face Planter' is a funny name but also - that's what this is? Apparently, it is sometimes called a 'coquette' planter. Whatever you want to call it, let me show you how to make a plant pot with a face. This is a super easy craft and a fun way to add some personality to a plain old pot. It's especially cool if you have a plant with tendrils that will look like hair.
I made this when I was putting together my Vertical Herb Garden last year, at the same time I made these DIY plant markers. I love this type of project the MOST because of how easy it is. If you are looking for more home decor go check our Cricut projects page!
How to Make a Coquette Face Planter
Materials Needed:
Instructions:
First, you will need to open the design I have made in Cricut Design Space or make/find a similar design.
Measure the planter you are using and decide how big you want the face to be. Resize the face image on the design space canvas to your desired size.
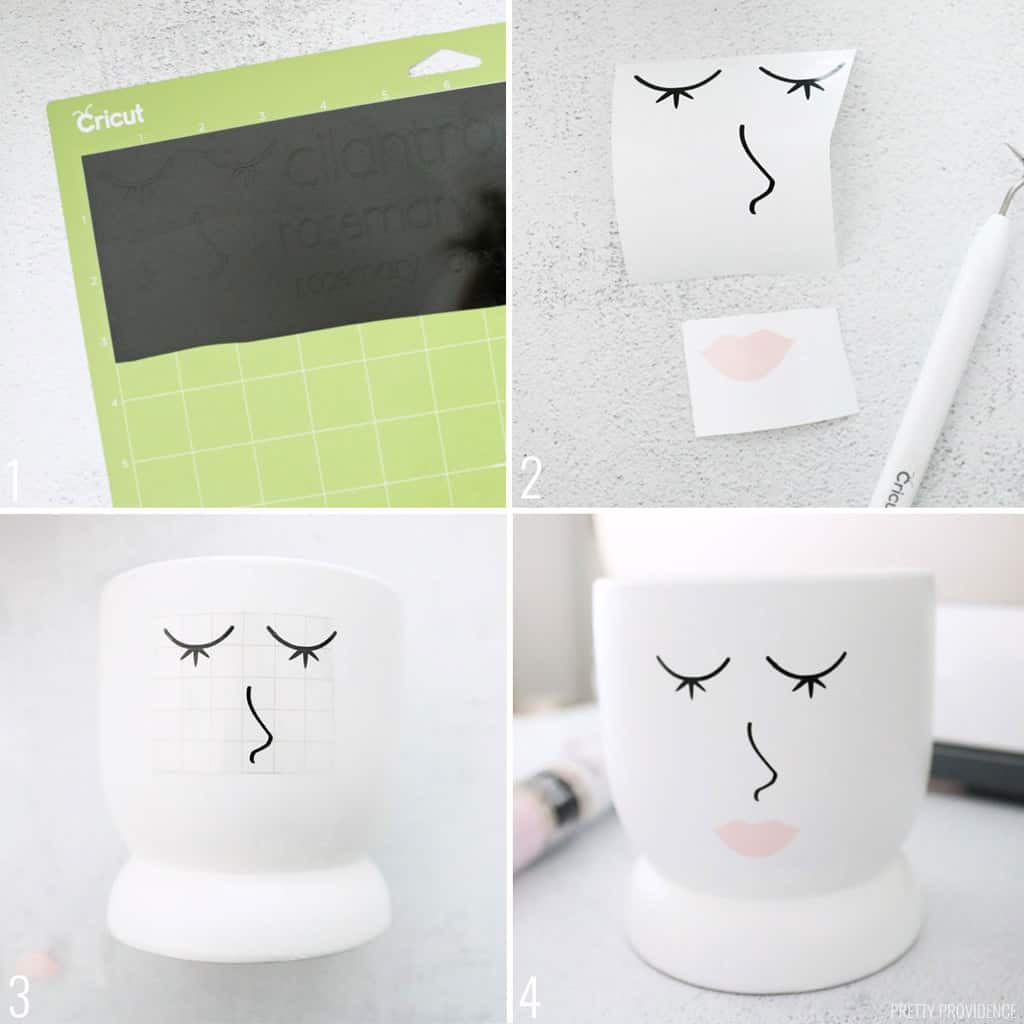
- Cut a piece of vinyl and put on on a green StandardGrip mat. Follow instructions in Cricut Design Space to cut vinyl.
- Weed extra vinyl from around the edges of designs.
- Press transfer tape onto the design and then peel the white piece off the back. Press the clear transfer tape with the design onto the planter. (We also have a detailed tutorial for how to use transfer tape.)
- Repeat the transfer tape to add the lips to the face planter. Ta da!

This planter is inside right now with a fake plant, but last year I had it outside with a real plant and it works well both ways! I honestly just brought it in because I like to shop my house and switch things around sometimes to freshen up a space.

I think we might need to name her. My kids will probably help me come up with something fancy. Any suggestions?

Here are printable instructions for how to add a face to a plant pot. If you make this project, please leave us a comment and a positive review!

How to make a Face Planter
Equipment
- Cricut Maker or any Cricut machine
- Basic Cricut Tool Set
- Transfer Tape
Materials
- Planter Pot
- Outdoor Glossy Vinyl
Instructions
- First, you will need to open the design I have made in Cricut Design Space or make/find a similar design.
- Measure the planter you are using and decide how big you want the face to be. Resize the face image on the design space canvas to your desired size.
- Cut a piece of vinyl and put on on a green StandardGrip mat. Follow instructions in Cricut Design Space to cut vinyl.
- Weed extra vinyl from around the edges of designs.
- Press transfer tape onto the design and then peel the white piece off the back. Press the clear transfer tape with the design onto the planter. (We also have a detailed tutorial for how to use transfer tape.)
- Repeat the transfer tape to add the lips to the face planter. Ta da!


Gayle Fox
My daughter and I just made this and it's surprisingly easy to make! Thank you!
Sarah
Lovely! I'm so glad!
Jessica
This was SO fun to make! The tutorial was so easy to follow, thank you!
Sarah
Hooray!