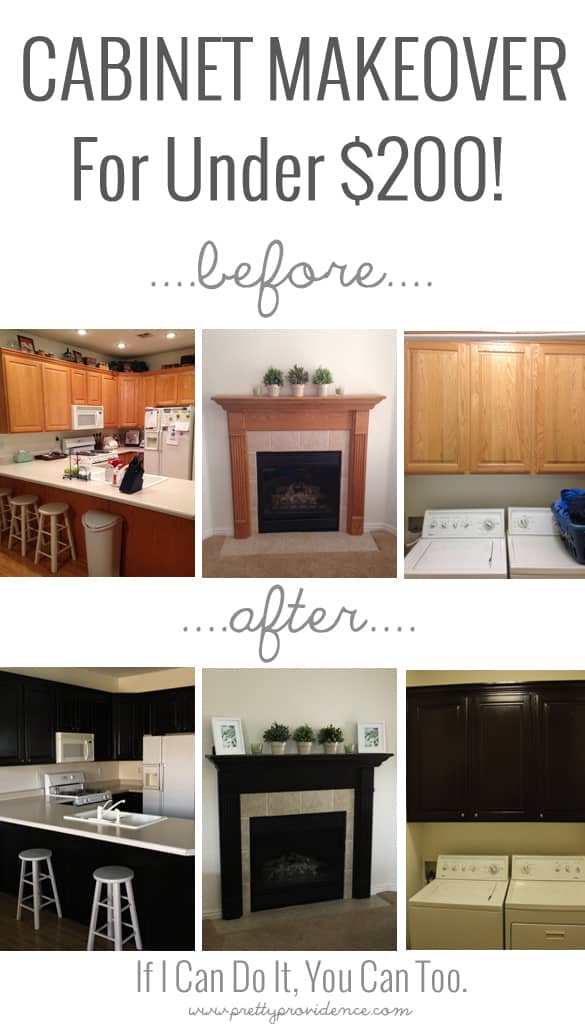
 Ever since I first moved into my house (almost two years ago) I wanted to refinish my cabinets. I am not, not, not a fan of honey oak. The issue is, when I first moved in I was pregnant, then I had a little baby and... well I was basically low on energy! To top it off, big house projects cost money, and it seems like there is never enough of that to make the changes I'd like to! Then, one day I was scrolling through my blogroll and I found this post of Brooke's from All Things Thrifty. It made me think, "hey, if it really is that easy, maybe I could do my cabinets." And then I thought, "nah. That was just a clock. It might not be the same." A few months passed, and then Brooke posted this tutorial on how to stain an oak banister dark, and I thought, "Let's do this thing."
I followed Brooke's tutorial pretty exactly, except I didn't sand (more on that later) so click over to read the details if you are interested in embarking on your own project!
Now, I am going to try to answer your questions in advance, and give you a few notes that I took along the way!
1. Why didn't you sand? I started with the laundry room because if I messed up on anything I wanted it to be there. I started out lightly sanding with the recommended grit, but it was making pretty deep marks on my wood. My cabinets had very little gloss to them, and I think the sanding was too much. I knew if I didn't sand just right it would show, and I didn't have the patience/time/energy to do it right. We tried staining the doors without sanding and it worked great. That was really all the excuse I needed. I am sure that in the future I will have more nicks from my lack of sanding, but I figured I'd rather touch up then spend like 200 extra hours and have a sandy mess in my house for a month. You decide.
Tip: If you are going to sand, make sure you go with the grain of the wood. I'm sure most of you aren't as dumb as me, but... enough said.
2. How many coats did you do? On the insides of the cupboard doors I did three coats of the gel stain, no topcoats. On the outside of the cupboard doors, drawers, and all inside finishes I did three coats of the java gel stain and two coats of the satin finish.
Tip: This project lasts quite awhile and it can start to blend together, so I made this little sheet to help me keep track of how many coats I did on what. It helped a ton, and it was fun to watch the sheet fill up. 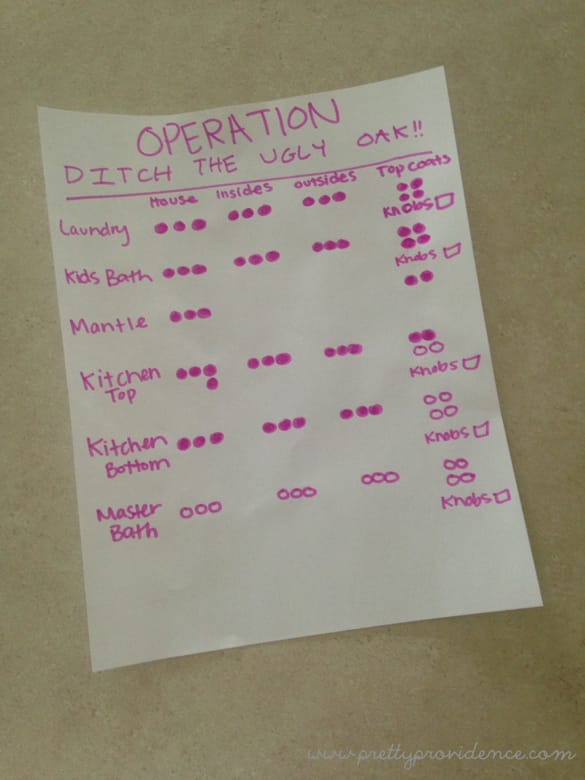
3.) What knobs/handles did you use? I used these Varnhem knobs (which have gone up $1.00 in price, btw) for the cupboard doors and these Attest handles for the drawers.
Tip: When adding your hardware, it will save you about a million hours if you make a template first. We made ours on a piece of card stock. Use a cereal box, anything. Measure and measure again and make sure it's exactly where you want it then make your template. Here is what ours looked like for the knobs....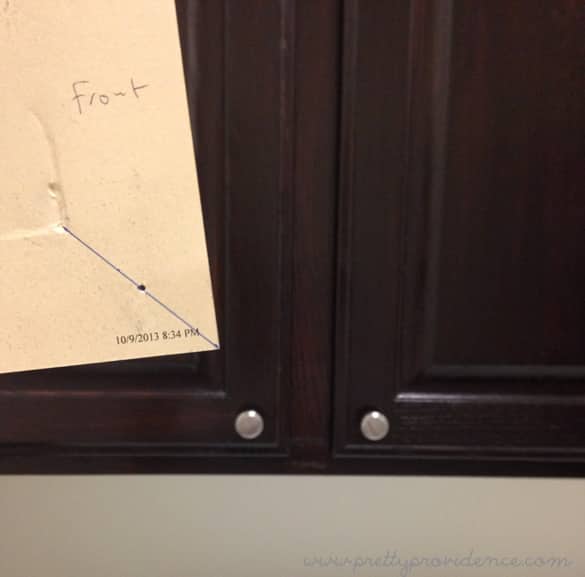 You may be tempted to skip the hardware, but it made a huge difference! The pictures don't really do them justice. After we had stained the cabinets we were so happy with the results, but once we added the hardware we were ecstatic.
4.) Was it really less than $200? YES. The knobs and handles cost me $99.37 and the gel stain, satin finish, gloves and a bag of new socks (seriously though, we went through a lot of socks!) made up the other $88 or so.
Tip: We used barely over 1 quart of gel stain (so we bought one quart and one pint). The top coat goes a lot further, and we did a lot less coats and we probably would have been just fine with a pint, but we bought a quart.
5.) Did you really wait 24 hours in between coats? Mostly. If you don't wait long enough then when you go to apply your second coat it will smear and smudge your previous coat. However, for the insides of doors (since I wasn't worried about them being perfect) sometimes I would do a coat in the morning and a coat at night, and they were fine. Also, we found the topcoat dried much quicker and we did those coats back to back morning and night without a problem.
Tip: We used a butter knife under a sock to get in hard to reach corners and edges.
6.) Was it easy? Yes and no. The actual concept is beyond easy. I mean it when I say anyone could do it. By far the hardest part in terms of actual skill was measuring for the hardware, and that is easy! BUT it is time consuming. I had cupboard doors off in my kitchen for a solid week. The best answer to this question is: yes, it is technically easy, but it takes a lot of man hours and wait time.
Tip: Every single person who has come to my house since has asked when we got new cabinets, and oohed and ahhed over how much better everything looks! If you are on the fence, do it!!!
Now that we have the nitty gritty out of the way, I know you are all dying for some more pictures right? Here ya go...
Kitchen Before: 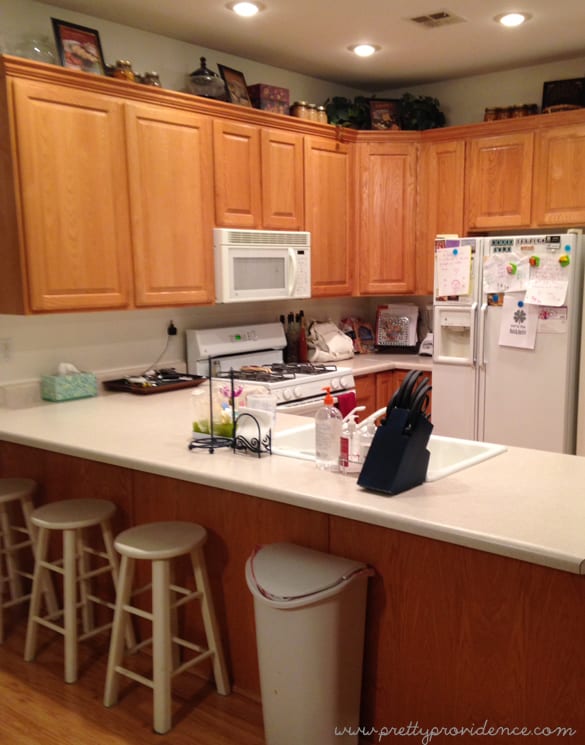
Kitchen After: 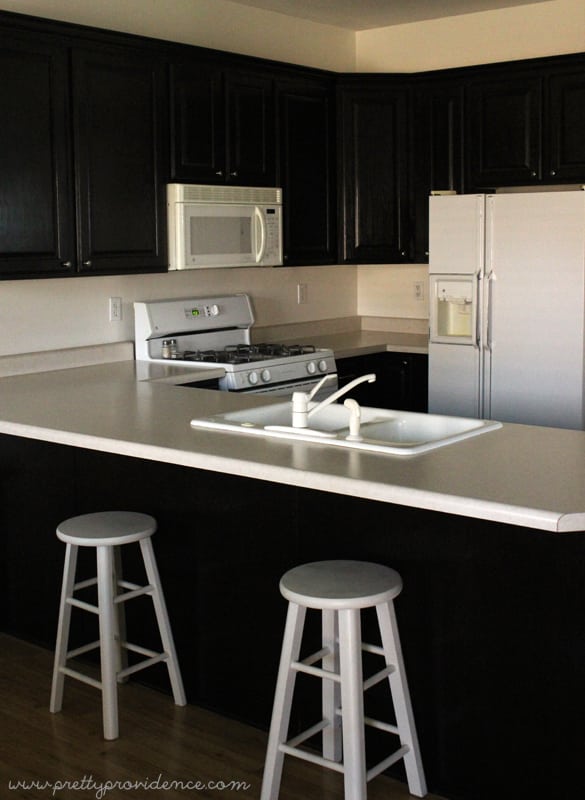
Mantel Before: 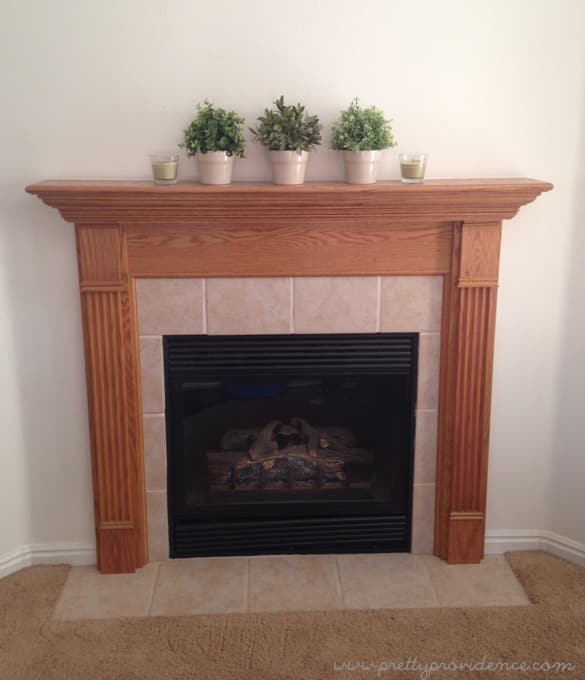
Mantel After: 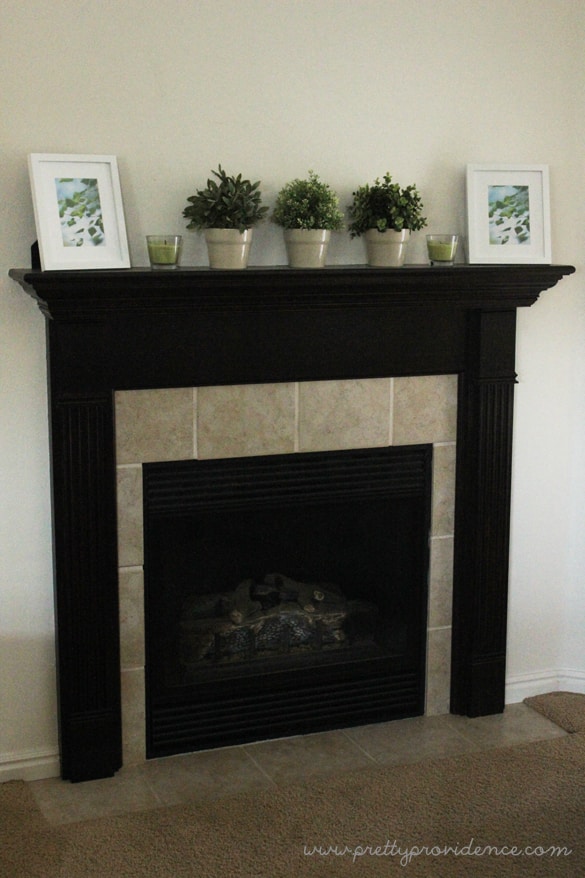
Laundry Before: 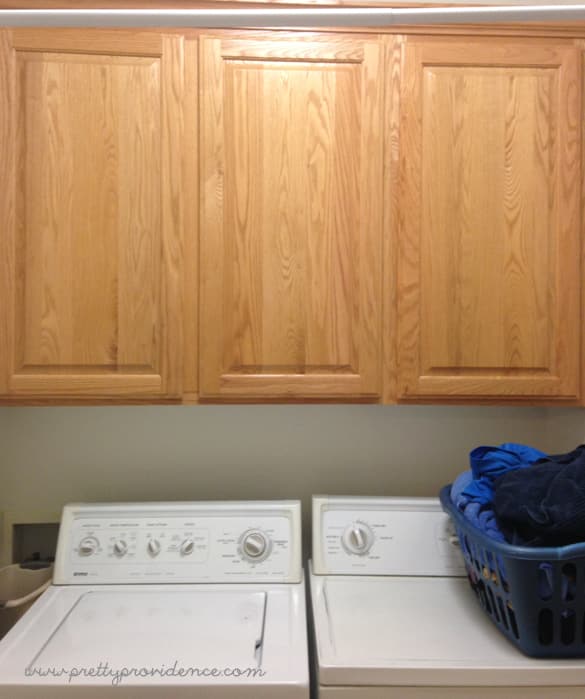
Laundry After: 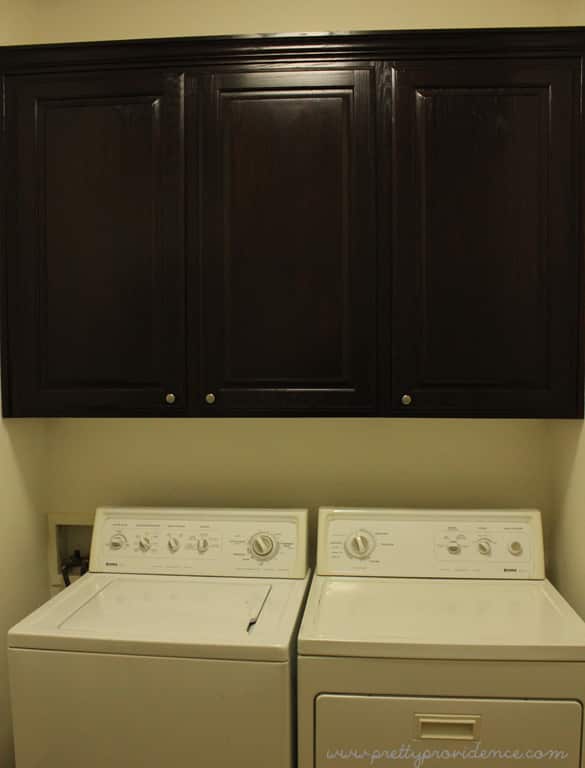 Pretty dramatic change huh? We also did both our bathrooms, and our master bath is actually probably my favorite transformation, but it was crazy messy and I didn't have the energy to clean it to take a picture, haha! #sadtruth. Anyway, if you have been on the fence about staining anything darker, go for it! Seriously, if I can do it, anyone can.

If you liked this post you will also love my dining room makeover on a teeny tiny budget or this DIY Ikea hack desk for $60!


Amanda
Did you sand the mantel, or just get straight to the gel stain? We've got a similar design, with the thin grooves down the length of the sides. I'm not looking forward to sanding those.
Jessica @ Pretty Providence
I didn't sand.. I just went strait to it! Mine doesn't have any scratched it anything yet either! I did do three costs though.
Crescentia
Did you leave the trim for the rest of the house white or did you stain them as well? We have oak trim throughout the house. I wasn't sure how the white trim looked or if you have suggestions for making it all come together.
Jessica @ Pretty Providence
Hmm. That is a good question! We had white trim so we didn't have to worry about that one. Would the trim be easy to remove?
[image: Facebook] [image: Twitter] [image: Google Plus Page] [image: pinterest] [image: Instagram]
Crescentia
I'm not sure how easy it would be to remove? I'd most likely just paint it where it stands :)
Gloria
Did the dark cabinets still look good with your light floors? I'm contemplating doing this, but I'm worried about that.
Jessica @ Pretty Providence
Wayyyyy better than the oak ones did!
cj
Did you have floors done as well? We have honey oak floors n cabinets everywhere and only issue is how odd it will look if we dont put in dark floors. You before n after are outstanding!
lizzie
Did you take out the bottom cabinets to paint those? or did you leave them in place and just used a cover on the floor?
Jessica @ Pretty Providence
I took them out!
Joann
Less than $200.00 wow...I ask a painter to paint my cabinet from Oak to white and he said it's going to cost me $1000.00 dollars because it's a lot of work. He said it need sanding, then light stain then paint. Is white color on cabinet harder to use and more expensive?
Jan Norton
What color is the stain? It looks black... I love it.
Colleen Pastoor
This looks great! The previous owners of our last apartment had done something like this (but reddish) on our kitchen- but not the bath. I love the dark colour you chose... so classy!
Jessica @ Pretty Providence
Thanks so much! I thought the dark dark color was pretty timeless and we love how it turned out. I love white kitchens too though!
Britchesnboots
I LOVE this!! I am SO gonna do mine now!! Seriously I hate the cabinets too and mine are same color!!! THANK YOU!!! Any other colors of stain??
Jessica @ Pretty Providence
Yay!!! So glad you like it! Yes there are other colors but unfortunately with stain you can't go lighter!
Kelsey Bills Harris
I love it! I'm surprised at how inexpensive it was.
Jessica @ Pretty Providence
I know, huh? If I had known I would have done it years ago.
Amber @ DessertNowDinnerLater!
This is like EXACTLY what I need! We hate the ugly oak in our house too and we've contemplated going dark. Now that I know it looks FABULOUS, I will have to show my hubby this and maybe we can make a summer project of it.
Jessica @ Pretty Providence
Seriously we love how it turned out. I love white cabinets too, but dark is easier and cheaper! Lol
Laura
Wow! It turned out so great! Good job~ There is nothing better than a fresh coat of paint!!
Jessica @ Pretty Providence
No there isn't! Thanks so much :)
Haili Hunter
Oh my heavens!!! Beautiful Jess! Your laundry room cabinets look like an espresso and your mantle and kitchen look black though. Haha is it all the same color?
Jessica @ Pretty Providence
Ya it is! Haha that's because in the laundry room I had my lights on when I took the photo and the others I didn't! They are all a dark chocolate brown!
Paula Iniguez
Gorgeous! It seriously looks so awesome!
Jessica @ Pretty Providence
Aw! Thank you so much!
Brooke Ulrich
Yeeeeehaw! You are a rock star! Great job!
Jessica @ Pretty Providence
It's all thanks to you!
Jennifer @ Brave New Home
Wow, they look amazing! Totally worth the $200. Thanks for all the tips, too.
Jessica @ Pretty Providence
You are so welcome!! Thank you, it took awhile but now that it's over I can hardly remember the work! Haha
Pam from Over the Big Moon
They look even better in person people!! YEY for the new cabinets!!
Jessica @ Pretty Providence
Haha yay!! I love you!
Debbie
Wow! LOVE it!!!! I have been wanting to do this to my bathrooms. I can't wait to do it now. Thanks!
Jessica @ Pretty Providence
You will LOVE how they turn out! The pictures don't even do it justice!