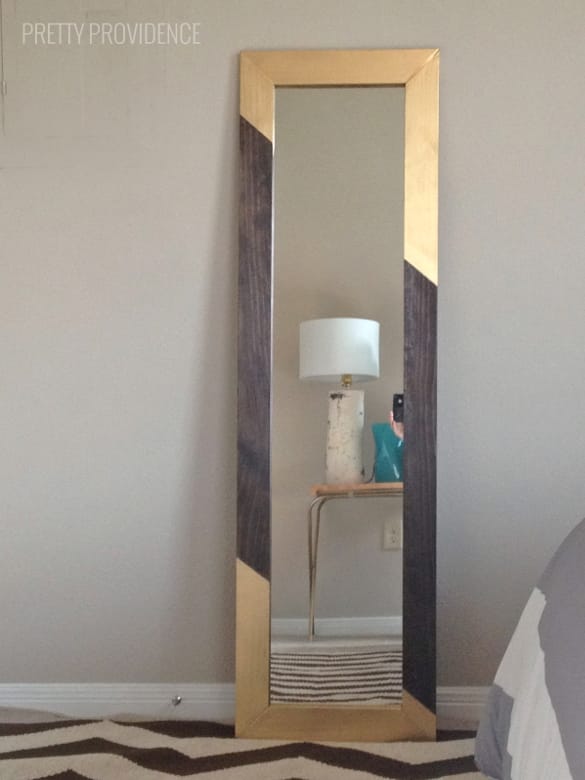
DIY Mirror Frame | Gold Dipped!
Okay you guys, I am not going to lie to you here. DIY projects are never as easy as you think. This one seemed soooo easy. It was going to take $15 and one hour of my time. Have you ever tried to do a DIY only to figure out that it's not quite as easy and cheap as it was for someone else? I think it depends on how experienced you are, and how many tools and materials you already own. If you have all of the stuff on hand and you're an avid DIY-er, yes, this will take you an hour (or two) and will cost $15. If you are a beginner, and have almost no tools, materials or experience, it will take longer and will cost you more like $50. BUT this is not a reason not to do it. The tools you buy will be yours forever! You can use them again and again! And then you will have gained valuable knowledge and experience from actually getting it done. In the past I've been able to borrow any tool I needed from family, but now that I live much further away, it's time to get my own tool box.
I have to say that building this mirror frame was liberating. Every time I walk past it, I feel so happy. I feel like now I can totally tackle something harder. But I did need to start simple! And it really was simple, just not quick. This is the best beginner DIY project ever - in my humble opinion.
I was inspired to do this when the cheap full-length mirror that my husband bought back in his bachelor days literally fell apart. One day, with the help of my 3-year old nephew, the frame became completely detached from the mirror part. They were both still in-tact though so I thought this was the perfect opportunity to try to build something. I found this post at Shanty2Chic so I followed her tutorial but like I said... it took me a little longer. Mostly because I was waiting for things to dry and hunting down the tool I didn't realize I needed until I needed it. So I geared this tute for beginners like me, listing every tiny thing you might need.
Stuff you need:
cheap mirror
1x3 boards
miter saw or miter box and hand saw
measuring tape
wood glue
loaded staple gun
wood filler (just in case!)
sandpaper
paint or stain
gold spray paint for "dipping"
painter's tape
liquid nails & caulk gun (here is a great video on how to use one if you never have)
*if you are staining rather than painting the first layer you will also want one or two clean rags that you don't mind ruining...
Step 1: Separate cheap mirror from cheap frame. I was fortunate enough that my mirror and frame were already broken apart which is what inspired the project in the first place. This post explains how to best remove one.
Step 2: Measure and cut your boards. Since you want it to fit your mirror perfectly, measure your mirror. Mine was 1' x 4' so I cut two pieces 14" ¾ long point to long point and two 48" with the ends at 45 degree angles. I'm not going to lie, the sawing was more difficult than I expected and I had to ask my husband to help me with it. Using the basic miter box and hand saw will take two people, one to hold the box and board steady and one to cut.

Step 3: When your four pieces are cut, lay them on a flat surface with the sides you want to be the back facing up. Use wood glue to glue the pieces together, and then staple them in place too. It's best if your staples are at least an inch from the inside so that they don't get in the way when it's time to glue your mirror on. Let it dry. It may look perfect, but in my case, there were a couple gaps that I wanted to fill in so I used wood filler.

Step 4: Prep for staining or painting. Just in case you are a staining newbie like me: wood glue will not stain, so you need to make sure you sand any remnants of wood glue down before you begin. Wood filler however, will stain. So there you go. Stain or paint your frame following directions on the package. I used this stain in espresso (got it at home depot in a super small container) and left it on for 15 minutes. Let sit for a few hours.
Step 5: Use painter's tape and newspaper tape off and cover the part of your frame that you don't want to change from your original color. Leave only what you want "dipped" exposed.

Step 5: Spray paint gold. Let dry for at least an hour. This Rust-oleum gold spray paint is my favorite. I've tried them all but I think this one is the classiest.
Step 6: Lay frame facing down and apply liquid nails right around the inside edges of your frame. Carefully lay the mirror over it, face up. Let dry.


Step 7: Admire your new mirror that you totally built yourself! Ooohhh. Ahhhh.
Also, if you love frugal and AMAZING DIY projects as much as we do, check out our awesome DIY Sliding Barn Door video tutorial!
href="http://3.bp.blogspot.com/-1gAo4xUfofA/UeAH9xCNB1I/AAAAAAAAGHU/3HQc0_K2NnI/s1600/sarah-signature.jpg">
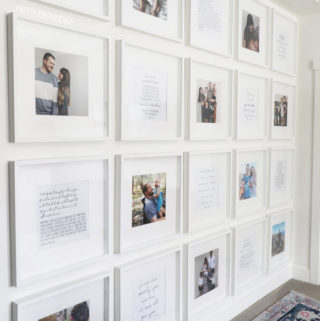
If you're into this DIY home decor stuff, you will love this super easy geometric wall art and these 15 DIY ottoman ideas!


can you explain a little more how the mirror is attached to the wood? I see in step 6 you laid the frame face down and put glue on the wood, but is there a "lip" of wood that the mirror is resting on? Can you see any of the glue?
Seriously rocking mirror!!
it's definitely worth the extra time and effort it took you because it turned out FABULOUS! i've found that having a chop saw on hand is extra nice in short projects like this:) can't wait to try one for my room
Thank you! Ah. I know I love it. Good luck!
Super impressed that you actually made the frame yourself! Totally loving the gold dipped; that is a neat effect! I'll be featuring this on my blog on Saturday!
http://www.sumossweetstuff.com
Thanks for linking up!
Sumo:)
Approve!
Love this! Great job!
Thanks Jen! We love you ????.
Love love love your gold dipped mirror!!! Makes me want to make one for myself! So glad I found your blog and I can't wait to browse through it! Following on Bloglovin!
Selene @ Restoration Beauty
Thanks Selene! You totally made our day!
I am so beyond impressed with this, Sar. You are the bees knees.
Thanks Cass!
That looks like something you would buy for lots of money - GREAT job!! Thanks for sharing, I'm definitely going to pin it.
what a compliment!!! thank you!
I love that look! So unique and not very difficult either! Thanks for sharing!
Thank you!