School and Art Supply Organization
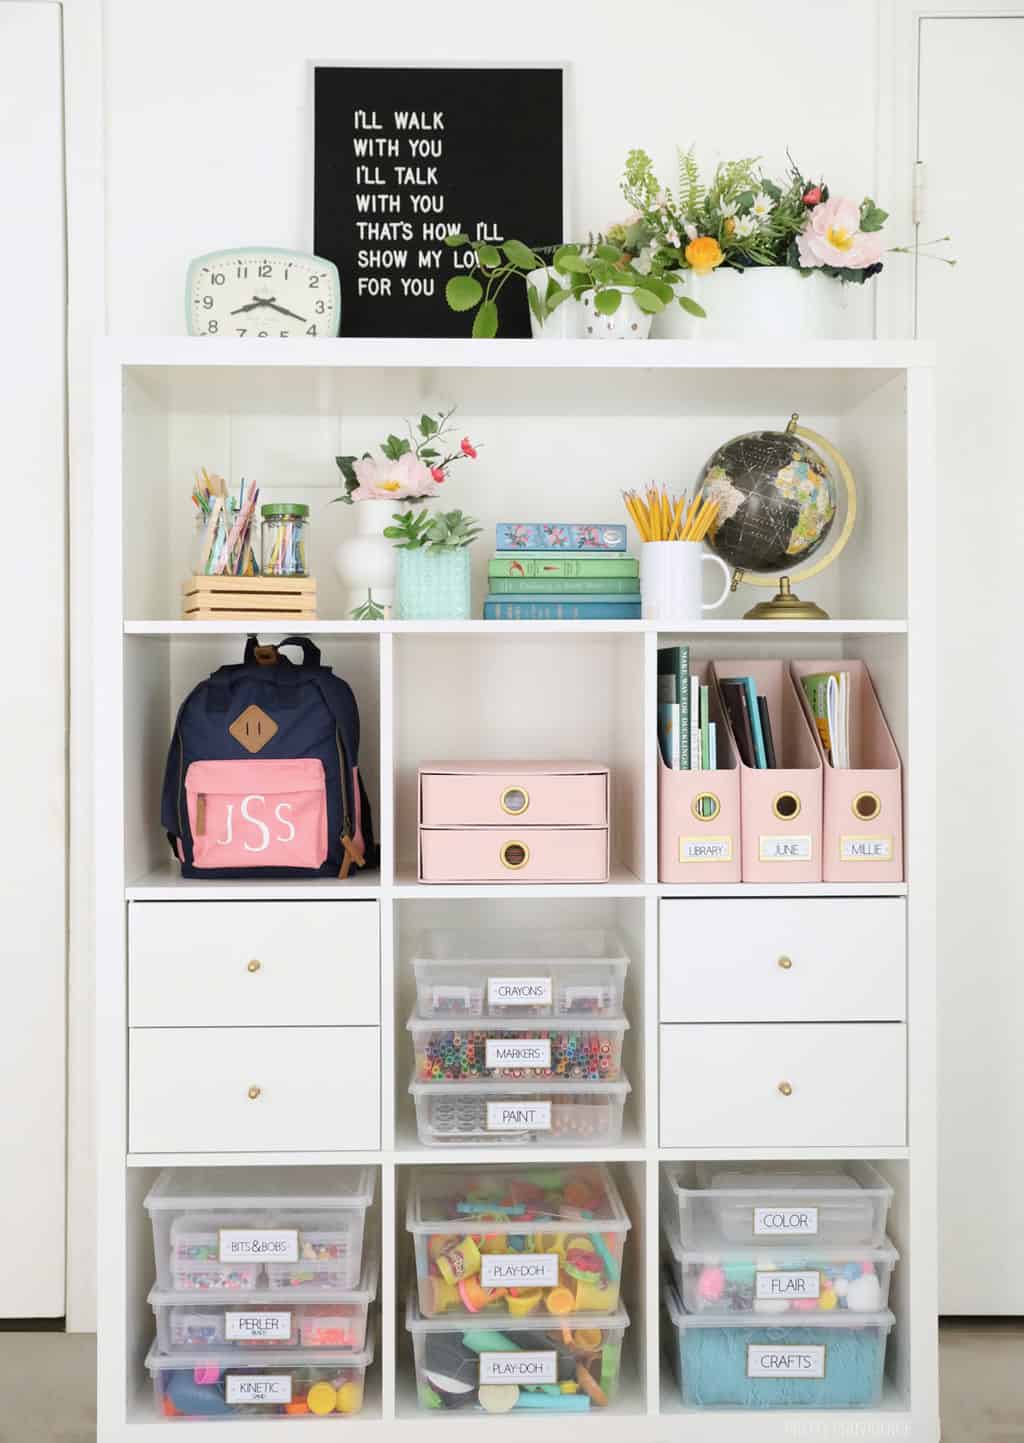
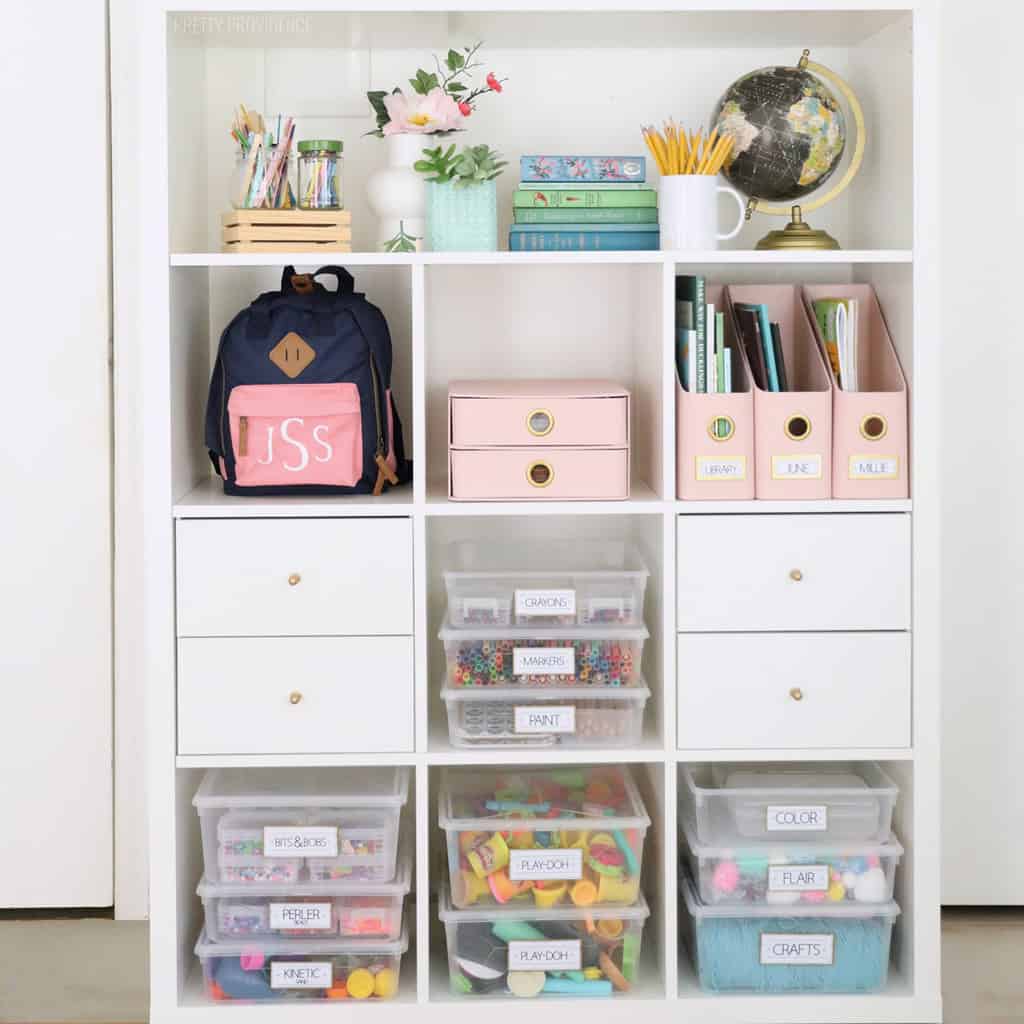
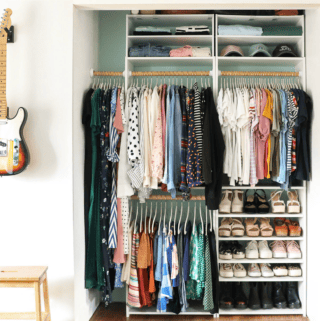
Hello friends! You know we love a good organizing project over here. I have been wanting to come up with a good art supply organization system for all of my kids' school, arts, and crafts stuff for a long time. They love doing crafts and even homework, but we had no central place to keep all of their stuff. My main goal for this was to make it so that they can easily access what they need when they want to get creative, without my help. I finally decided to get an IKEA shelf and splurged on doors and cute knobs for it. Inside the shelves, I organized all of the art supplies and school supplies into clear bins, then made labels for everything with my Cricut Joy.
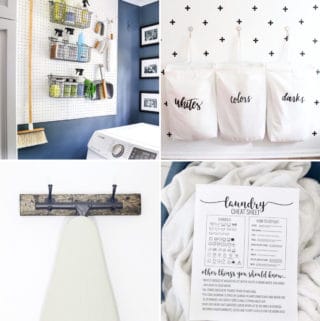
This time of year I'm always getting into some kind of labeling. Check out these DIY School Supplies (the backpack and water bottle are still going strong!) Personalized Teacher Gifts, and also you might like this Under the Stairs Craft Storage Closet or Jessica's Pantry Makeover! All of these projects were done with Cricut, check out our whole Cricut project page.
How to Make Labels with the Cricut Joy and Smart Label Writable Vinyl
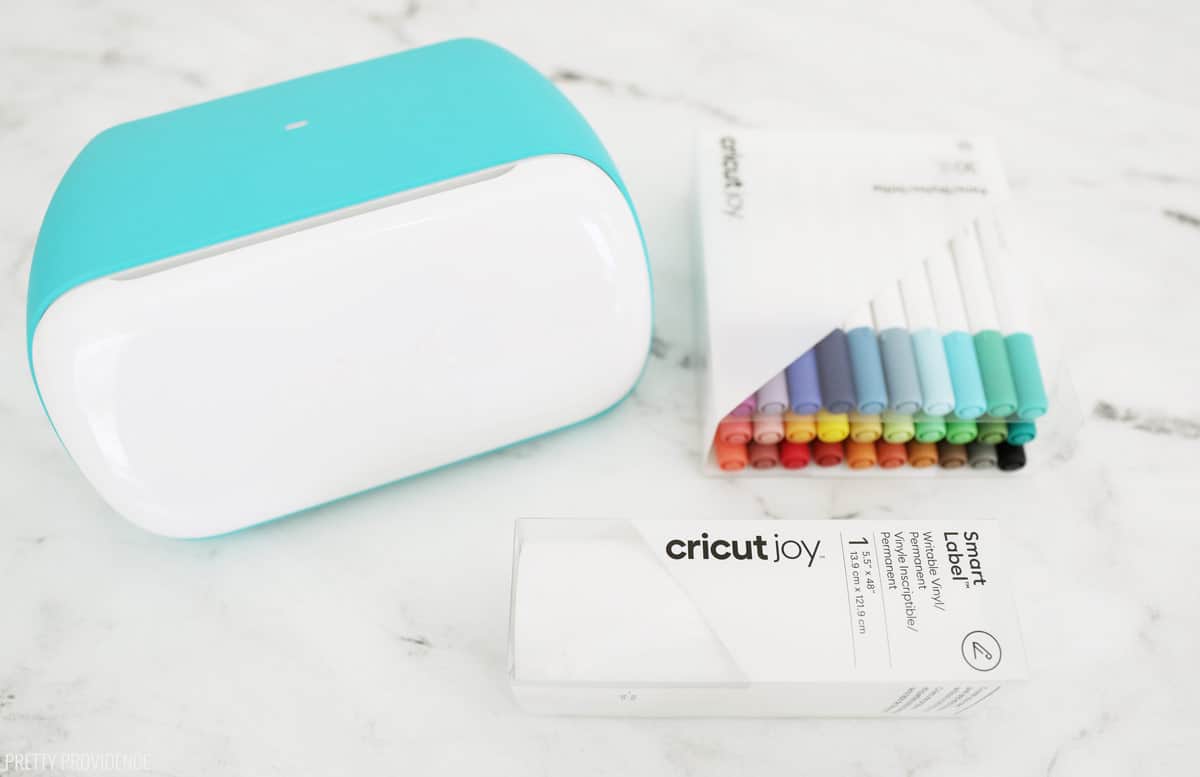
Cricut Materials needed:
- Cricut Joy
- Smart Label Writable Vinyl
- Smart Vinyl, Gold (optional)
- Cricut Joy fine point pens (0.4)
- Cricut card stock (optional)
Other Materials:
- Clear organizing bins and small containers to label
Instructions:
Design labels in Cricut Design Space. If you search for Cricut Joy labels you will find some cute designs. I chose one and customized it for my needs.
Plug your Cricut Joy in and make sure that in your design space canvas you have selected the Joy as your machine.
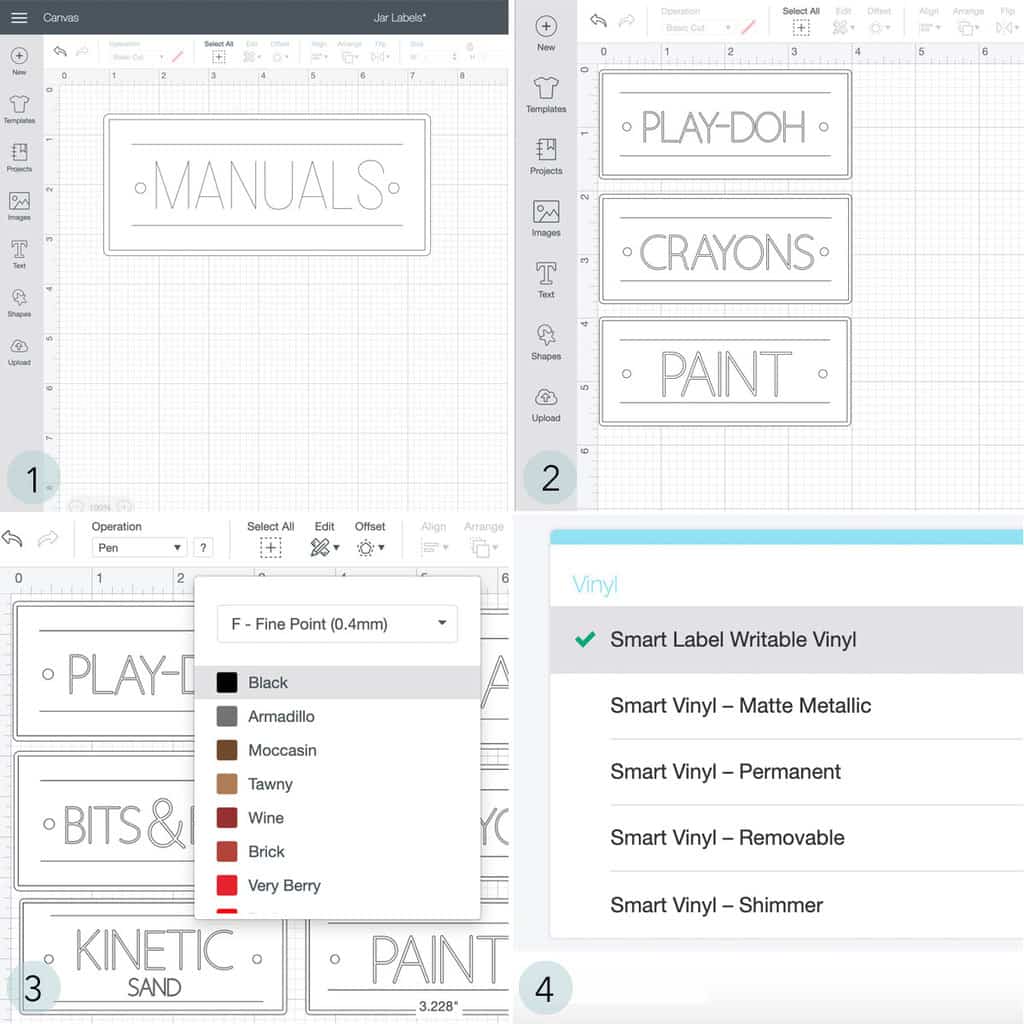
- In Design Space go to images. Pick a label design, then put it into your canvas. (This label design is #M280AC2E7)
- Use the contour tool to remove the word 'manual' from the label. Write your own words in and instead of 'cut' select "writing" up in the top menu.
- Highlight each word and its corresponding label outline. Select 'attach.' Then make sure to select the type of pen you are using. Fine point 0.4mm is the size compatible with the Cricut Joy. Hit 'Make it!'
- Follow the prompts to select the size of your mat and which materials you are using. Make sure to choose 'Smart Label Writable Vinyl.'
- (Not pictured) Size the labels in your canvas to fit on whatever containers you are labeling.
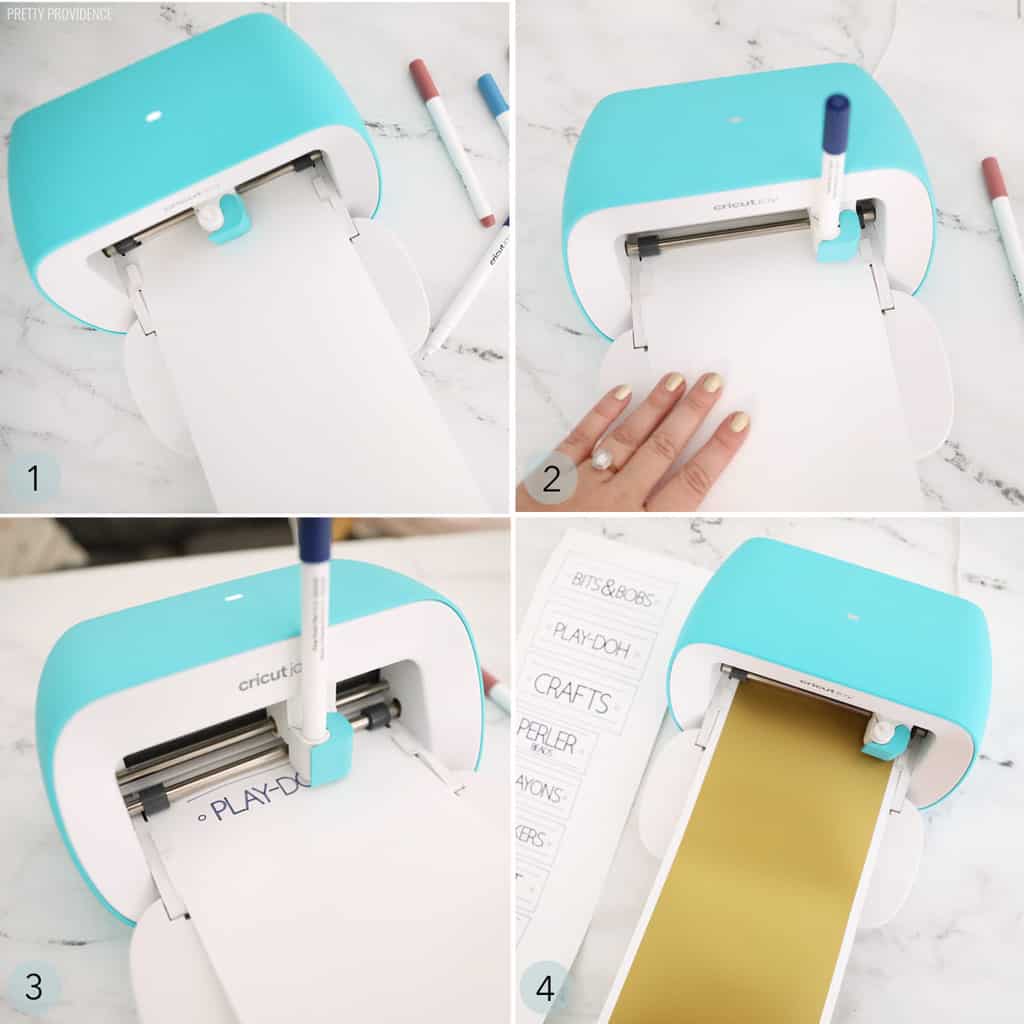
- Keep following prompts in design space. Load writable vinyl into the Joy and insert a pen into the tool part first.
- Push 'go.'
- When writing is done, switch the pen out and put in the fine point blade. Let the machine cut each label.
- Optional - cut an outline for the label with another color. I chose gold removable Smart Vinyl.
- Put labels on your art supply organizer bins and containers.
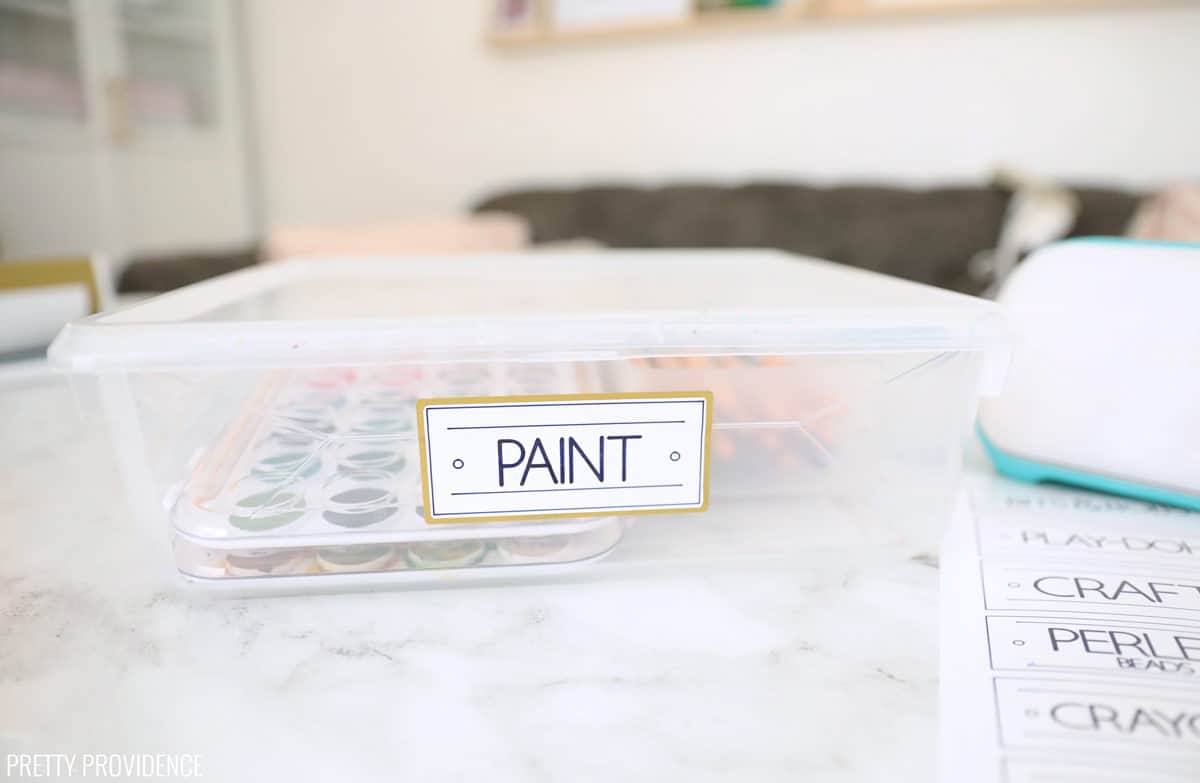
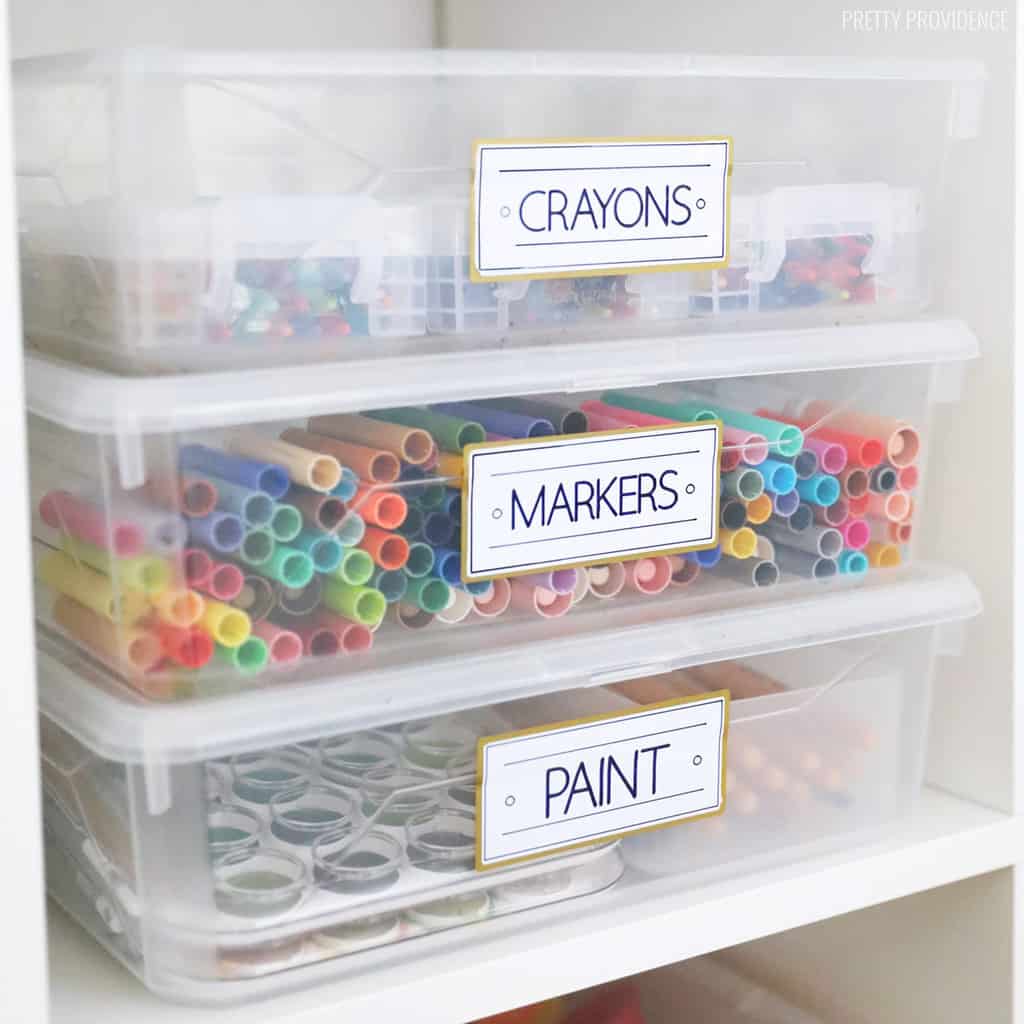
Tada! These labels turned out so nice! When Cricut writes on labels it just outlines the word, but I colored in the words so that they would be bolder and easier to read.
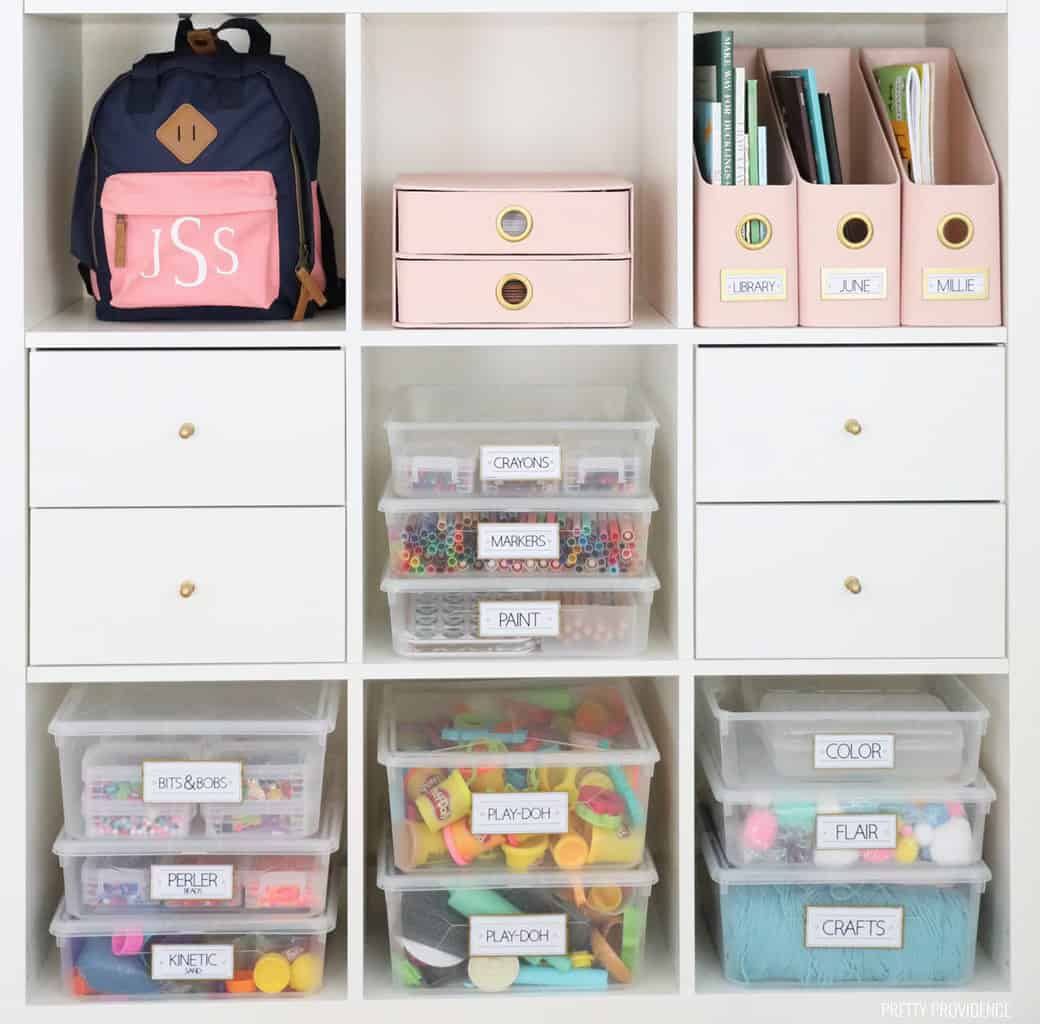
Art Supply Organization
Making the labels with the Writable Vinyl was the easy part. Organizing all of the tiny arts and craft supplies was quite a task, but I listened to a book and had a pretty nice time sorting through everything.
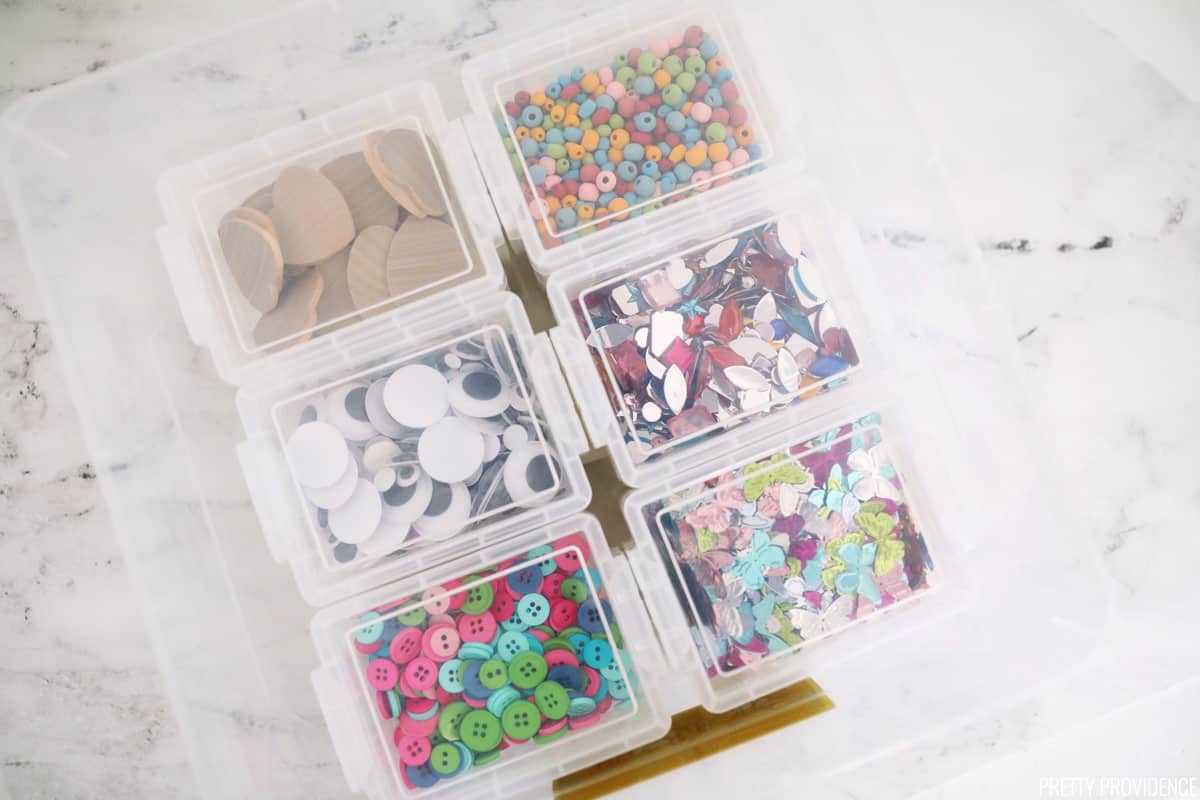
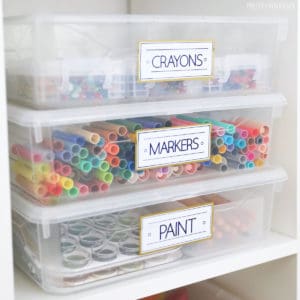
I love these stackable containers I found for the small art supply storage. Technically they are crayon boxes, they fit a 24-pack of crayons. They were only .50 cents each! I used to keep small things like beads and googly eyes in spice jars. Spice jars didn't work great for my little girls. They would just dump the jars out whenever they wanted to use something, and clean-up was a bear. These little containers have removable lids, and it's easy to get things out of them!
These square stackable bins are also a favorite. They are inexpensive and they look nice. I have a ton of them all over my house. They are the perfect size to go inside of cube organizers, under beds, etc. and we especially love them for keeping toys, puzzles, games, and art supplies organized.
Here are links to all of the organizing bins I used:
- Small Square Stackable Bins
- Large Square Stackable Bins
- Magazine Files
- Very Small Stackable Containers
School Supplies and Homework Organization
For our school supplies and homework, I wanted there to be a special place to keep things that we're currently working on.
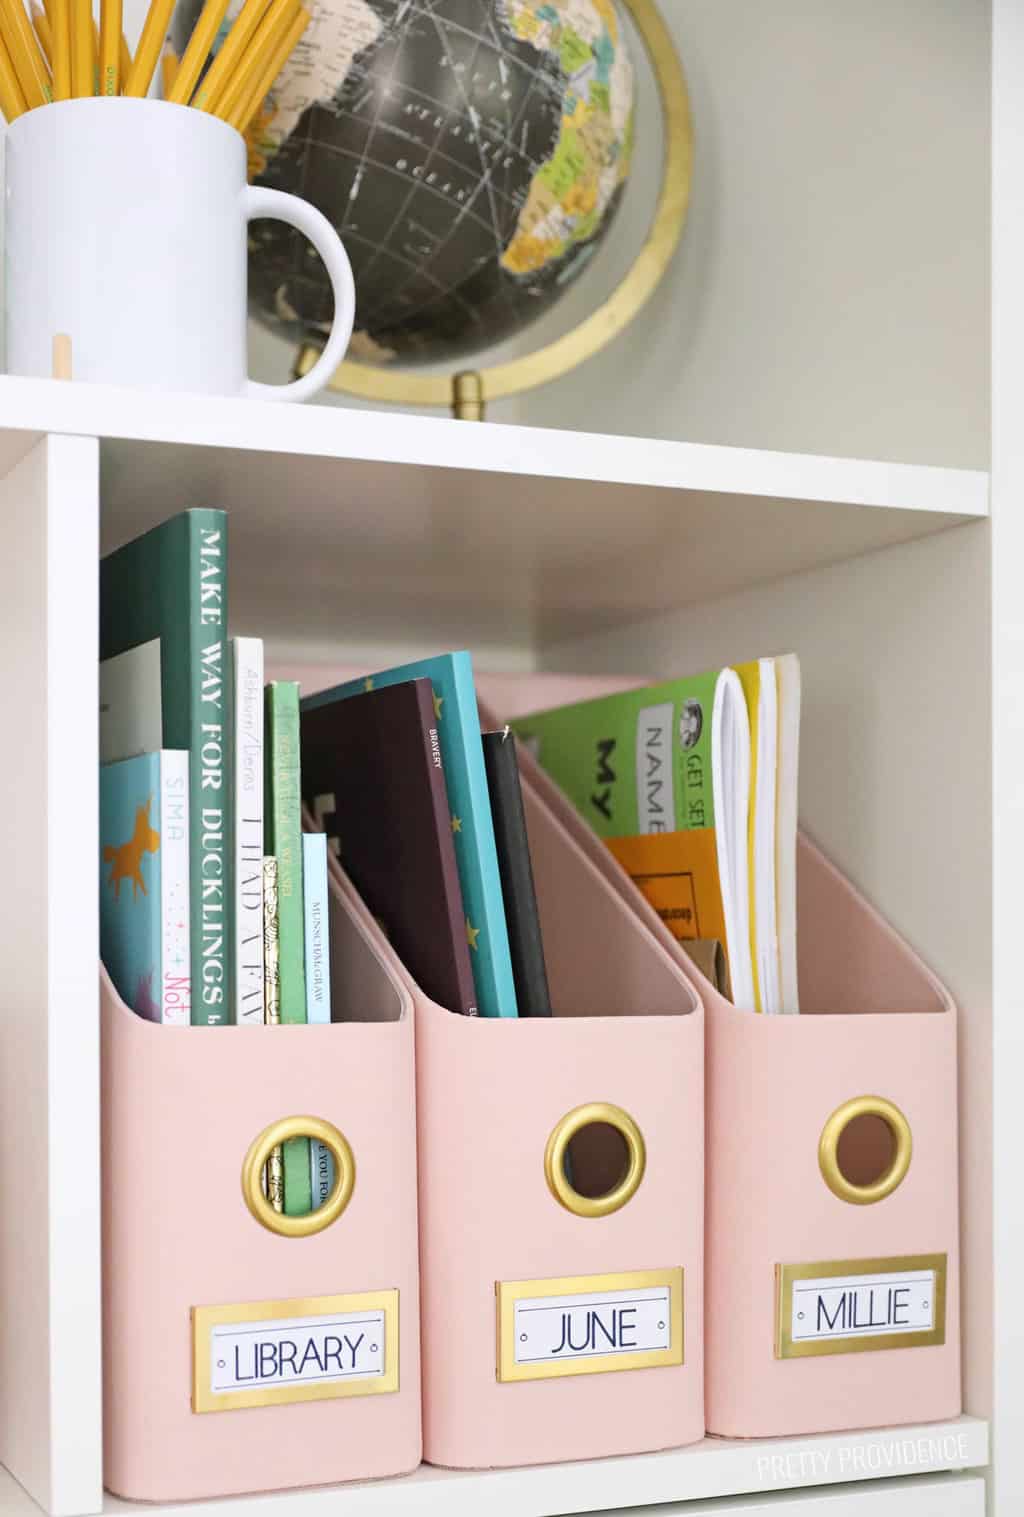
I also made paper labels for these magazine files. I used the same Design Space file as I used for the vinyl labels, just did it with card stock. One is for library books so we don't mix them up with the books on our other bookshelves, and then each of my daughters has one for their homework, workbooks, or current projects.
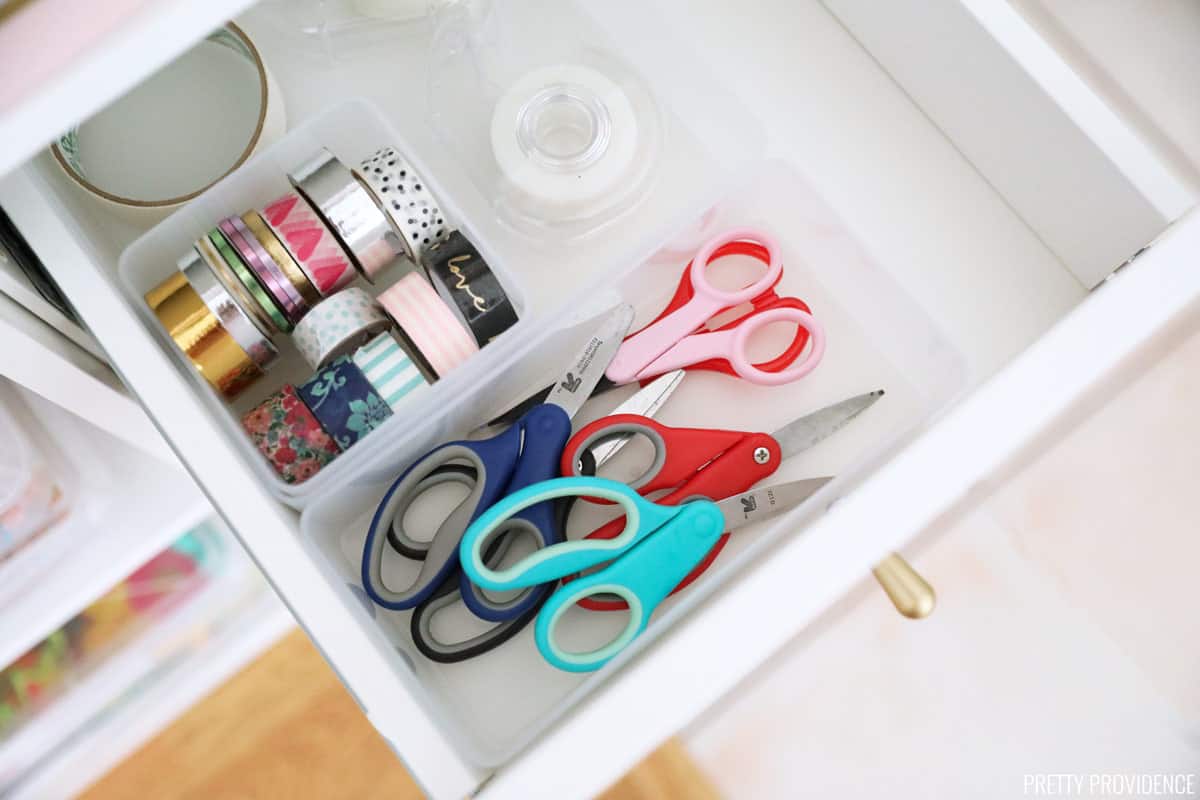
Here is a look inside one of the drawers. It's so nice to know where the scissors and tape are! Let's hope we can put them back after we use them...
I am really happy with this! Do you have any great ideas for art supply organization you could share with me?!
If you find this tutorial helpful, please leave us a comment and a positive review! They mean a lot to us!
How to Make Labels with Cricut Smart Label Writable Vinyl
Equipment
Materials
- Smart Label Writable Vinyl
- Smart Vinyl Gold (optional)
- Cricut Joy fine point pens 0.4
- Cricut card stock optional
Other Materials:
- Clear organizing bins and small containers to label
Instructions
- Design labels in Cricut Design Space. If you search for Cricut Joy labels you will find some cute designs. I chose one and customized it for my needs.
- Plug your Cricut Joy in and make sure that in your design space canvas you have selected the Joy as your machine.
- In Design Space go to images. Pick a label design, then put it into your canvas. (This label design is #M280AC2E7)
- Use the contour tool to remove the word 'manual' from the label. Write your own words in and instead of 'cut' select "writing" up in the top menu.
- Highlight each word and its corresponding label outline. Select 'attach.' Then make sure to select the type of pen you are using. Fine point 0.4mm is the size compatible with the Cricut Joy. Hit 'Make it!'
- Follow the prompts to select the size of your mat and which materials you are using. Make sure to choose 'Smart Label Writable Vinyl.'
- (Not pictured) Size the labels in your canvas to fit on whatever containers you are labeling.
- Keep following prompts in design space. Load writable vinyl into the Joy and insert a pen into the tool part first.
- Push 'go.'
- When writing is done, switch the pen out and put in the fine point blade. Let the machine cut each label.
- Optional - cut an outline for the label with another color. I chose gold removable Smart Vinyl.
- Put labels on your art supply organizer bins and containers.
Notes

Do you have a link to the shelf you got at IKEA?
I'd like to know the link to this shelf too!
Where did you get the white drawer bins? I don’t see a link for them.
Those are part of the IKEA cabinet - they are bought separately but also part of the KALLAX line there.
HI! Can you tell me the dimensions for the larger square storage bins? The product is no longer sold at Target and I am hoping to find something similar. Thank you!
They are just under 12x12x6. Target sells an updated version now, here is the link! https://rstyle.me/+31Vx455-pgzGSB_4yvIDWg
Hi, what kind of containers are those? Where did you purchase them? I’m organizing our closet and those look great.
Thank you!!!
Thanks! They are modular storage bins from Target
My daughter loves to use her Cricut! She will love this project!
This makes my little OCD heart happy! I am obsessed with bins, and the labels are so cute!
I'm ready to come over and start art projects! Seriously this looks so cute and yet so practical. Thanks for the inspo.