Impress your friends and family with Rainbow Jello - a delicious and beautiful treat. Follow this recipe with a few simple tips and tricks to get the best layered Rainbow Jello ever!
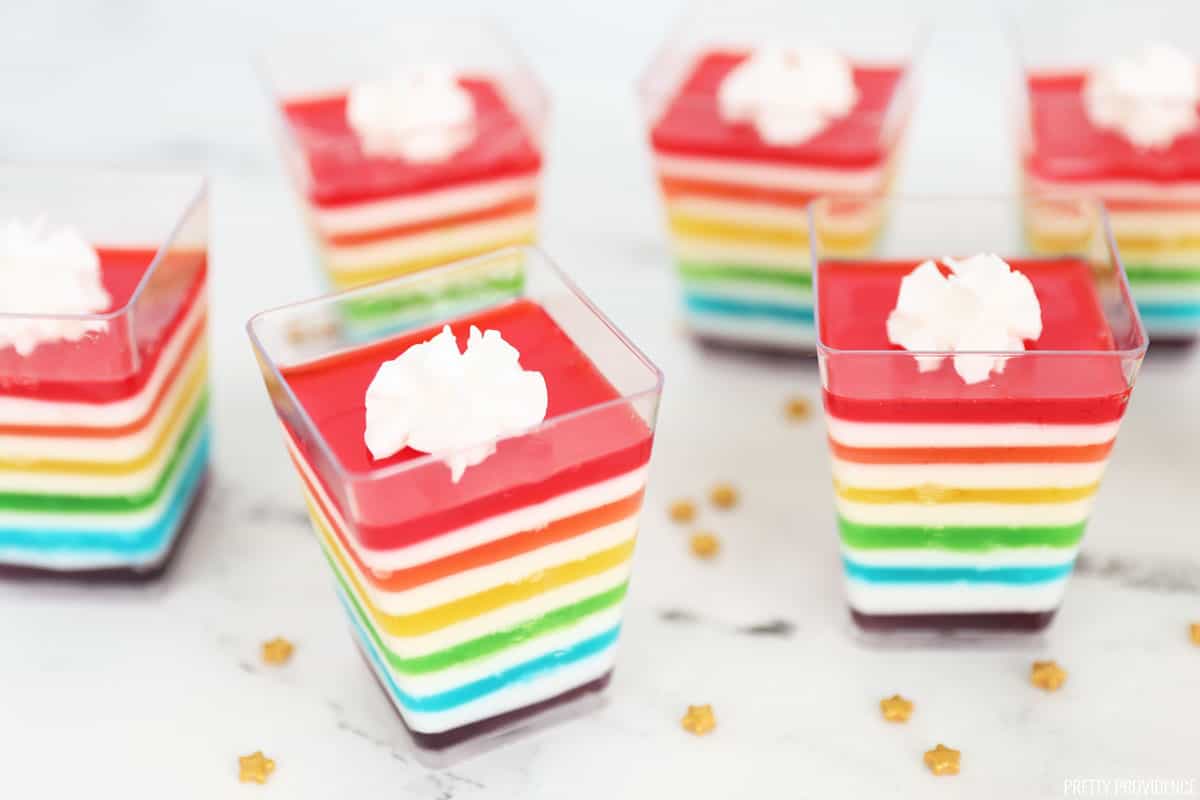
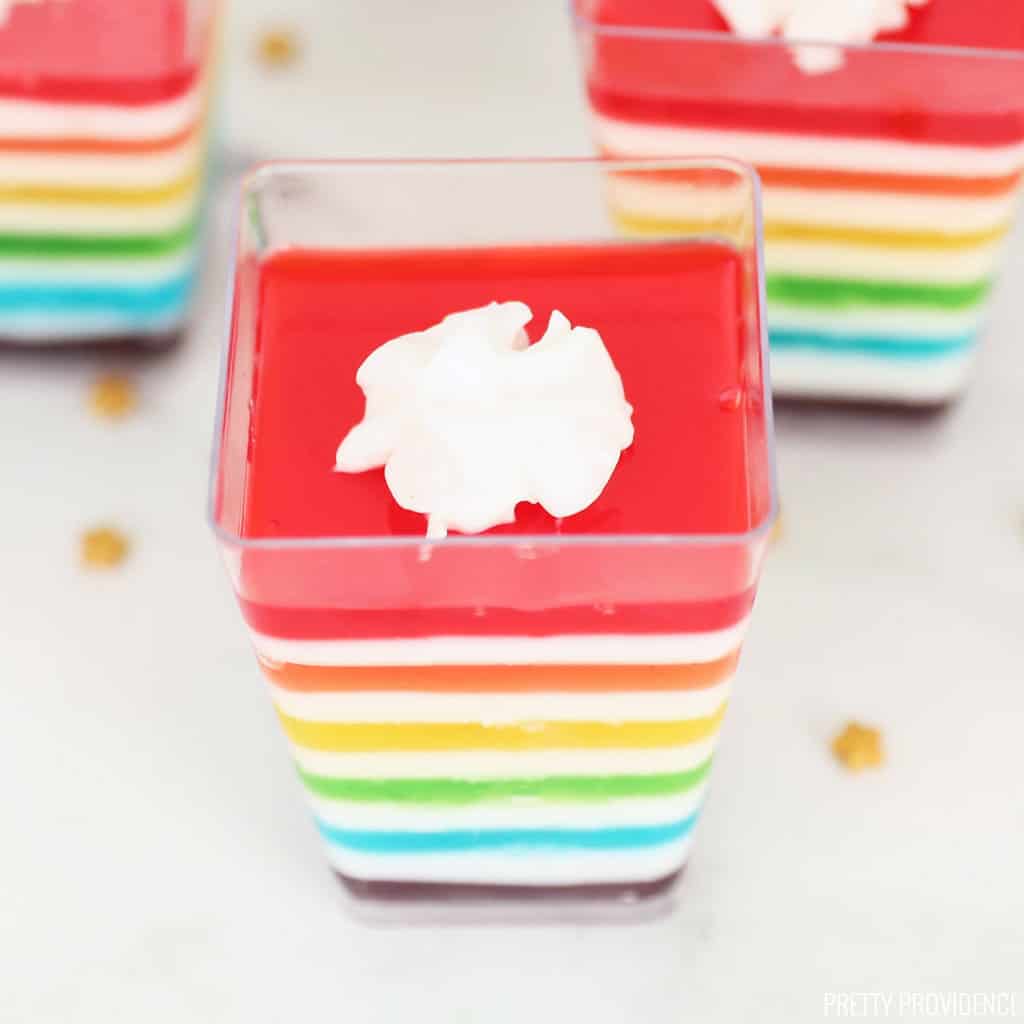
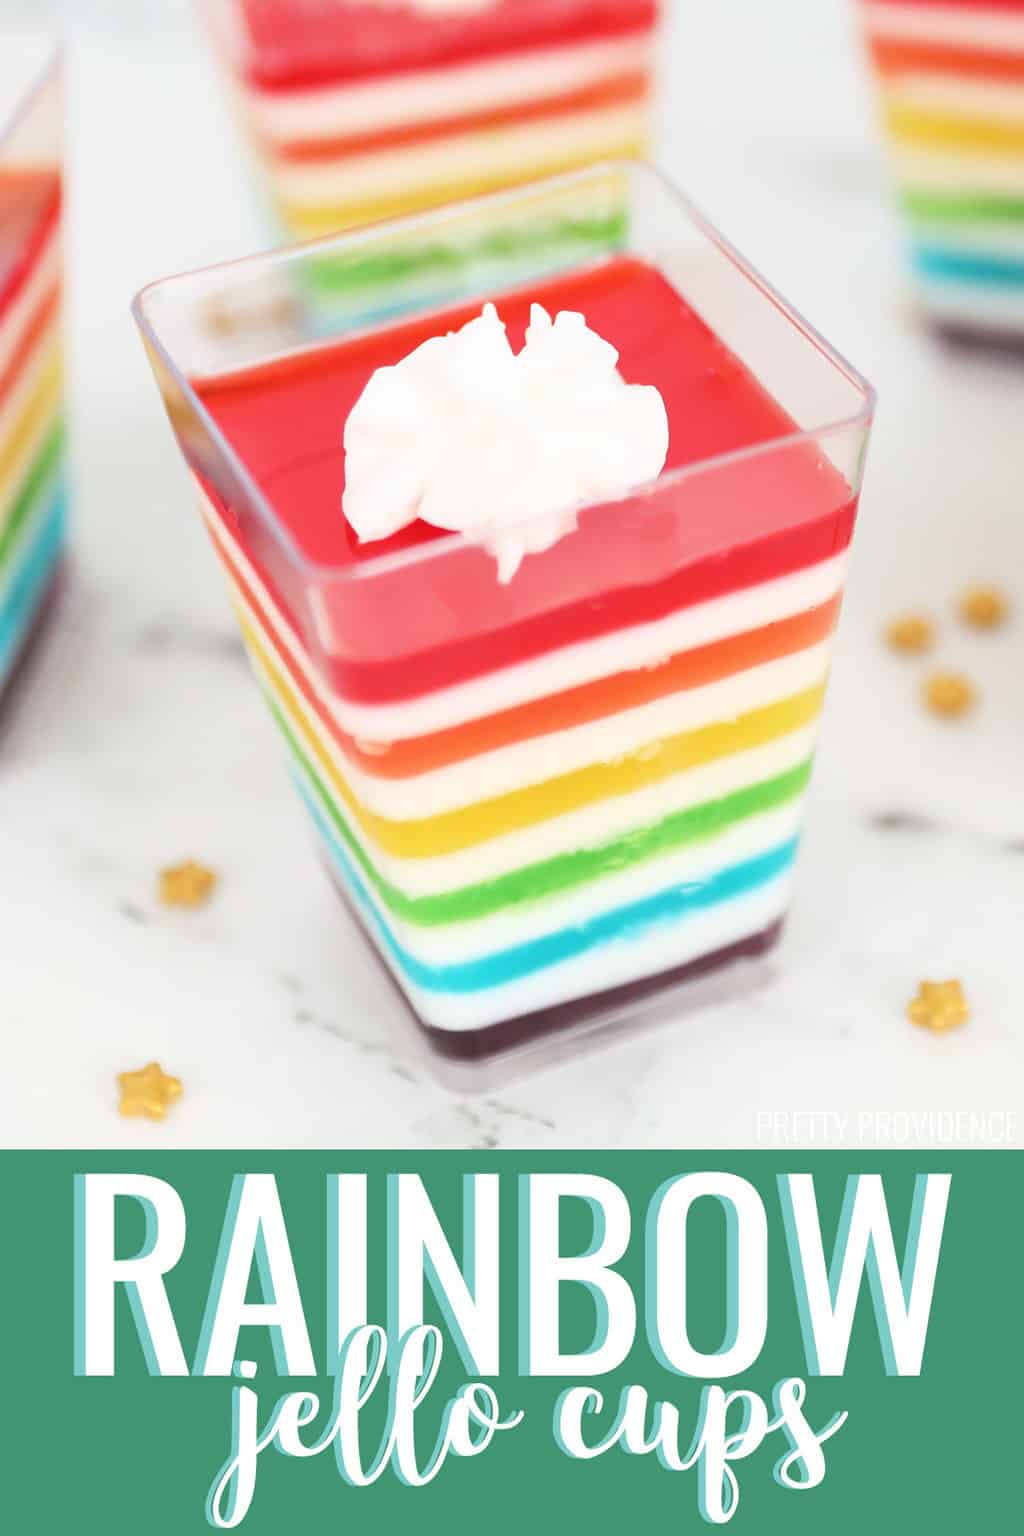
The first time I saw Rainbow Jello, I thought my eyes were playing tricks on me. I tried it and found out that it's not only beautiful, it tastes so good! Better than it looks even, which is saying something!
What is Rainbow Jello
Layered rainbow jello is a colorful dessert that is perfect for parties or special occasions. It has layers of fruity jello alternating with layers of a creamy sweetened condensed milk layer. The result is fruity, melt-in-your-mouth delicious!
 Rainbow Jello Ingredients
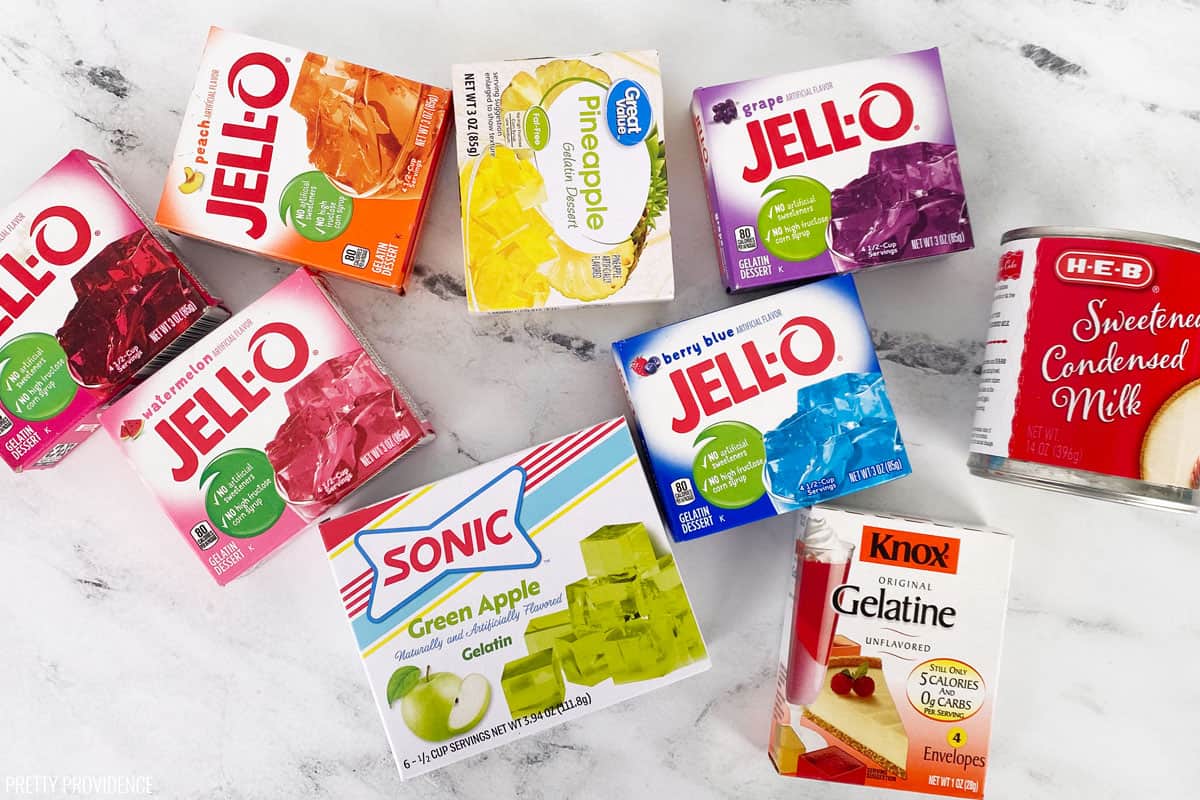
- Red Jello (raspberry, cherry, strawberry)
- Orange Jello (orange, peach)
- Yellow Jello (lemon, pineapple)
- Green Jello (green apple, lime)
- Blue Jello (blue raspberry, blueberry)
- Purple Jello (grape)
- Unflavored gelatin
- Sweetened condensed milk
This recipe is made using 3 oz. boxes of Jello and 14 oz. cans of sweetened condensed milk.
Flavors I used: Raspberry, Peach, Pineapple, Green Apple, Blue Raspberry, Grape
How to Make Layered Jello in a Cup
Step 1: Jello layer
- Mix 1 teaspoon unflavored gelatin powder with one package (3 oz) of jello powder.
- Pour 1 cup boiling water into the powder and stir until powder is dissolved.
- Pour jello mixture into a baking dish or individual cups. Put the jello in the refrigerator to set.
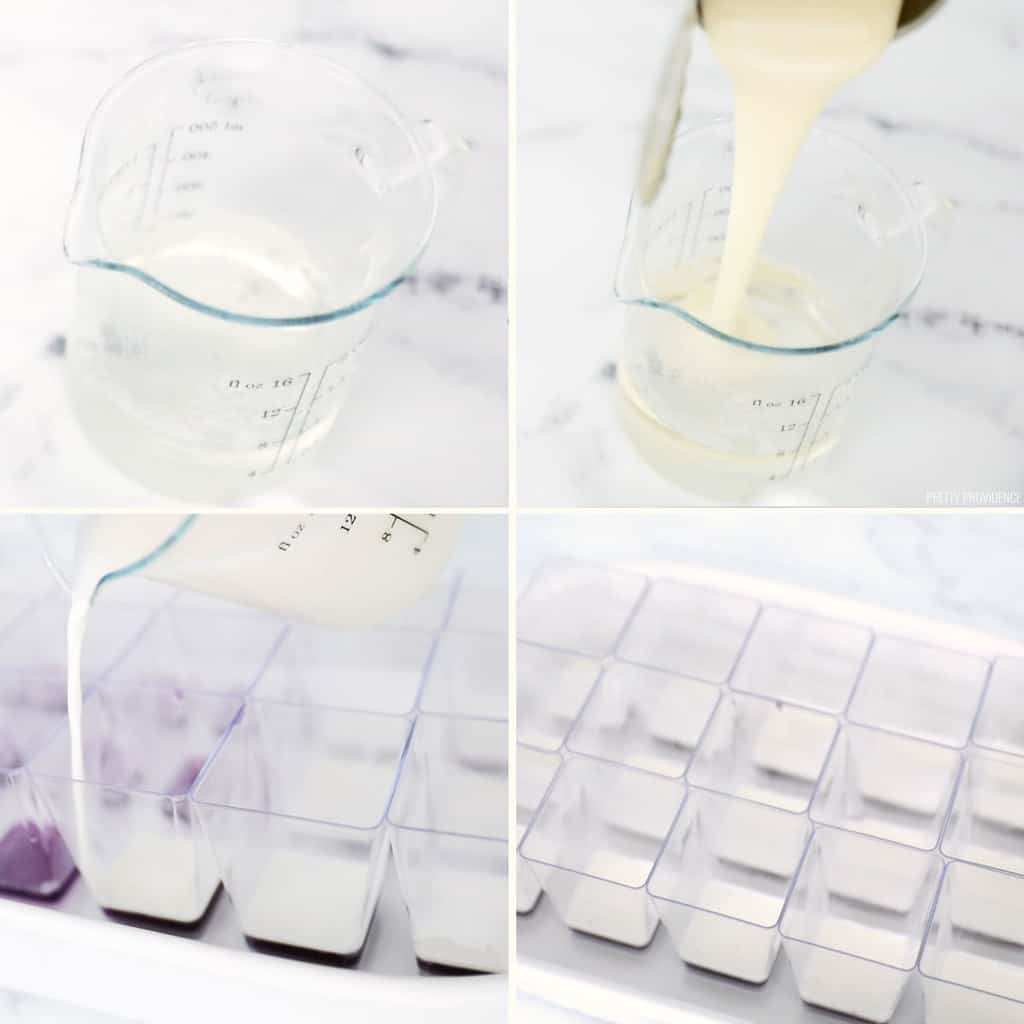
Step 2: White layer
- Mix unflavored 2 teaspoon gelatin powder with 1 cup boiling water and stir til dissolved.
- Stir half of a 14 oz can of sweetened condensed milk into the gelatin mixture. Let it cool to room temperature.
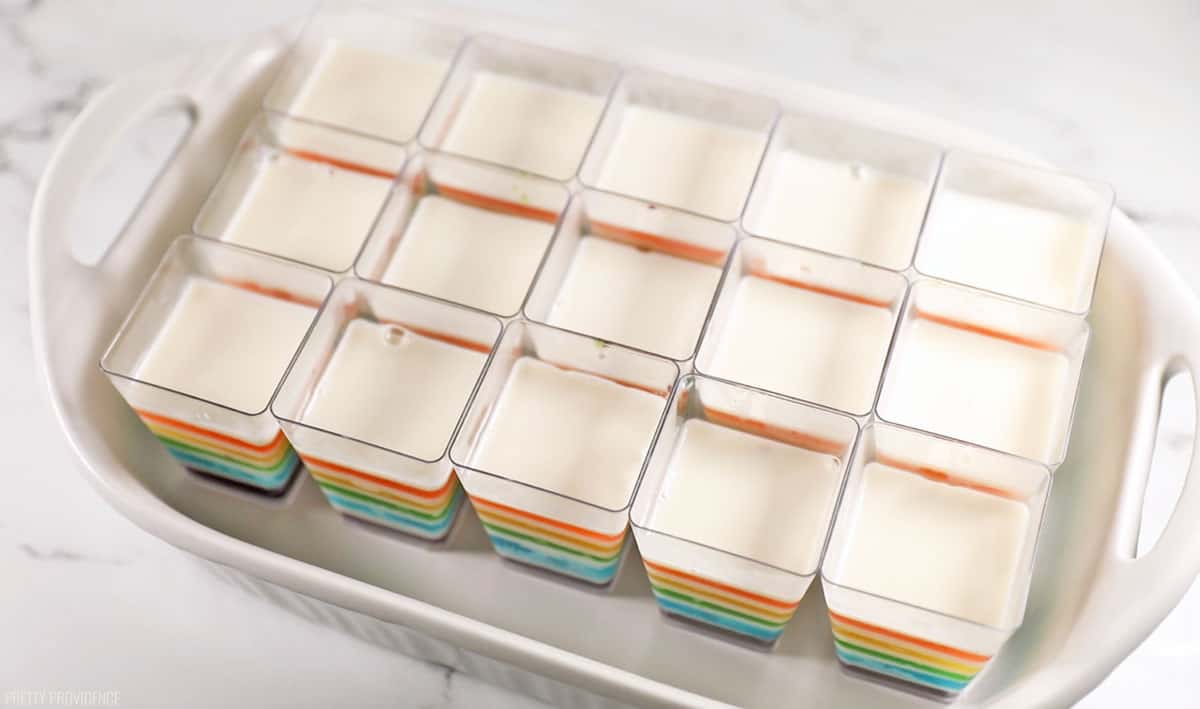
- When the first jello layer is fully set (30 minutes) pour the room temperature white layer evenly over the first jello layer.
- Next, return the dish to the fridge to set and begin preparing the next jello layer. (Refer to step 1)
- Repeat steps 1 and 2 until you have poured all of your rainbow layers.
Pro Tips for Rainbow Jello in a Cup
- Stir together the flavored jello and gelatin before adding the hot water. This is to avoid the gelatin clumping together.
- Refrigerate each layer and make sure it is sufficiently cooled before adding the next layer.
- Cool jello mixture to room temperature before pouring it on top of a chilled layer.
- Do not pour hot (or even warm) jello mixture onto a previous jello layer. It will result in the jello mixing together and ruining the clean, layered jello look.
- If you're making jello in individual cups, place the cups in a larger baking dish or baking sheet so you can more easily transfer the cups back and forth from the fridge to the counter.
Layered Jello FAQ
Do you Cover Jello after making it?
Cover Jello only after it's cooled down.
After the jello has been set properly, it is a good idea to cover it with plastic wrap so that it doesn't pick up other smells or flavors from the fridge.
Is it Hard to Make Layered Rainbow Jello?
Making layered jello is easy, but it is time-consuming! Each layer requires about 30 minutes to set before you can add a new layer, plus you need to let each new batch of jello cool a little before pouring it on the previous layer.
The reactions I see on the faces of my friends and family always make it worth my time.
What kind of cups do you use for Jello in a cup?
I use these dessert cups. We use them to make layered jello, yogurt parfaits, or to serve snacks for parties. They're very nice and can even be hand-washed and used more than once.
If you try this recipe, we'd be grateful if you would leave a comment and positive review! Definitely tag us on social media as well. We love to see it!

Rainbow Jello
Video
Equipment
- 2 Liquid Measuring Cups
- 1 Measuring Spoons
- Clear plastic cups optional
Ingredients
- 1 box Red Jello raspberry, cherry, strawberry
- 1 box Orange Jello orange, peach
- 1 box Yellow Jello lemon, pineapple
- 1 box Green Jello green apple, lime
- 1 box Blue Jello blue raspberry, blueberry
- 1 box Purple Jello grape
- 2 boxes Unflavored Gelatin no flavor
- 2.5 cans sweetened condensed milk 14 oz.
Instructions
Step 1: Jello layer
- Mix 1 teaspoon unflavored gelatin powder with one package (3 oz) of jello powder.
- Pour 1 cup boiling water into the powder and stir until powder is dissolved.
- Pour jello mixture into a baking dish or individual cups. Put the jello in the refrigerator to set.
Step 2: White layer
- Mix unflavored 2 teaspoon gelatin powder with 1 cup boiling water and stir til dissolved.
- Stir ½ a can sweetened condensed milk into the gelatin mixture. Let it cool to room temperature.
- When the first jello layer is fully set (30 minutes) pour the room temperature white layer evenly over the first jello layer.
- Next, return the dish to the fridge to set and begin preparing the next jello layer. (Refer to step 1)
- Repeat steps 1 and 2 until you have poured all of your rainbow layers.
Notes
- this recipe uses 3 oz. boxes of Jello and 14 oz. cans of sweetened condensed milk
- Stir together the flavored jello and gelatin before adding the hot water. This is to avoid the gelatin clumping together.
- If you're making jello in individual cups, put the cups onto a baking sheet or arrange them in a baking dish to make it easier to transfer them back and forth from the fridge to the countertop.
- Make sure that you refrigerate each layer sufficiently before adding the next layer.
- Cool jello mixture to room temperature before pouring it on top of a chilled layer.
- Pouring hot (or even warm) jello mixture onto a previous jello layer will result in the jello mixing together and ruining the clean, layered jello look.
Nutrition


Marie
This would be so easy for me to do. I will be taking this to my red hat party for the ladies.
Can't wait. Thank you. Wonderful ideas.
Anna
My kid would be obsessed with this. Also never knew about how to get white so thank you.
Jessica
It is so fun!