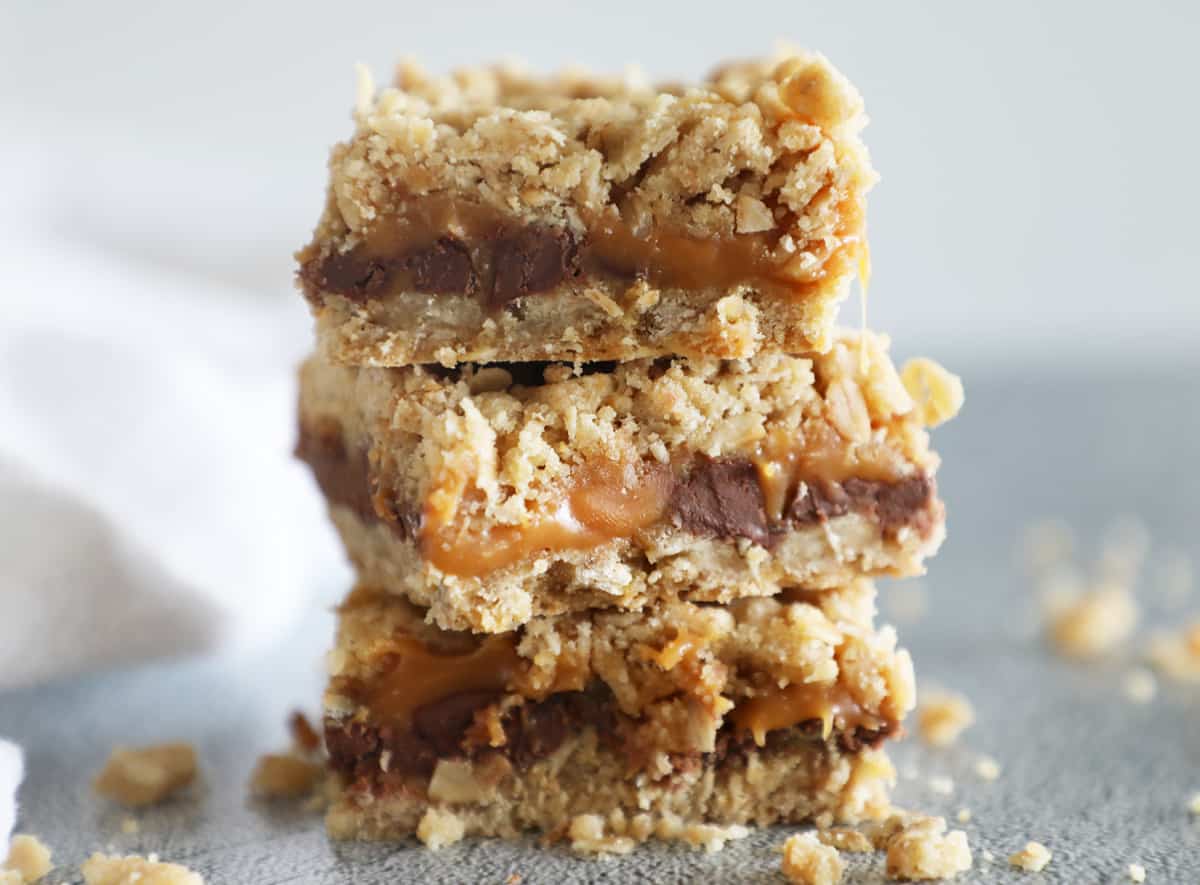
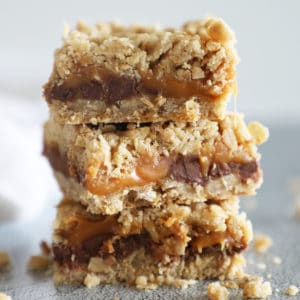
Carmelita Bar

These chocolate caramel oatmeal bars are a massive reader favorite and we get why. Check out all the 5 star reviews or better yet make them to see for yourself!
Crowd pleasing Carmelitas Recipe
You can't please everyone, unless you are Carmelita bars. If you need an easy to prepare treat that is sure to please look no further.
My Mom has been making these as long as I can remember and without fail they get requested at EVERY party or gathering. Here are a few of the reasons why we love them so much.
Layers of Flavor: Carmelita bars are composed of layers of rich and complementary flavors. The buttery oat crust, sweet and gooey caramel filling, and chocolate chips create a harmonious combination that caters to most taste preferences.
Textural Contrast: These bars offer an appealing contrast in textures. The crunchy and crumbly oat crust pairs beautifully with the soft and chewy caramel layer, while the chocolate chips (and nuts if you want to add them) add additional crunch and flavor.
Sweet and Salty: The combination of sweet caramel and the potential addition of a touch of salt (e.g., sea salt sprinkled on top) creates an irresistible sweet-and-salty flavor profile that many people find addictive.
Carmelita Recipe ingredients
- Flour
- Oats
- Salt
- Baking Soda
- Brown Sugar
- Butter
- Caramels, Unwrapped
- Whipping Cream
- Milk Chocolate Chips
How to Make Carmelitas
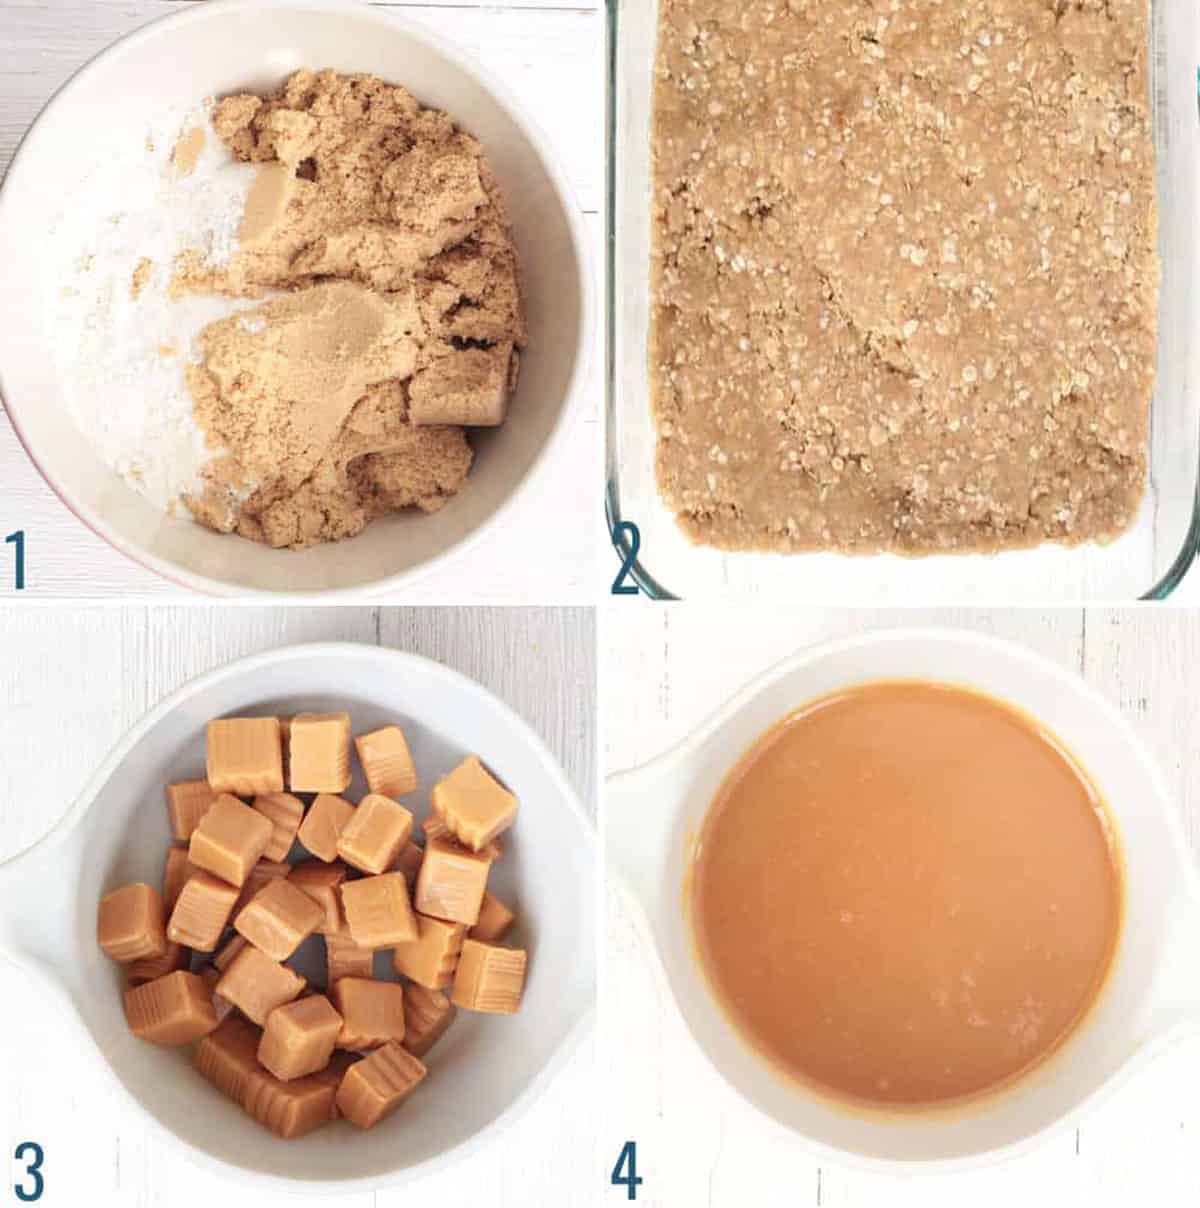
- Add dry ingredients to a bowl and mix. Add melted butter and mix well.
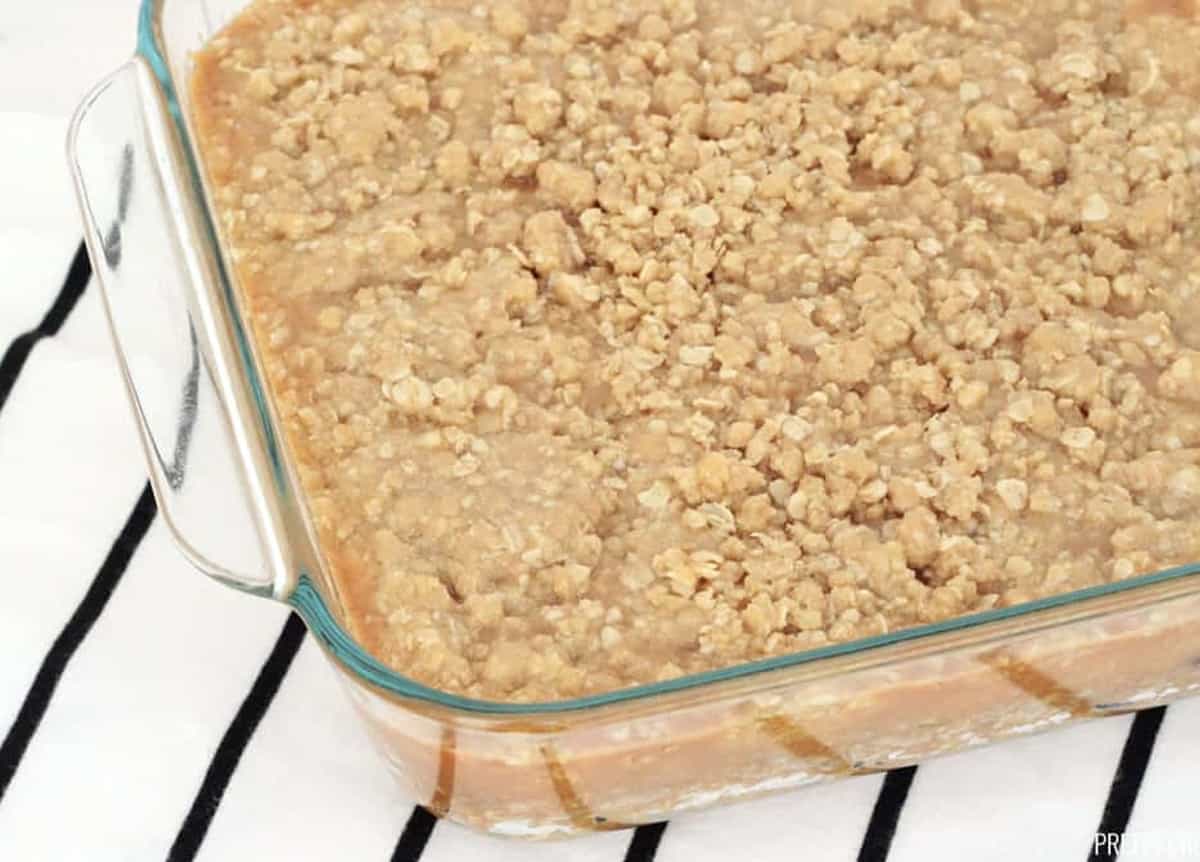
- Press half of the oatmeal mixture into the bottom of a greased 9x13 baking dish. You can use a 9x9 baking dish for thicker bars if you prefer, either works fine. The photos and video in this post show 9x13.
- Unwrap caramels and put them into a microwave-safe bowl. Add heavy whipping cream to the bowl of caramels.
- Melt in the microwave for 30 seconds at a time, stirring in between, until completely melted.
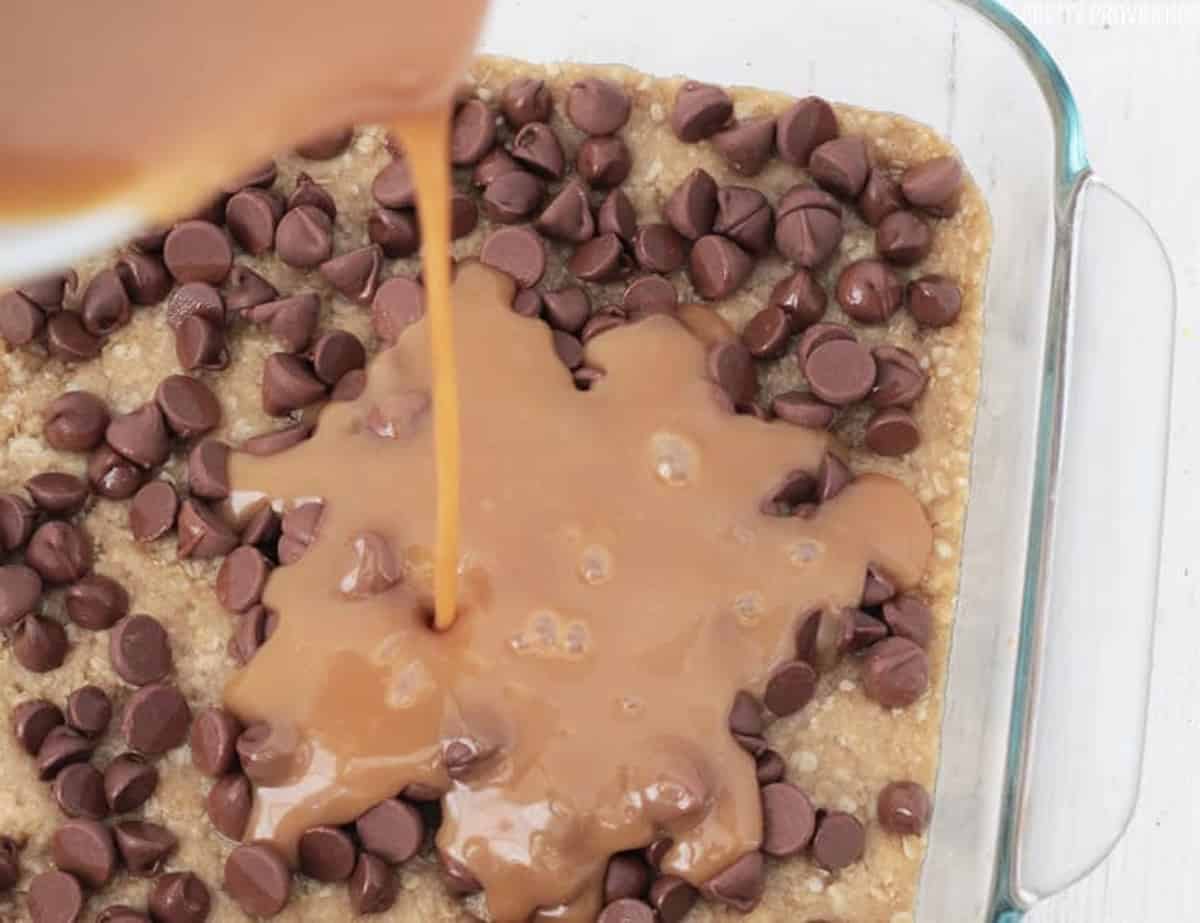
- Remove the bottom layer from the oven and sprinkle milk chocolate chips over the top of it. Pour caramel over that.
6. For the topping, take the rest of the oatmeal mixture and make little pancakes with it, putting them over the top of the caramel layer until it's completely covered. Softly pat crumbs down with a silicone spatula.
7. Bake for 12-15 more minutes. Remove from the oven and let them cool completely before trying to cut.
Note: These can take a few hours to cool. Pop the dish in the fridge (once they've cooled to at least room temp) to speed up the process.
Oatmeal Carmelitas variations
Carmelita bars are a delicious dessert consisting of layers of oats, caramel, and chocolate chips. While the classic recipe is fantastic on its own, there are numerous creative variations you can try to add different flavors and textures. Here are some ideas for variations on Carmelita bars:
Nut Variations: Use the traditional chopped pecans or walnuts, or you can experiment with other nuts like almonds, cashews, macadamia nuts, or peanuts. Toasting the nuts before adding them can enhance their flavor. Coconut Bliss: If you love coconut, consider adding sweetened shredded coconut to the oat mixture or caramel layer. Toasted coconut can add a delightful crunch and tropical flavor.
Flavored Chips: Use different types of chocolate chips or flavored chips to change the overall taste. Try white chocolate chips, butterscotch chips, peanut butter chips, or dark chocolate chips.
Salted Caramel: Enhance the caramel layer by sprinkling a little sea salt on top. The combination of sweet and salty can be irresistible.
How to Serve Carmelita Bars
You're going to want a glass of milk with these. Now comes the hardest part, not eating the ENTIRE pan by yourself.
Carmelita Bar storage
To maintain the freshness and flavor of Carmelita bars, it's essential to store them properly. Here's how you should store Carmelita bars:
Cooling and Setting: After baking the Carmelita bars, allow them to cool completely in the baking dish. This cooling period allows the layers to set and makes it easier to cut them into bars.
Cut and Separate: Once the Carmelita bars have cooled and set, use a sharp knife to cut them into individual bars or squares. Be sure to cut through all the layers cleanly.
Layer Separation: To prevent the bars from sticking together, separate them with parchment paper or wax paper when stacking them in an airtight container or on a plate.
Airtight Container: Store the Carmelita bars in an airtight container with a secure lid. This helps maintain their freshness and prevents them from becoming stale or absorbing odors from the refrigerator.
Should Carmelita bars be stored at Room Temperature?
Refrigeration (Optional): While Carmelita bars can be stored at room temperature for a few days if you plan to consume them relatively quickly, it's generally a good idea to refrigerate them if you intend to keep them for an extended period or if your kitchen is particularly warm. Refrigeration helps preserve the texture and prevents any potential melting of the caramel or chocolate.
Freezing (Optional): If you want to store Carmelita bars for an even longer period, you can freeze them. Place the individual bars on a baking sheet lined with parchment paper and freeze until firm. Once frozen, transfer them to an airtight container or resealable freezer bags, separating layers with parchment paper. Frozen Carmelita bars can be stored for up to 2-3 months. When ready to enjoy, let them thaw in the refrigerator or at room temperature.

If you're craving chocolate, you might also consider these S'mores Bars (a no-bake favorite) or Perfect Chocolate Chip Cookies! Browse all of our dessert recipes for even more delicious treat ideas! Are you making these Carmelitas? If you do, we'd be so grateful if you comment and rate this recipe for us! It means so much to hear your feedback!
Carmelita Recipe
Video
Ingredients
- 1 ½ cups flour
- 1 ½ cups oats
- ¼ teaspoon salt
- ½ teaspoon soda
- 1 ½ cups brown sugar
- 1 cup melted butter
- 14 oz bag of caramels unwrapped
- ½ cup whipping cream
- 1 bag milk chocolate chips
Instructions
- Preheat the oven to 350 degrees F.
- Add flour, oats, brown sugar, baking soda, salt, and melted butter to a bowl and mix well.
- Press ½ of mixture into a 9×13 pan. Bake for 10-12 minutes.
- In the meantime, combine caramels and unwhipped whipping cream in a microwave-safe dish. Microwave in 30 second increments, stirring well between, to melt them together.
- When oat crust comes out of the oven, sprinkle the whole bag of milk chocolate chips over the top of it. Then, pour caramel mixture over the chocolate chips.
- Make the rest of the oat mixture into little pancakes by hand in order to spread it as evenly as you can over the top of the caramel.
- Bake at 350 degrees for 12-15 minutes. Watch while cooking to be sure you don't over cook.
Notes
Nutrition

This post was originally published in 2015 but has been updated with better photos, video, and more detailed information.

My mother used to make something similar growing up and these are even better! I am so happy to find this recipe and share with my kids!
These oatmeal bars are so good! The caramel and chocolate blend wonderfully with the oats. I tried them and totally agree with the rave reviews. A must-try treat for everyone!
I am so glad! Thank you for your review this just made our day.
This is such a keeper! Thank you for the tips, it turned out incredibly delicious and satisfying!
These are my favorite thing to bring to potlucks. Everyone is obsessed!
I'm so glad!
These were incredible! Loved the combination of all the flavors. They went together perfectly. New favorite dessert!
Thank you so much!
I can't even begin to describe how good these are! All of my favorite flavors in one amazing bar. These didn't even last two days once my kids tried them -- guess it's time to make more! :)
Sounds like our house! Haha. So glad you loved them!
These are a family favorite! Checks alllllll the boxes! So yummy!
Thank you for letting us know :)
These are my favorite dessert. So tasty
So glad you love them!
YESSS THESE ARE THE BEST CARAMEL DESSERT OF ALL TIME I SAID WHAT I SAID
Oh my gosh you just made our day! Thank you.
My fav dessert hands down.
They are so good huh?
Looks Delish!! While reading the recipe with the pictures you typed to put it in a 9 x 9 pan & I can see that in your picture. After I printed it out and was reviewing it the size changed to 9 x 13. Just wanted to make sure what size pan. And have you doubled it to fit a 9 x 13 pan? Thank you.
Oh, I'm so sorry! It actually works either way I think but I like to use 9x9 because they are thicker that way. I recommend 9x9. Thank you for pointing it out! I will change that in the printable recipe.
These are amazing and gEt gobbled up in a flash. AlWays a croud pleaser!
Heaven in a bar!
Haha amen!
5/5 for thEse! If 10/5 was An option id go for that. They are the best dessert and taste like heaven. Highly recommend!
Yay!! So so glad you loved them, they are my top FAVE dessert bar!
Love this chocolate and caramel combination--fantastic!
Yay I'm so glad! Thank you so much!
I'm a HUGE fan of "bar" recipes and these ones are awesome. Chewy and delicious!
these are a family favorite for sure! so glad you love them!
These look amazing! Thanks for the great recipes... you're making my life tastier.
Oats and brown sugar are such a great combo. Looks yummy!
mmmm so yummy looking pinned!
These look so yummy! I will definitely be trying these!