DIY Princess Costumes
Make one of these DIY Princess Costumes today! This is a super fun no-sew project to make using the Cricut maker.
DIY Princess Costumes
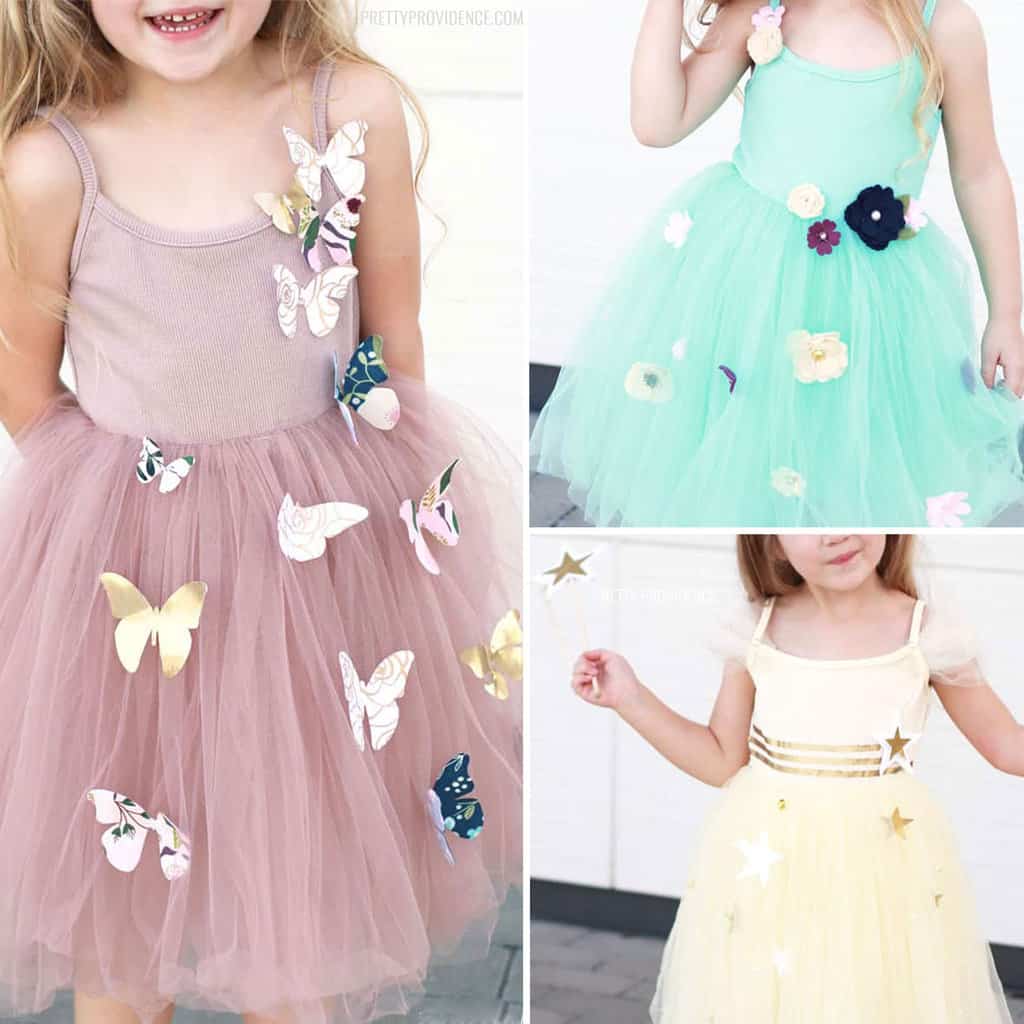
I have always loved making DIY Halloween costumes, and it's been especially fun the past two years because my little June loves dressing up for Halloween! It's all she talks about. This year, she said she wanted a princess Halloween costume.
I had some ideas in my head and couldn't decide on just one, so I made three different princess Halloween costumes. These are perfect for Halloween but also could be great for dress-ups or princess camp, tea parties... really whatever a little girl can dream up. Each of these princess costumes has a theme - butterfly princess, flower princess and star princess!
If you're looking for a few more DIY costume ideas, try this easy Easy Bunny Costume, DIY Spider Costume, these Funny Halloween Costumes or browse all of our Halloween ideas.
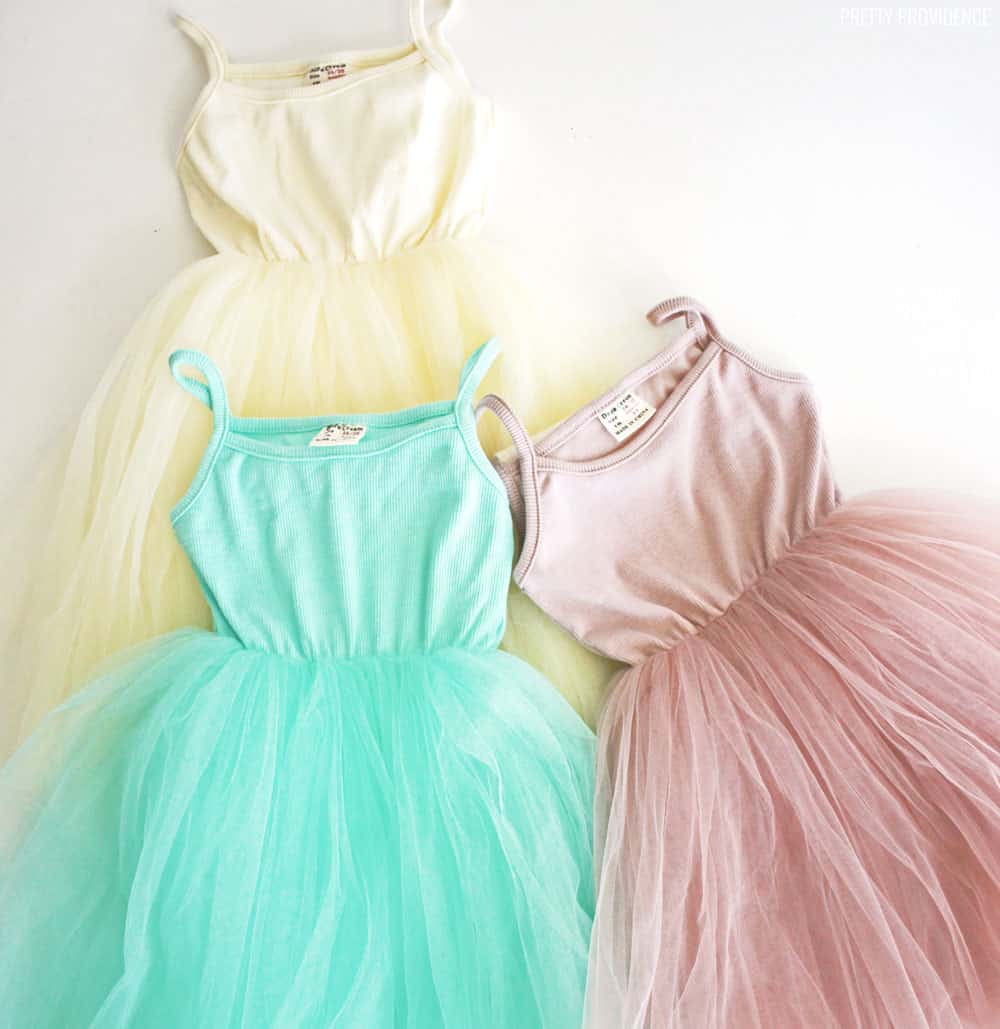
I didn't want to sew three dresses, so I found these solid colored tulle dresses on Amazon. They are the perfect base to start with! I used my Cricut Maker to cut all of the shapes and details out. The Cricut Maker has a rotary blade, and it is amazing, you guys. It cut fabric and felt like a dream with its gliding, rolling action! Some of the fabrics I used were really delicate and it cut them beautifully. Now I will show you how to make all three of these DIY princess costumes.
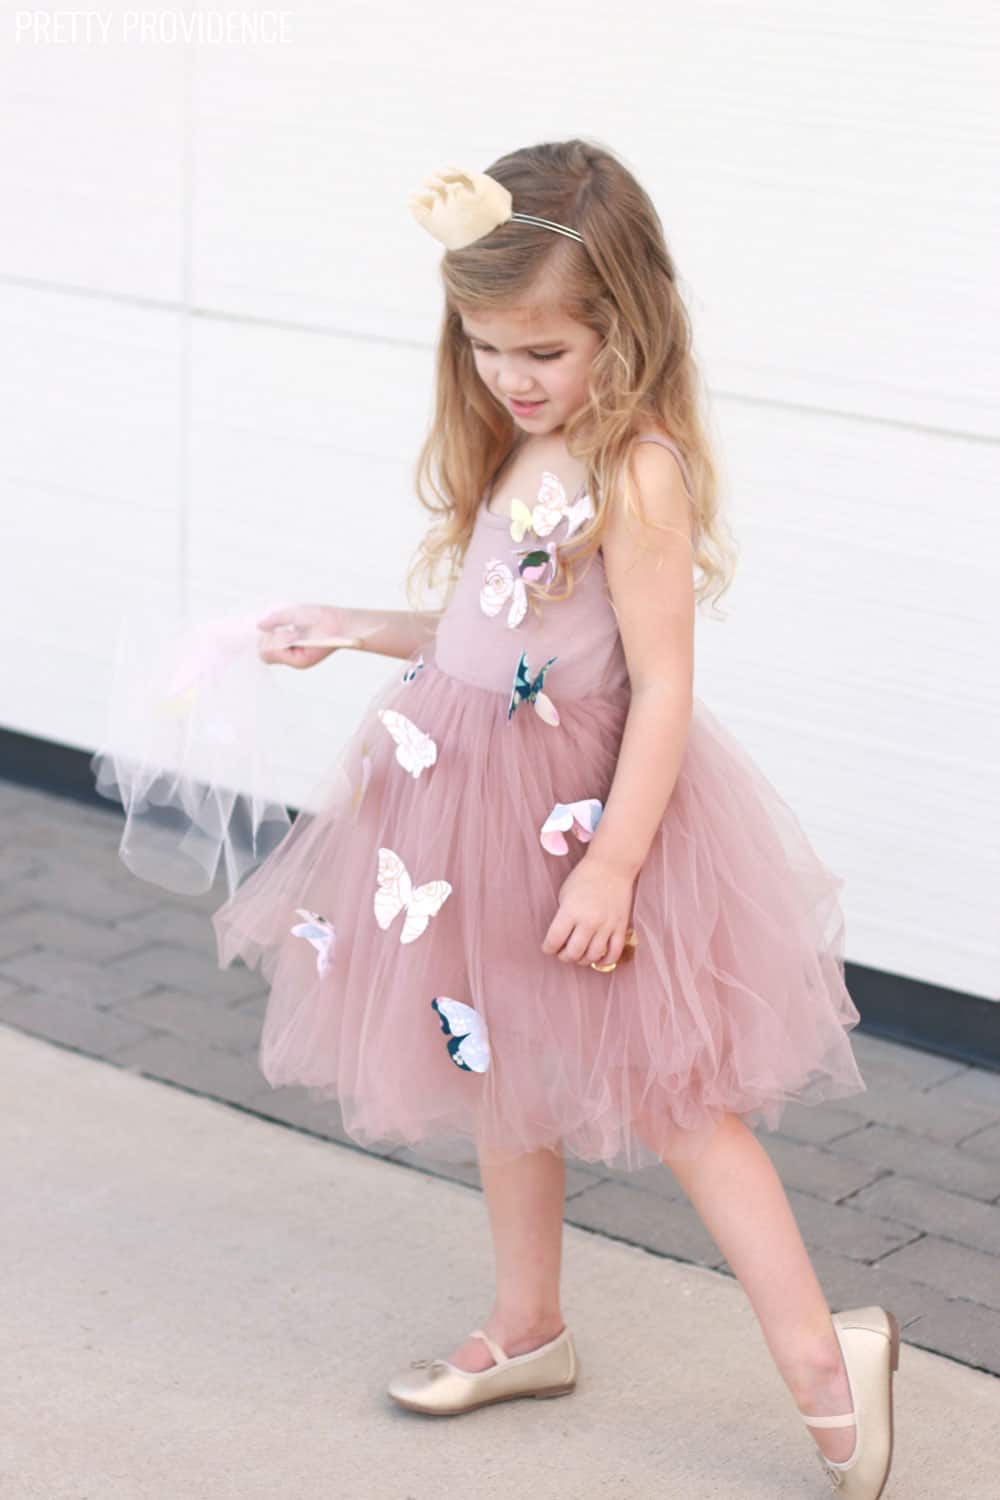
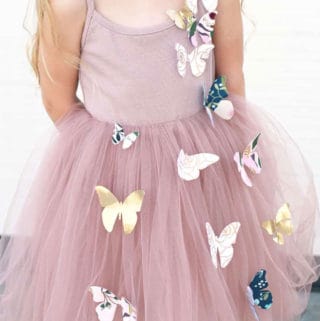
Easy No Sew Butterfly Princess Costume
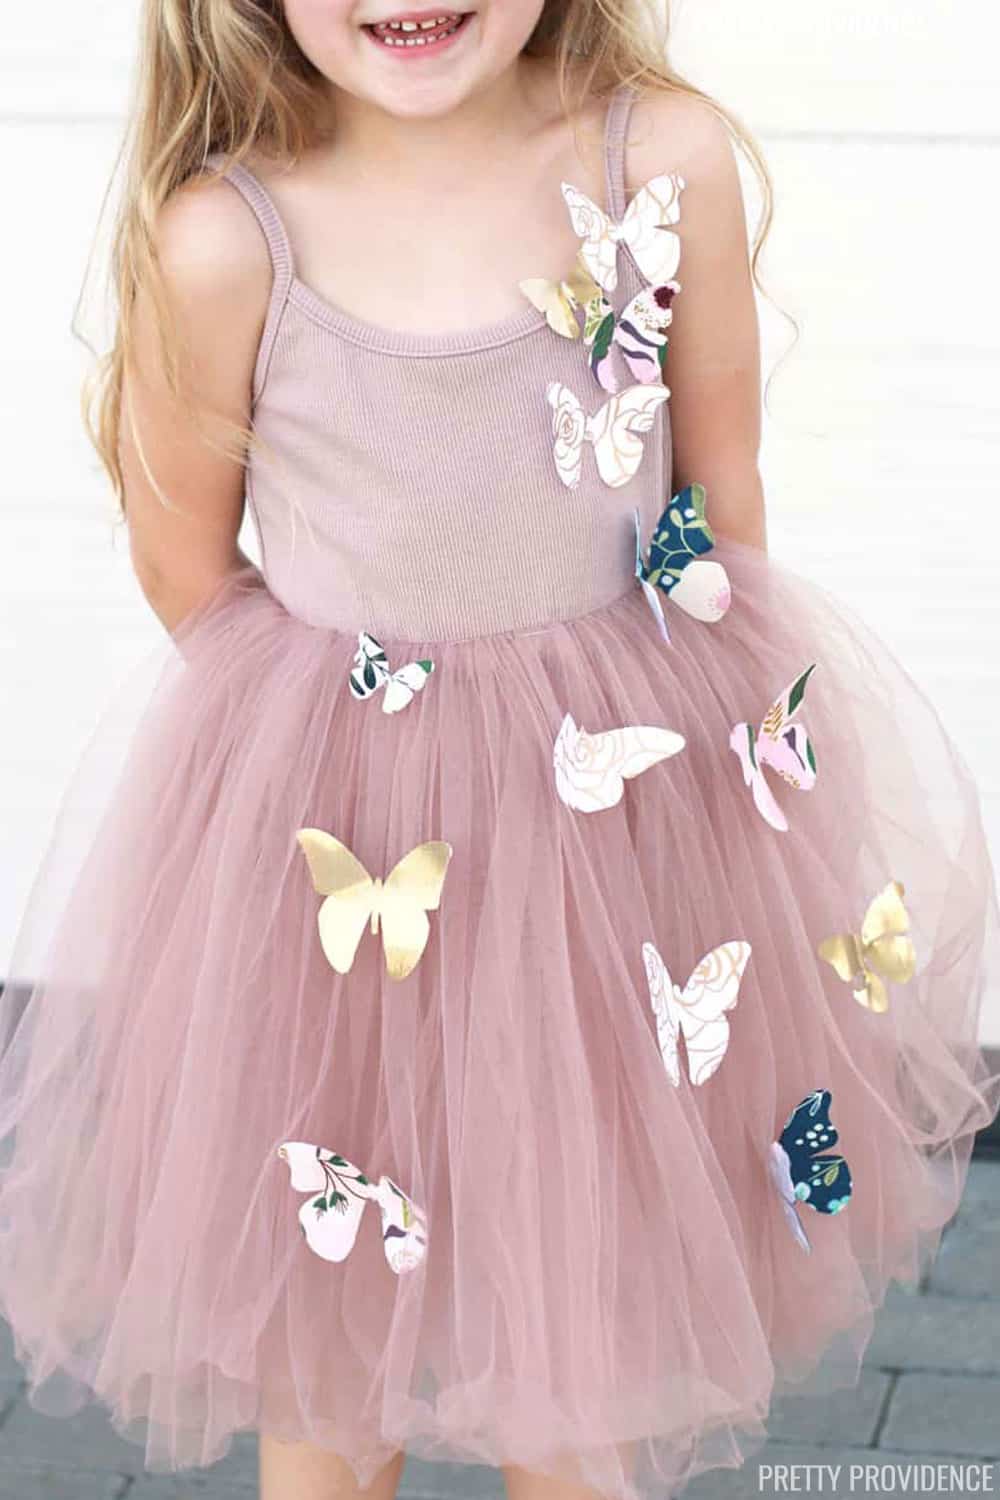
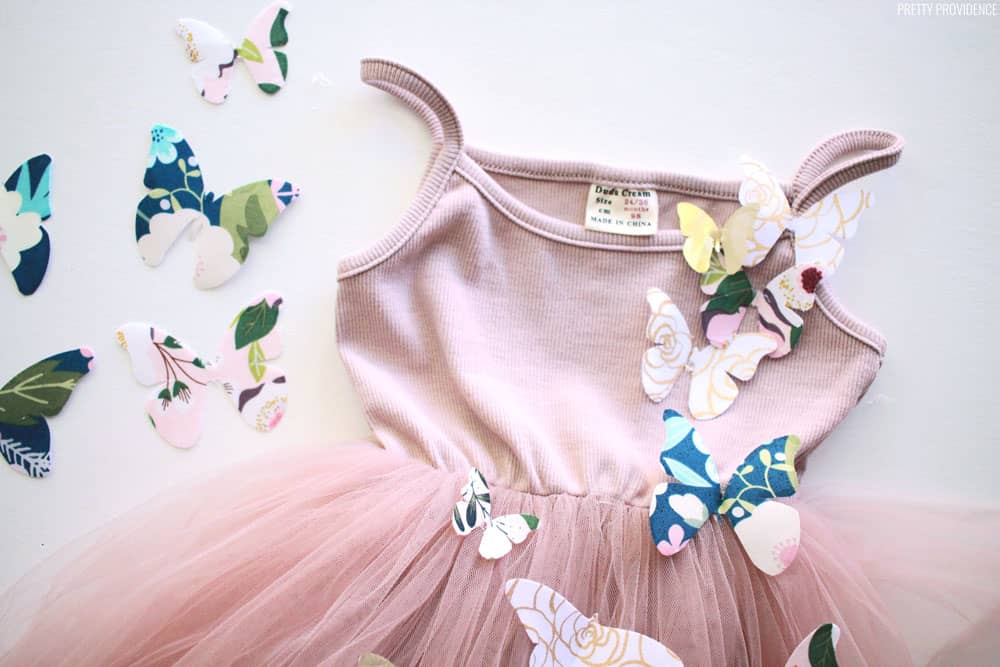
This butterfly princess costume is by far the crowd favorite. I love the fabric butterflies so much! I found a tutorial in Cricut Design Space for making fabric butterfly wall art, and adapted the butterflies to be the right size for the princess costume. They are 3D and just gorgeous, right?
Butterfly Princess Costume Supplies:
Pink Tulle Dress
Fabric Butterflies
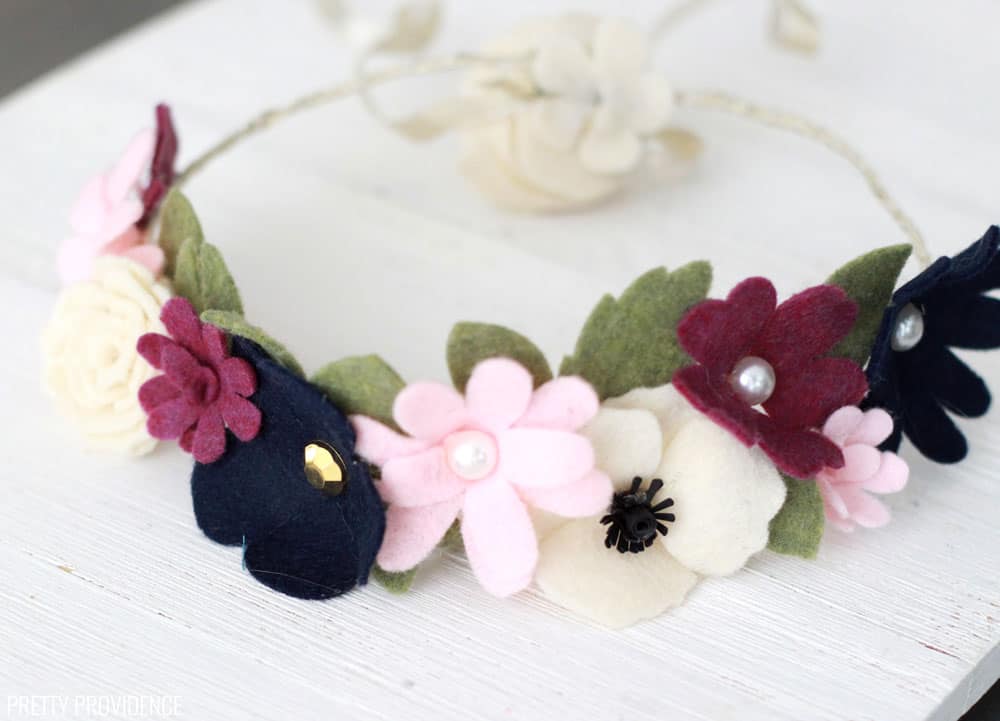
Felt Crown Headband
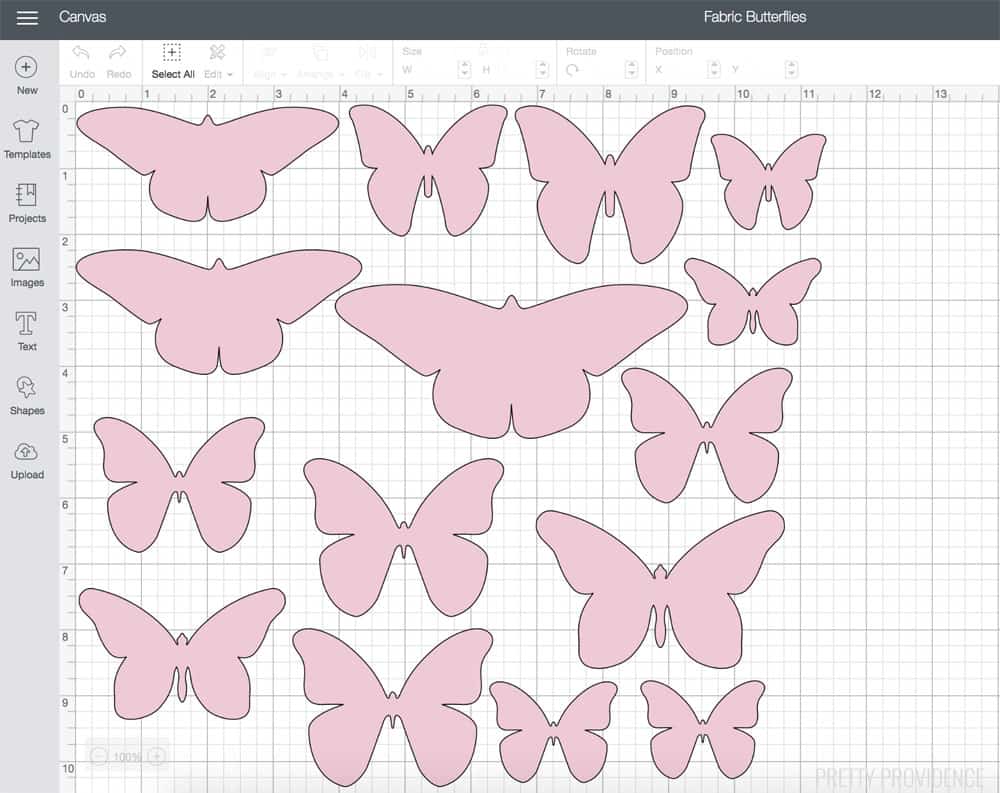
How to Make Fabric Butterflies with Cricut Maker
Access the fabric butterfly template directly in Cricut Design Space. The butterfly images are available with Cricut Access subscription
Fabric Butterflies Supplies:
Cricut Maker
2-4 different fabrics
FabricGrip Mat
Brayer
Heat N Bond fusible interfacing
EasyPress 2 or Iron
Fray Check
Hot Glue
Fabric Butterfly Directions:
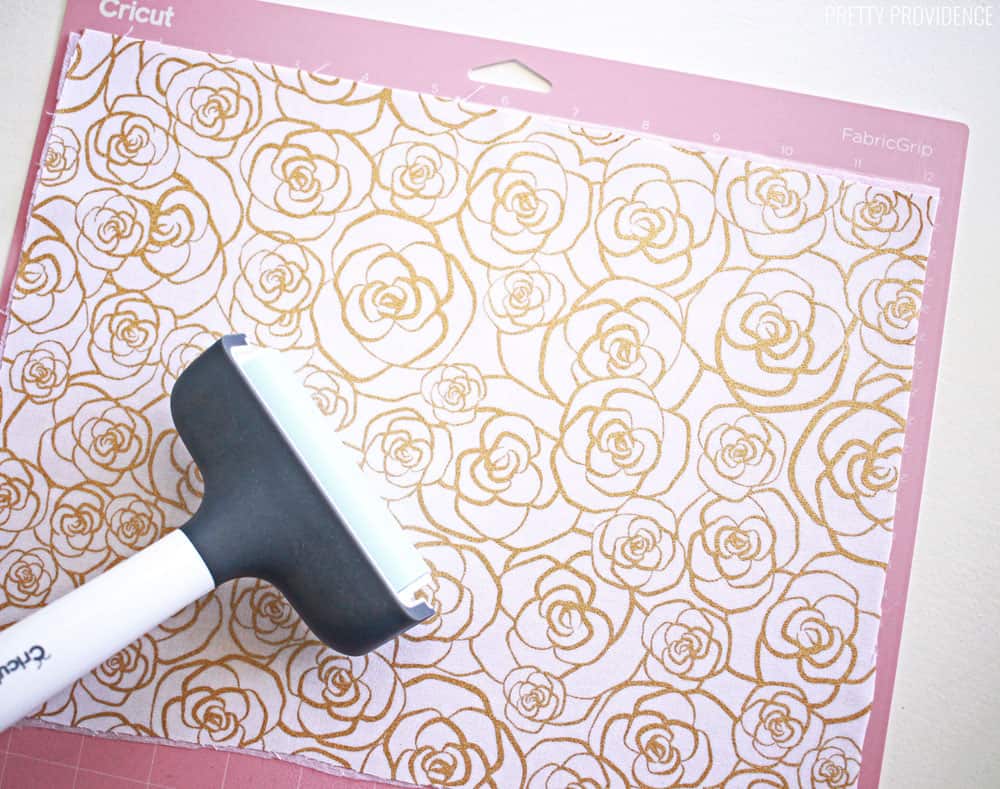
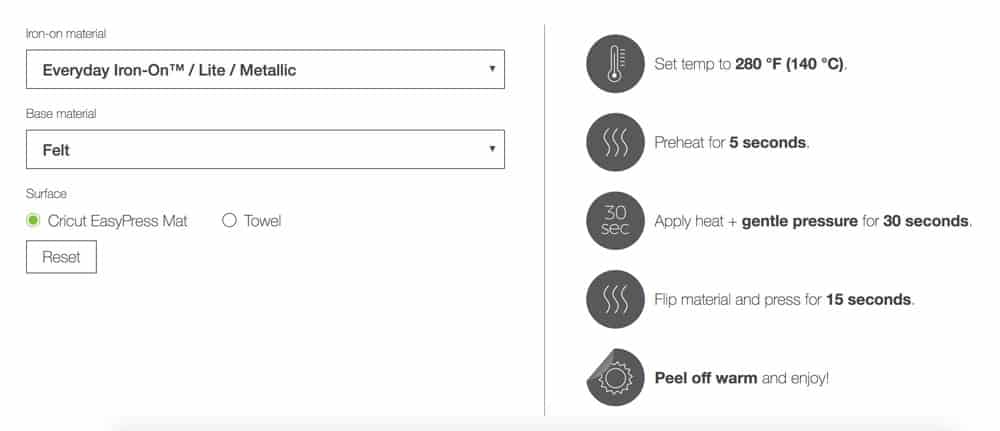
Cut a piece of fabric and a piece of fusible interfacing into a 12x12 square. Use an EasyPress 2 or a regular iron to attach the fusible interfacing to the back of your fabric. Fusible interfacing gives the fabric a more stiffness, which is important so the butterflies don't flop around too much on the dress.
Place the square onto your FabricGrip mat with the fusible interfacing side down, and the pattern facing up. Use a brayer to eliminate wrinkles.
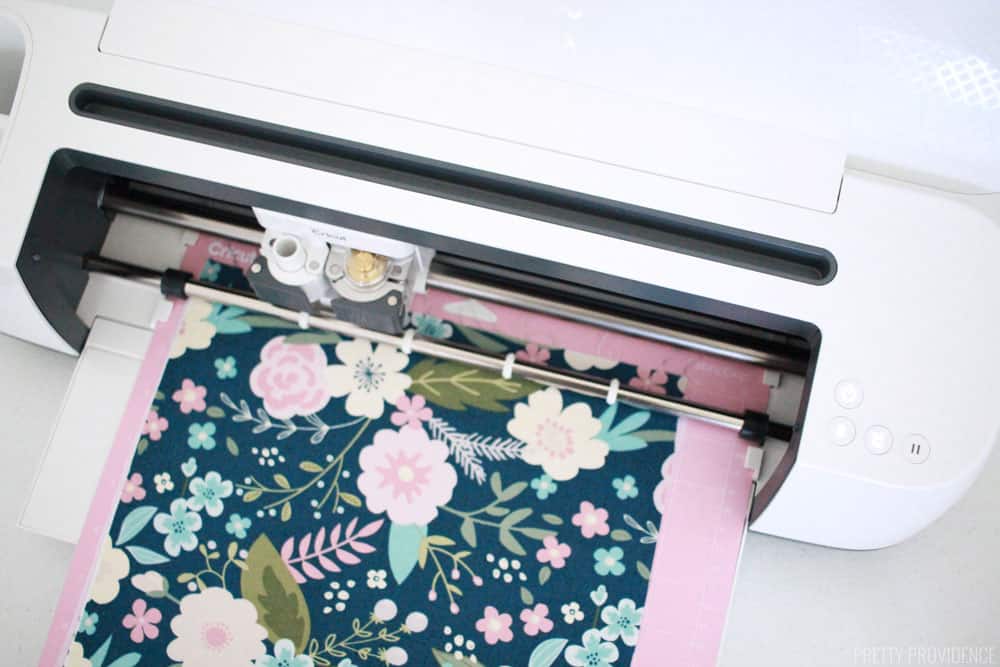
Load the FabricGrip mat into your Cricut Maker and load the rotary blade into the machine. Select fabric as your material, choose 'edit tools' and pick rotary blade. Now you are ready to cut!
The rotary blade makes perfectly clean, gorgeous cuts. Can you even believe these edges?
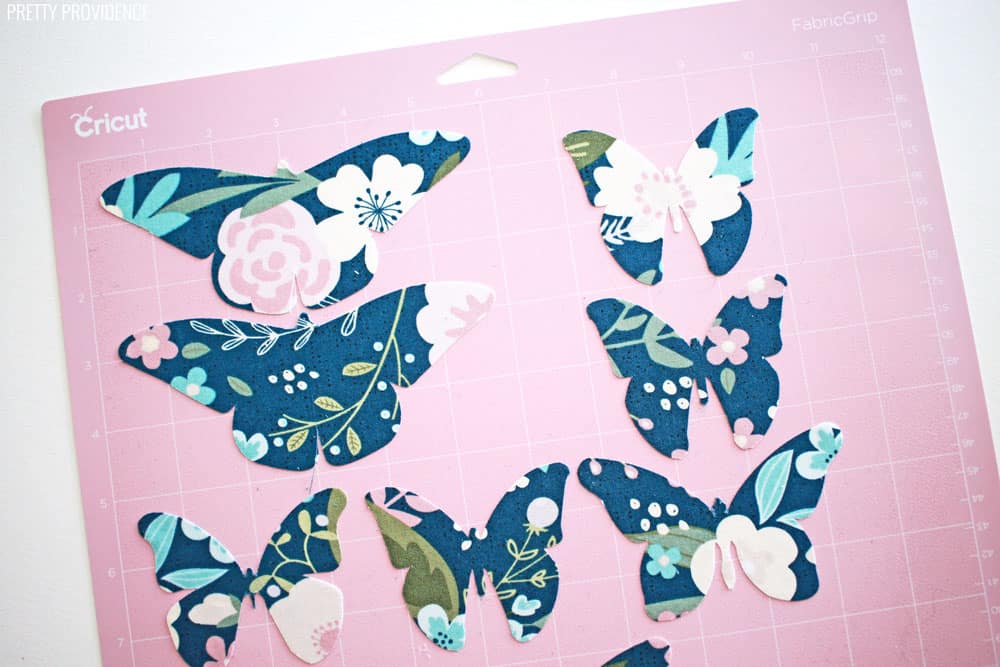
After carefully removing the butterflies from the mat fold the butterflies in half, pattern facing in. Use an EasyPress or iron and press down onto the butterfly, to give them a permanent fold. Trace the edges of each fabric butterfly with Fray Check so they won't fray and those beautiful edges will stay clean.
Repeat this process of cutting butterflies with each fabric you are using. I did it 4 times.

Once all of your butterflies are ready, use a hot glue gun to attach the them to the dress.
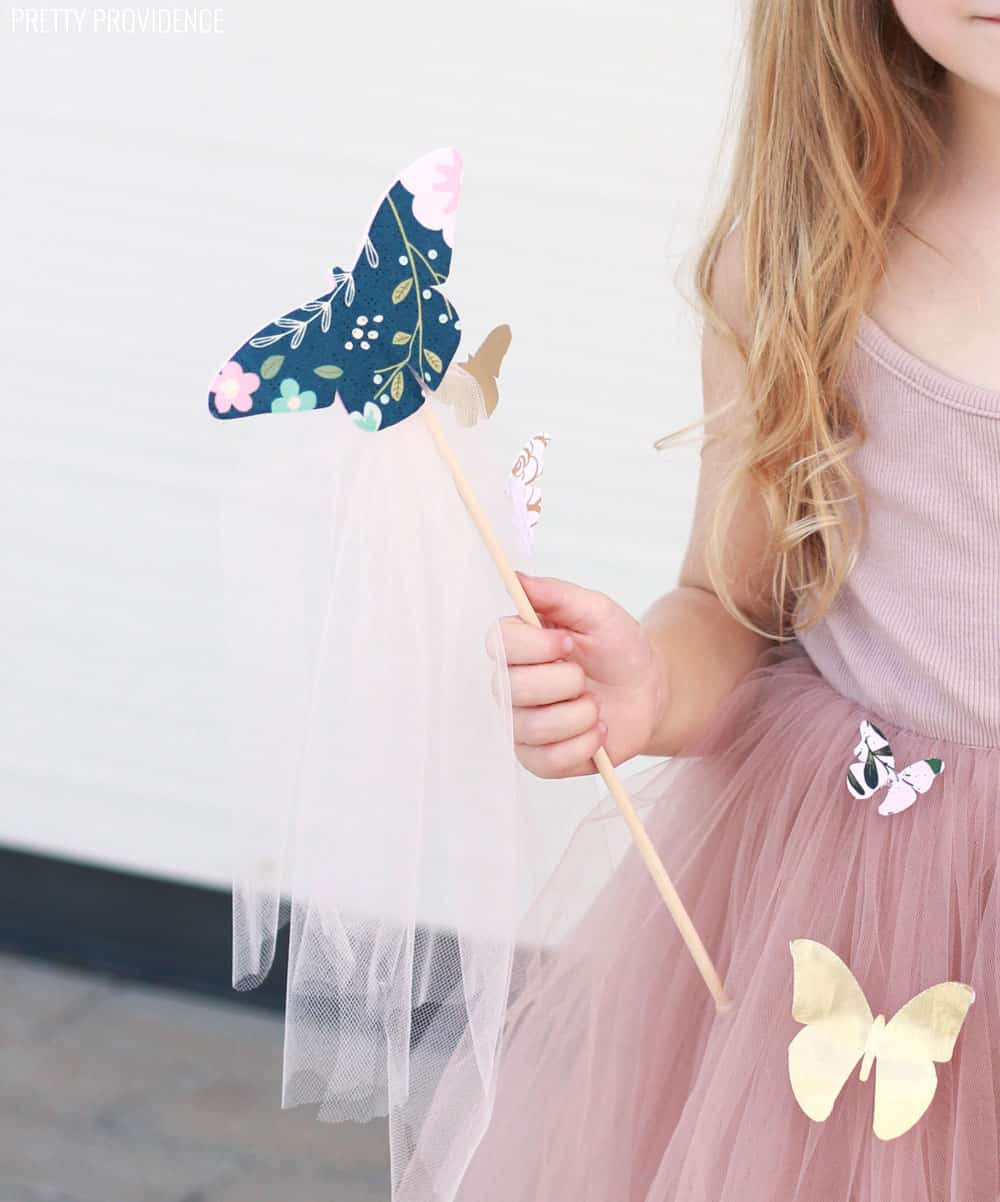
I also had to make a cute butterfly wand to go with this princess dress. The easy tutorial is at the bottom of this post!
How to Make a Felt Crown Headband
This easy felt crown takes all of 5 minutes to make. Click here to access the crown template directly in Cricut Design Space.

Felt Crown Headband Supplies:
Headband
Felt
Cricut Maker with Rotary Blade
Hot Glue
Felt Crown Headband Directions:
Load the crown template into your Design Space canvas. Put felt on FabricGrip mat and use a brayer to remove wrinkles.
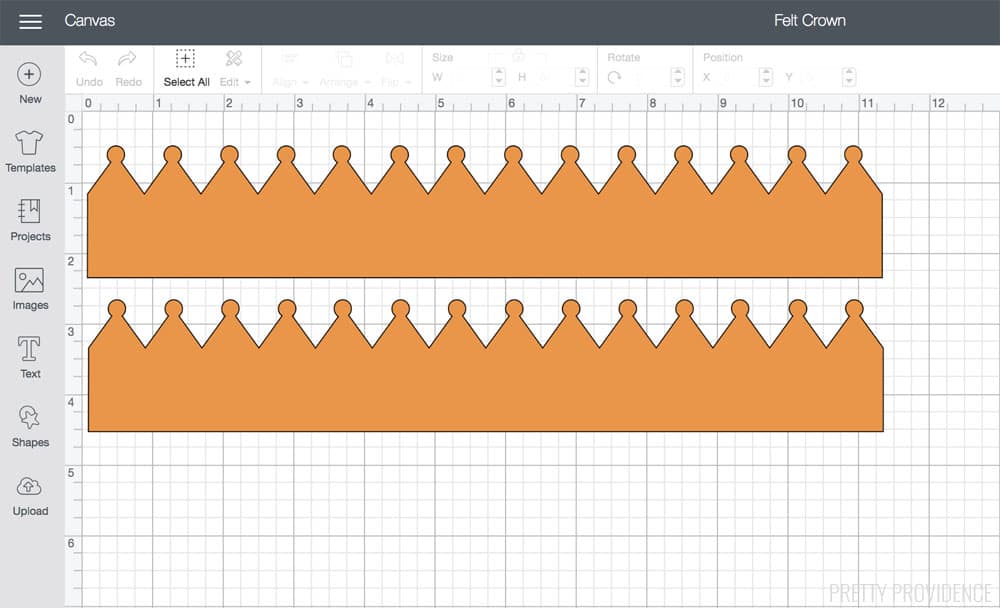
Load the mat into your Cricut Maker and load the rotary blade into the machine if it isn't already. Select felt as your material, choose 'edit tools' and pick rotary blade. Now you are ready to cut!
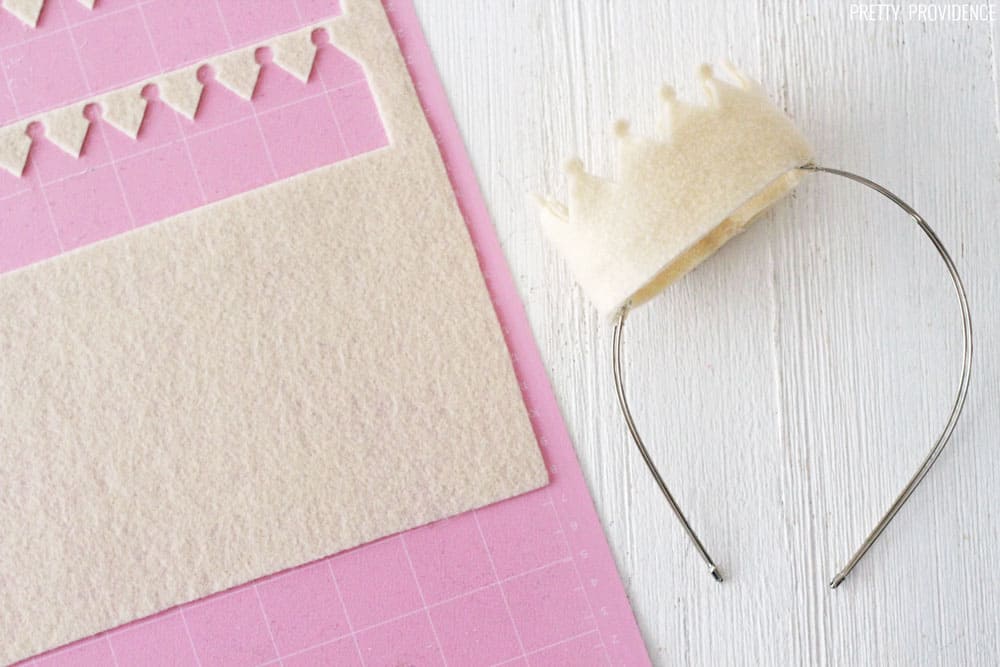
This will cut two layers of felt. Use hot glue to stick them together, this gives them more of a sturdiness. No one wants a floppy crown.
Fold the crown around in a circle and cut any extra that you want off. I think I cut about 3 inches off mine. Use hot glue to make it round. Use more hot glue to stick either side to the top of the headband. Hold it still until the glue cools.
No-Sew DIY Princess Costume
Equipment
- Rotary Blade
- Heat N Bond fusible interfacing
- EasyPress 2 or Iron
Materials
- Tulle Dress
- 2-4 different fabrics
- FabricGrip Mat
- Fray Check
- Headband
- Felt
Instructions
How to Make Fabric Butterflies with Cricut Maker
- Click here to access the fabric butterfly template directly in Cricut Design Space. The butterfly images are available with Cricut Access subscription.
- Cut a piece of fabric and a piece of fusible interfacing into a 12x12 square. Use an EasyPress 2 or a regular iron to attach the fusible interfacing to the back of your fabric. Fusible interfacing gives the fabric a more stiffness, which is important so the butterflies don't flop around too much on the dress.
- Place the square onto your FabricGrip mat with the fusible interfacing side down, and the pattern facing up. Use a brayer to eliminate wrinkles.
- Load the FabricGrip mat into your Cricut Maker and load the rotary blade into the machine. Select fabric as your material, choose 'edit tools' and pick rotary blade. Now you are ready to cut!
- The rotary blade makes perfectly clean, gorgeous cuts. Can you even believe these edges?
- After carefully removing the butterflies from the mat fold the butterflies in half, pattern facing in. Use an EasyPress or iron and press down onto the butterfly, to give them a permanent fold. Trace the edges of each fabric butterfly with Fray Check so they won't fray and those beautiful edges will stay clean.
- Repeat this process of cutting butterflies with each fabric you are using. I did it 4 times.
- Once all of your butterflies are ready, use a hot glue gun to attach the them to the dress.
- I also had to make a cute butterfly wand to go with this princess dress. The easy tutorial is at the bottom of this post!
How to Make a Felt Crown Headband
- Access the crown template directly in Cricut Design Space.
- Load the crown template into your Design Space canvas. Put felt on FabricGrip mat and use a brayer to remove wrinkles.
- Load the mat into your Cricut Maker and load the rotary blade into the machine if it isn't already. Select felt as your material, choose 'edit tools' and pick rotary blade. Now you are ready to cut!
- This will cut two layers of felt. Use hot glue to stick them together, this gives them more of a sturdiness. No one wants a floppy crown.
- Fold the crown around in a circle and cut any extra that you want off. I think I cut about 3 inches off mine. Use hot glue to make it round. Use more hot glue to stick either side to the top of the headband. Hold it still until the glue cools.
Easy DIY Flower Princess Costume

How to Make Felt Flowers with Cricut Maker
Click here to access the felt flowers template directly in Cricut Design Space.
Felt Flower Supplies:
Cricut Maker
Felt in lots of different colors
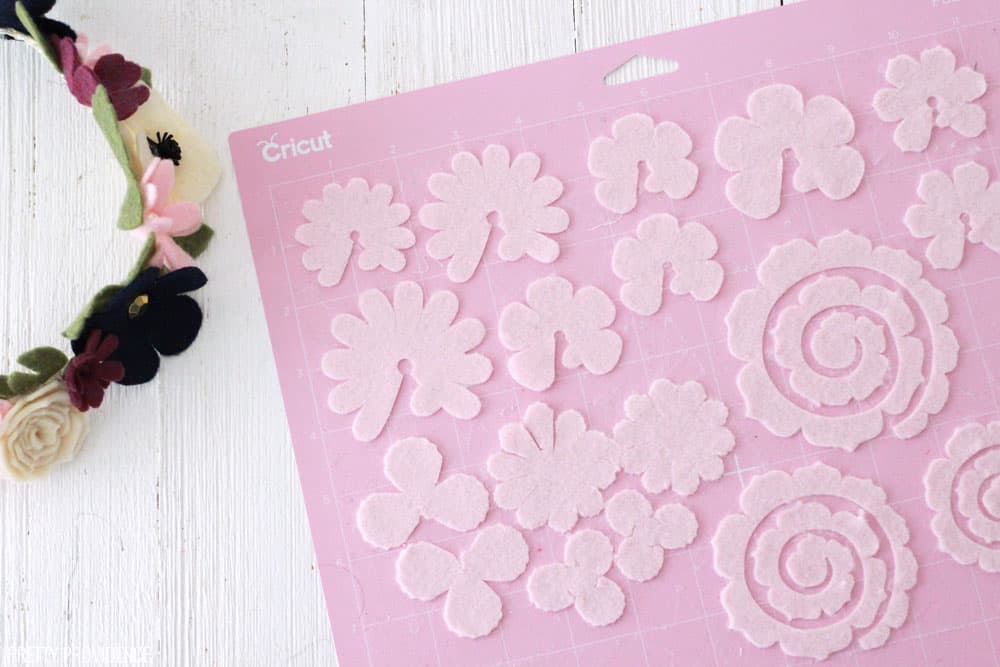
Cricut FabricGrip Mat
Brayer
Small pearls or rhinestones
Hot glue
Felt Flower Directions:
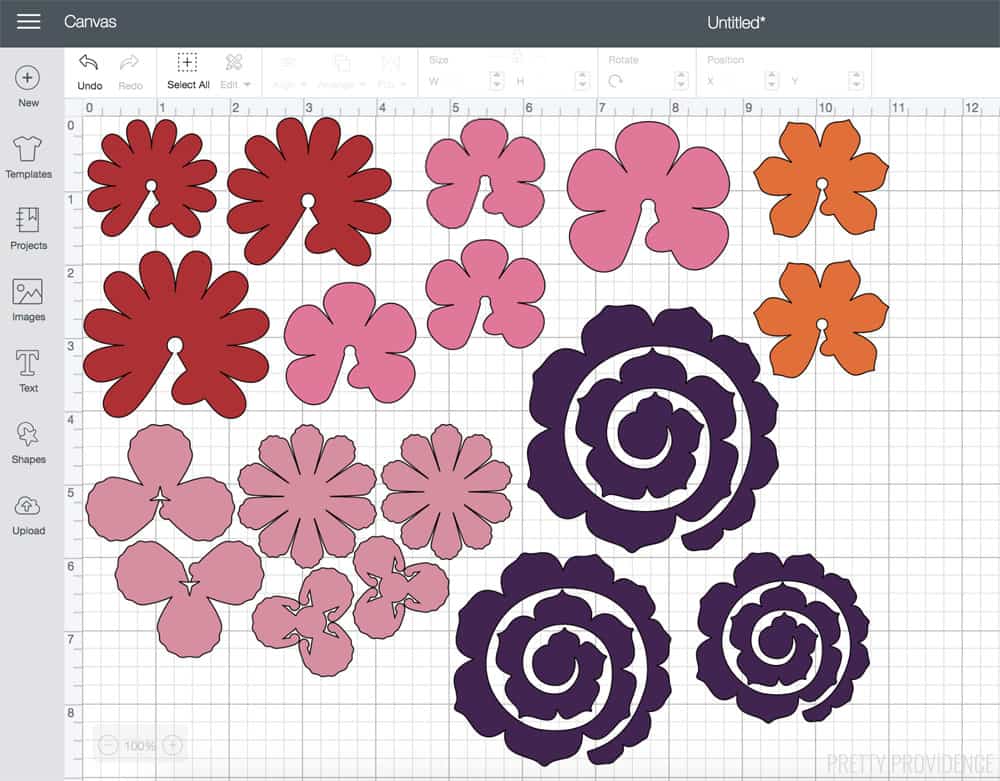
Making felt flowers can be really time consuming. I recommend doing this while you're watching something riveting on Netflix. I do have a few shortcuts that I've learned that helps the process go much more quickly. When you load one felt flower into your Cricut Design Space canvas, it will bring all of the different elements of the flower, and then gives your directions to load each different color into its own mat, and then cuts them each out one-by-one. If you're making a lot of different felt flowers, it's easier to cut all the pink parts at once, then all the purple parts, and then all the green, etc. You see what I'm saying?
To make this easier, I've loaded a bunch of the different flower templates into one design canvas. Use this template for each color of felt you want to use. Then, cut all of the leaves and greenery at once, too. Such a time saver! Click here to access the flower template directly in Cricut Design Space.
Load the mat into your Cricut Maker and load the rotary blade into the machine if it isn't already. Select felt as your material, choose 'edit tools' and pick rotary blade. Now you are ready to cut!
Don't forget the leaves! Click here to access the leaves template directly in Cricut Design Space.
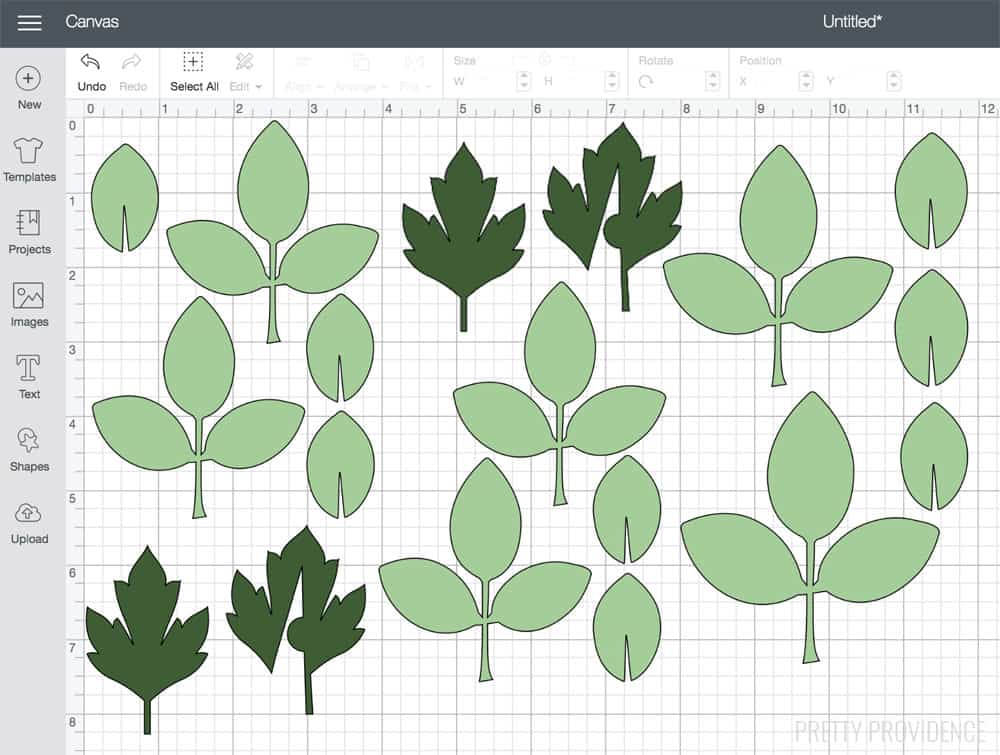
Assemble your flowers and glue them together with hot glue or fabric glue. Use rhinestones and pearls for the middles, or you can cut pistils out of card stock, like I did for the poppies!
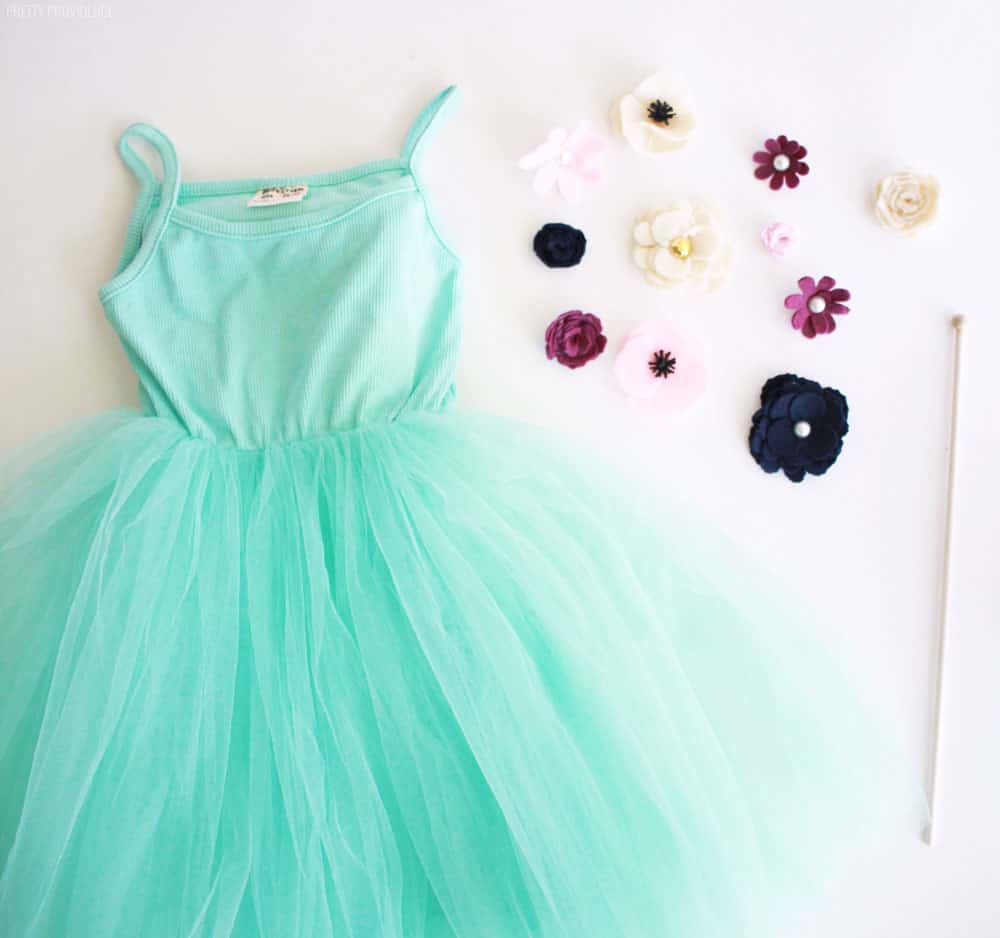
DIY Flower Princess Costume Supplies:
Cricut Maker
Blue Tulle Dress
Felt Flowers
Floral Wire
Ribbon
Flower Princess Costume Directions:
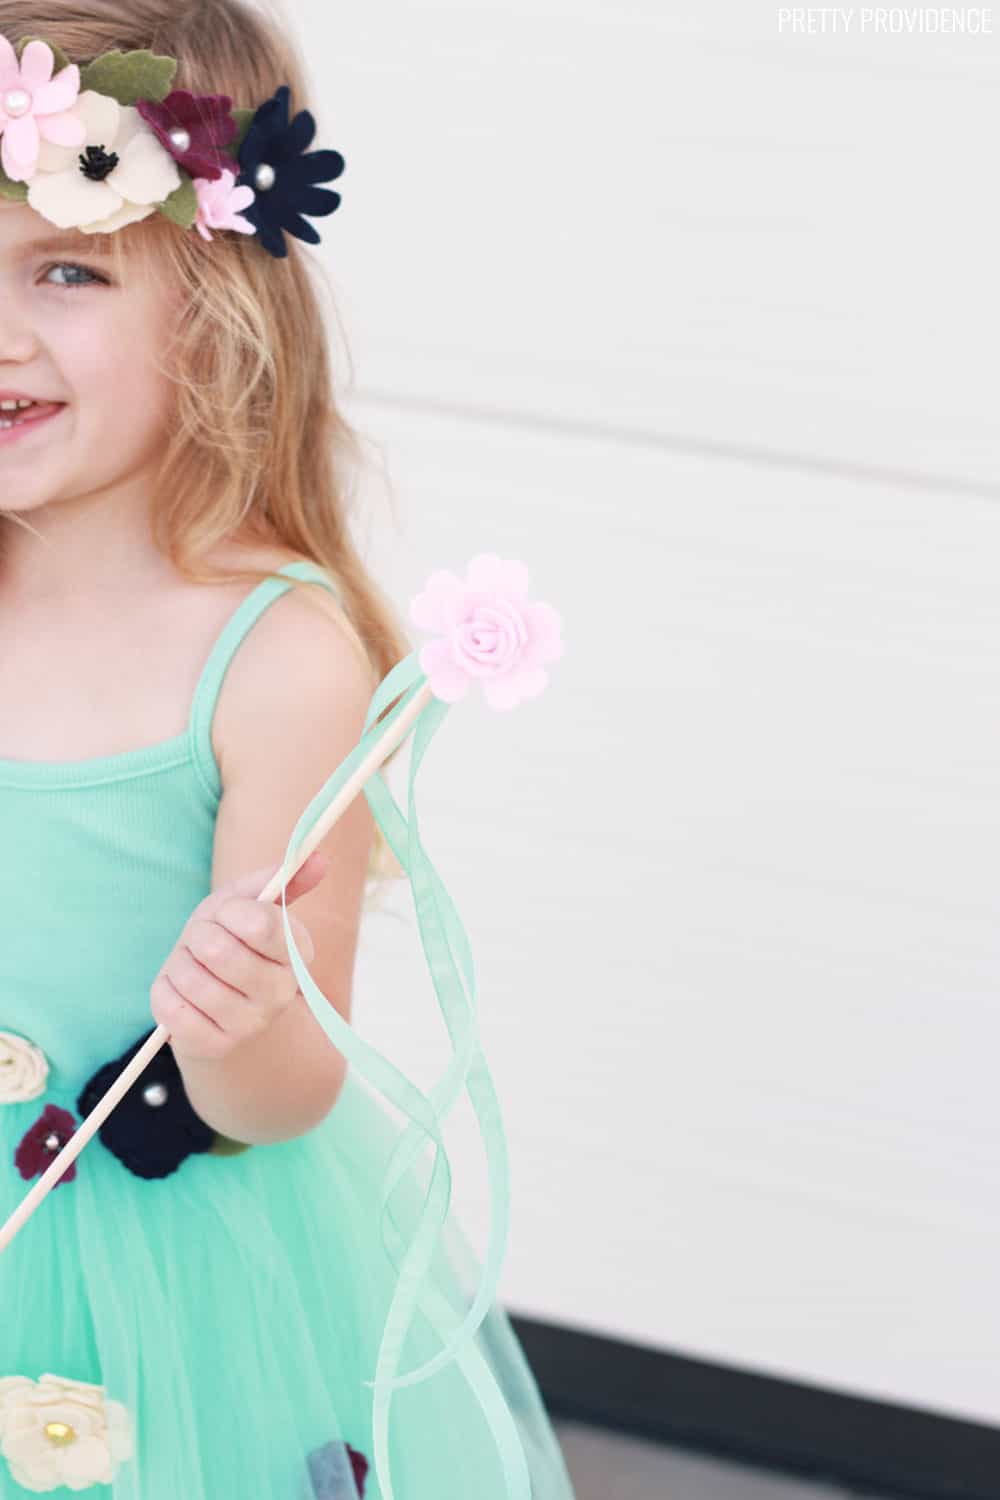
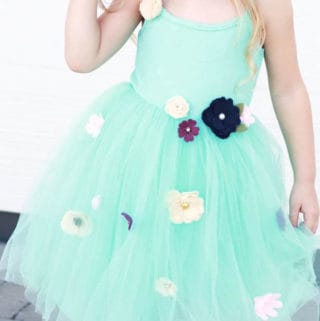
First, use hot glue to attach felt flowers all over the dress. Next, make a flower crown.
Felt Flower Crown Directions:
First, use floral wire to measure your head and cut it to size. Twist the ends together. Wrap ribbon around the floral wire.
Attach flowers and leaves around the edges of the ribbon-wrapped wire with hot glue. Let glue cool completely before trying to put the flower crown on.
DIY Princess Costume
Equipment
- Rotary Blade
- Brayer
Materials
- Felt in lots of different colors
- Small pearls or rhinestones
- Tulle Dress
- Floral Wire
- Ribbon
Instructions
How to Make Felt Flowers
- Search Cricut Design Space for 3D flowers, or open the felt flower template I made in Cricut Design Space.
- Load the mat into your Cricut Maker and load the rotary blade into the machine if it isn't already. Select felt as your material, choose 'edit tools' and pick rotary blade. Now you are ready to cut!
- Don't forget the leaves! Click here to access the leaves template directly in Cricut Design Space.
- Assemble your flowers and glue them together with hot glue or fabric glue. Use rhinestones and pearls for the middles, or you can cut pistils out of card stock, like I did for the poppies!
- Use hot glue to attach felt flowers all over the dress. Next, make a flower crown.
How to Make a Felt Flower Crown
- First, use floral wire to measure your head and cut it to size. Twist the ends together. Wrap ribbon around the floral wire.
- Attach flowers and leaves around the edges of the ribbon-wrapped wire with hot glue. Let glue cool completely before trying to put the flower crown on.
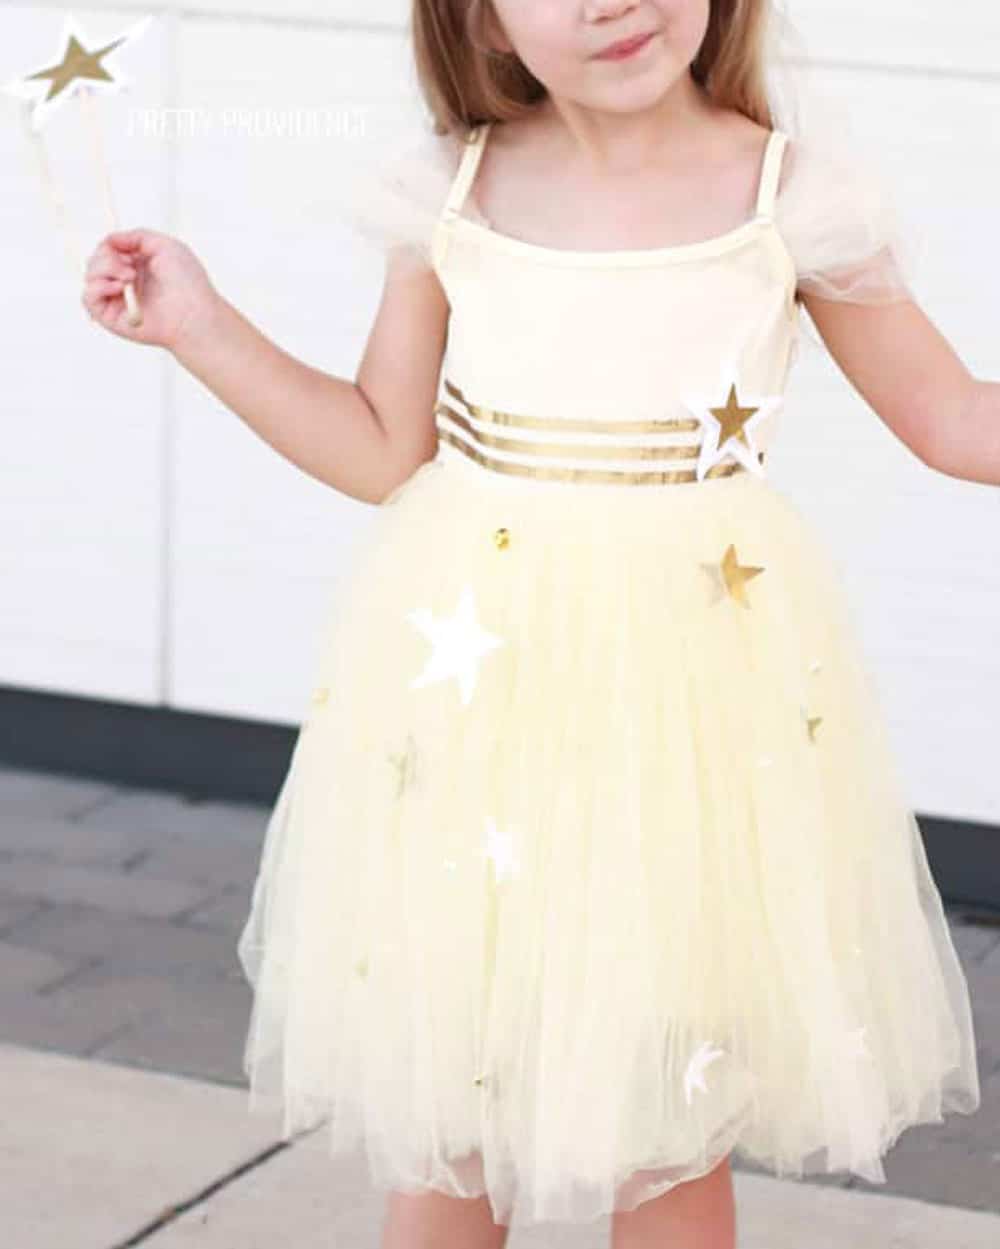
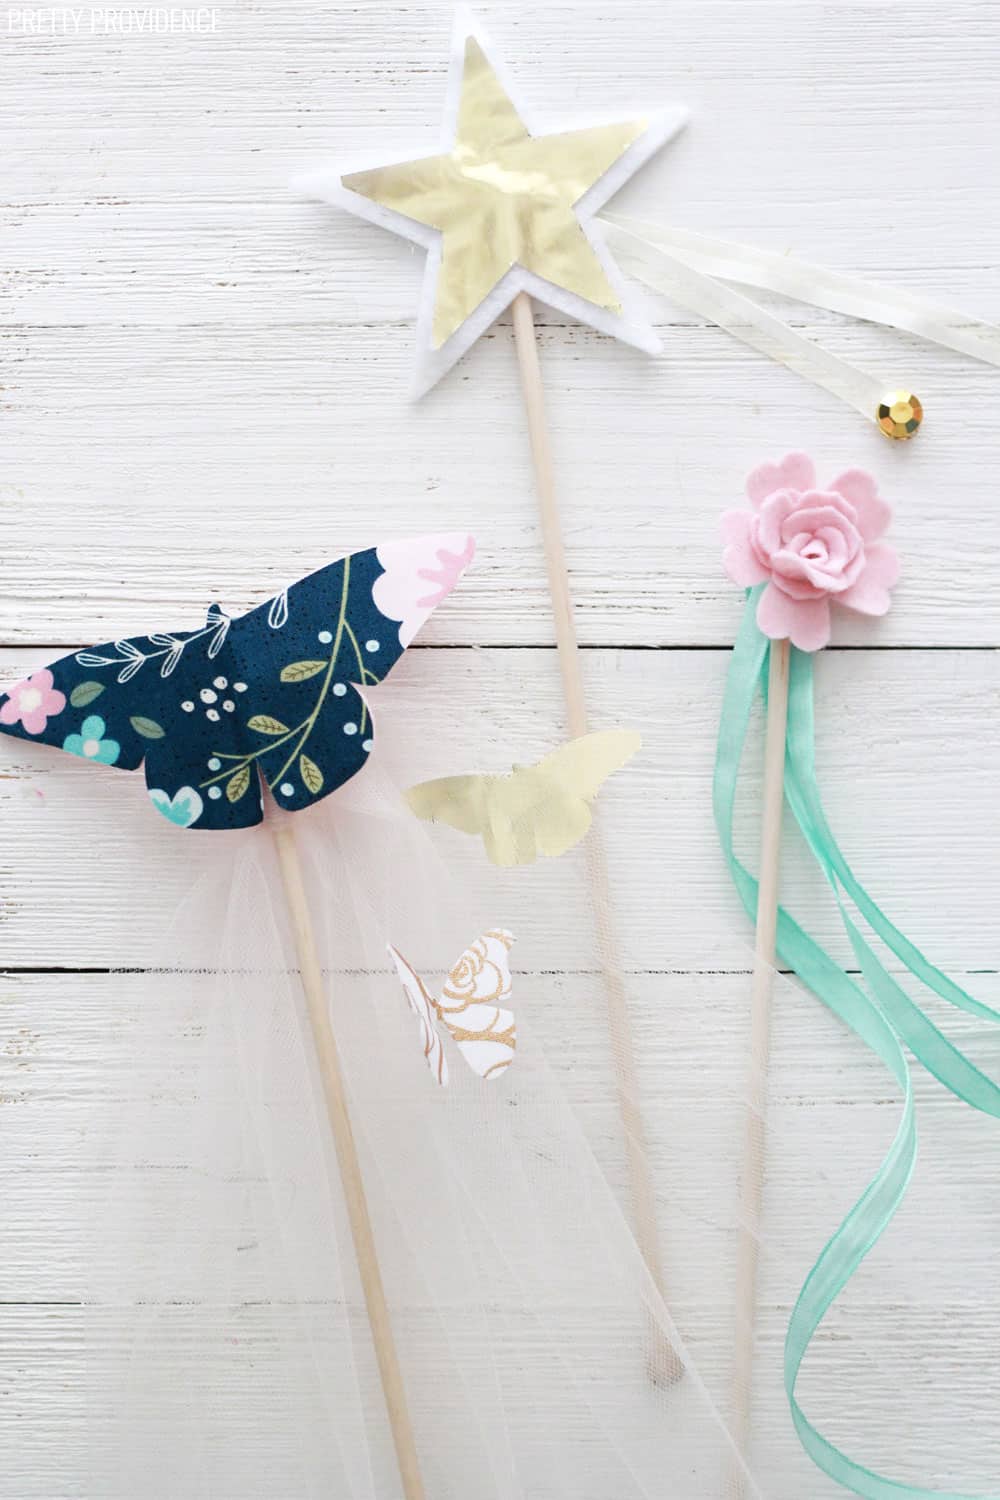
Easy DIY Star Princess Costume
Supplies for the Star Princess Costume:
Cricut Maker
FabricGrip Mat
Standard Grip Mat
EasyPress 2 or Iron
Yellow Tulle Dress
White Felt
Metallic Gold Iron-On
Gold SportFlex Iron-On
Headband
Felt Crown Headband (tutorial above)
Rhinestones and Pearls for Embellishment
Yellow Tulle (optional)
How to Make Felt Stars
Click here to access the felt stars template directly in Cricut Design Space.
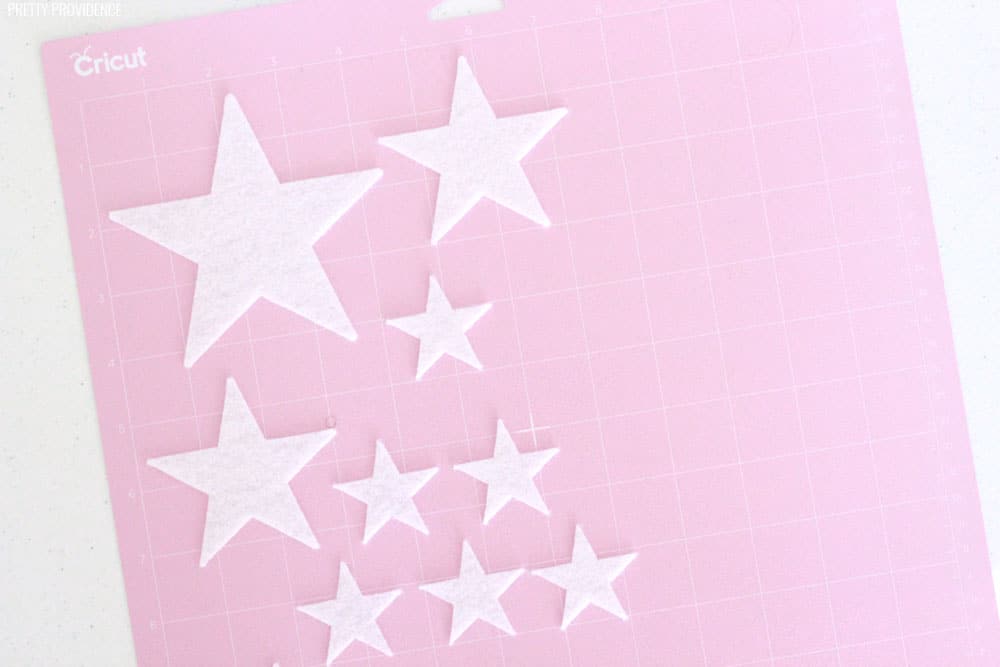
First, attach white felt to a FabricGrip mat and use a brayer to eliminate wrinkles.
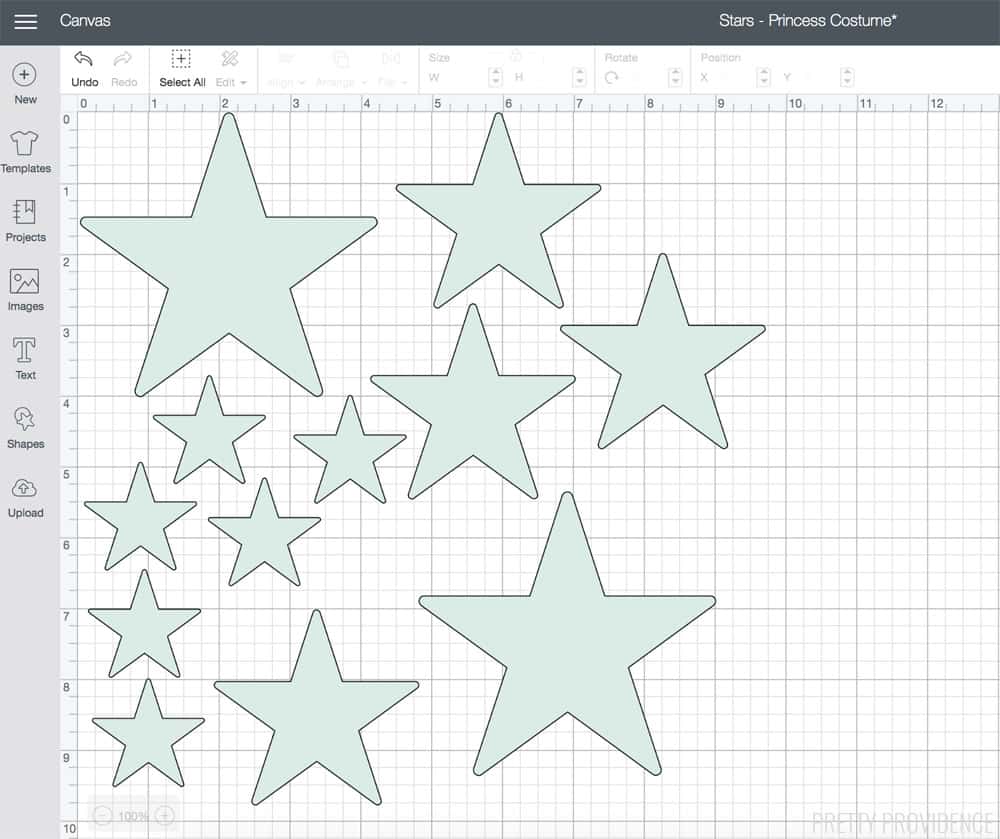
Next, load the mat into your Cricut Maker and load the rotary blade into the machine if it isn't already. Select felt as your material, choose 'edit tools' and pick rotary blade. Now you are ready to cut!
Felt Stars with Iron-On Directions:
Some of the stars needed to be shiny and gold, of course, so I used gold metallic Iron-On on top of felt.
Attach gold iron-on to a Standard Grip mat, shiny side down and cut stars using the same template you used for the felt. You will need to switch back to a fine-point blade to cut the iron-on.
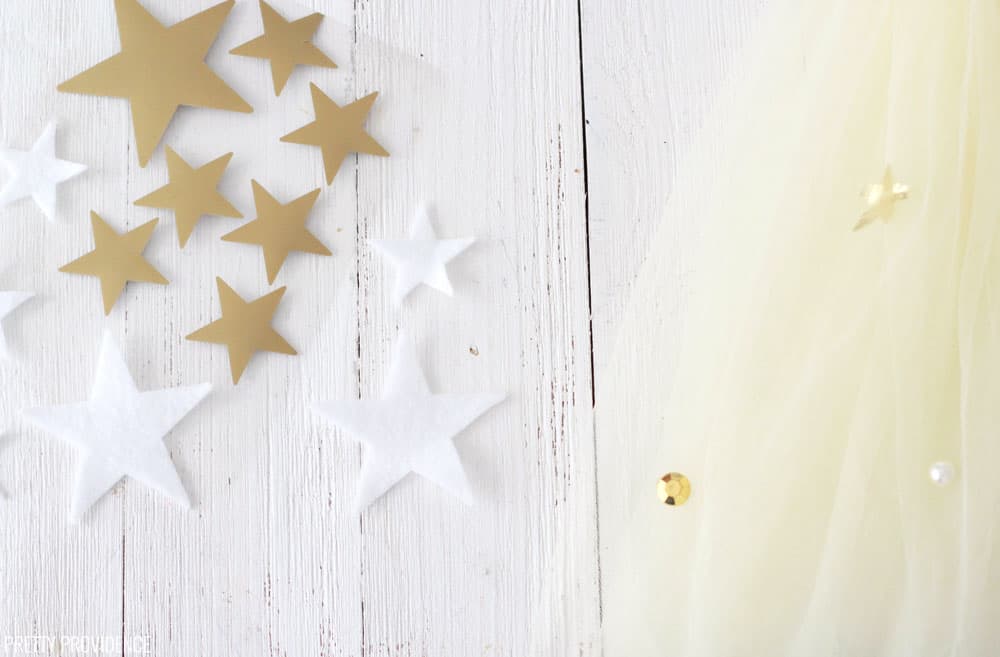
Once your iron-on stars are cut out, use an EasyPress or iron to attach the gold iron-on to the felt stars.
I had never used Iron-On on felt before but the Cricut website has a really good interactive heat settings guide for the EasyPress - so I just selected my materials and it gave me the directions! So cool...
Directions for the Star Princess Costume:
First, use hot glue to stick the white and gold stars to the dress.
Next, if you want to add the stripes like I did, I did that using SportFlex Iron-On. It was my first time using SportFlex, but the dress was so stretchy, I knew it was the only way I could add Iron-on details. I love how they turned out, and it was so easy!
Then, add rhinestones and pearls to the tulle with hot glue, very carefully. This is a delicate process, and you don't want the glue to go through more than one or two layers of tulle. I love how they add some extra sparkle and shine to this star princess costume.
Stick two or three felt and gold stars to the felt crown headband.
Last but not least, and totally optional...
How to add extra tulle to the sleeves:
Fold tulle until it's at a thickness you like. The best way to do this is to have your little one wear the dress so you can measure how long the tulle should be for this. Everyone's arms will be different! Use hot glue to attach the tulle to the front and back corners of the dress.
How to Make DIY Princess Wands
DIY Princess Wand Supplies:
Fabric Butterflies
Felt Stars
Felt Flowers
Tulle
Hot Glue
12" Wooden Dowels
Gold Satin Ribbon
Princess Wand Directions:
Take a wooden dowel and use hot glue to attach flowers, stars or butterflies to the top.
For the star wand, use two felt stars so it is double-sided. Add ribbon embellished with rhinestones and stars at the ends for a shooting star effect.
To make the butterfly wand, glue a fabric butterfly for one side, and a felt butterfly in the same size for the back. Attach tulle to the bottom of the butterfly and use hot glue to attach small fabric butterflies to the tulle.
I am so SO happy with how these easy princess Halloween costumes turned out, and so is June! She loves them and wants to wear them all the time. The dresses are perfect for twirling. Do you like to make Halloween costumes?


I can’t access your flower template in design space - the link just takes me to design space. Is there another link or way to search for it! I love the dresses!
Oh weird! It works for me... try this link too and let me know if that doesn't work: https://design.cricut.com/#/landing/user-project/109628999
THose are adorable!
Thank you!!
Oh my gosh you are so talented! These tUrned out amazing! Thanks for sharing how to make these!
Aw, thank you so much!!! You're so sweet.
Such an adorable outfits! Beautiful!
Thank you so much!
This is the best! my daughter would go crazy over all of these ideas.
These are so adorable! Such great ideas to make them extra cute! Thank you for sharing!
Thank you!!!
These are so precious!! I really need to learn how to use my Cricut machine. What an easy way to make the cute and simple dress perfect as a Halloween costume!!
Thank you so much! Yes, I used to be so intimidated by my cricut but it's SO easy once you get started!