Under the Stairs Craft Storage Closet
This under stairs storage closet has been transformed into craft storage heaven! This is the craft closet of my dreams, with tons of organization. Ribbon storage ideas, Cricut iron-on vinyl, scrapbook paper storage, and more!

Hey friends. I am ecstatic to be able to share my under stairs craft storage closet with you today.
Last year, I realized the way we were using our under stairs closet was not efficient. Being that it's our biggest closet, and we don't have a basement, it was just filled with random things. I'd started putting craft supplies in there too.
I craft and use my Cricut Maker at least once a week (sometimes more) and I found myself struggling to find things when I needed them. It drove me bananas, and I decided to re-think the closet.
To get started, I had to relocate a lot of stuff to the garage (a project of it's own!) Then I could create a functional craft storage, with easy access to what I need, right when I need it!
*This post contains affiliate links.
Before and After Under Stairs Closet
Before we get down to the nitty gritty, do you want to see a before and after? This poor under the stairs closet had nothing going for it.
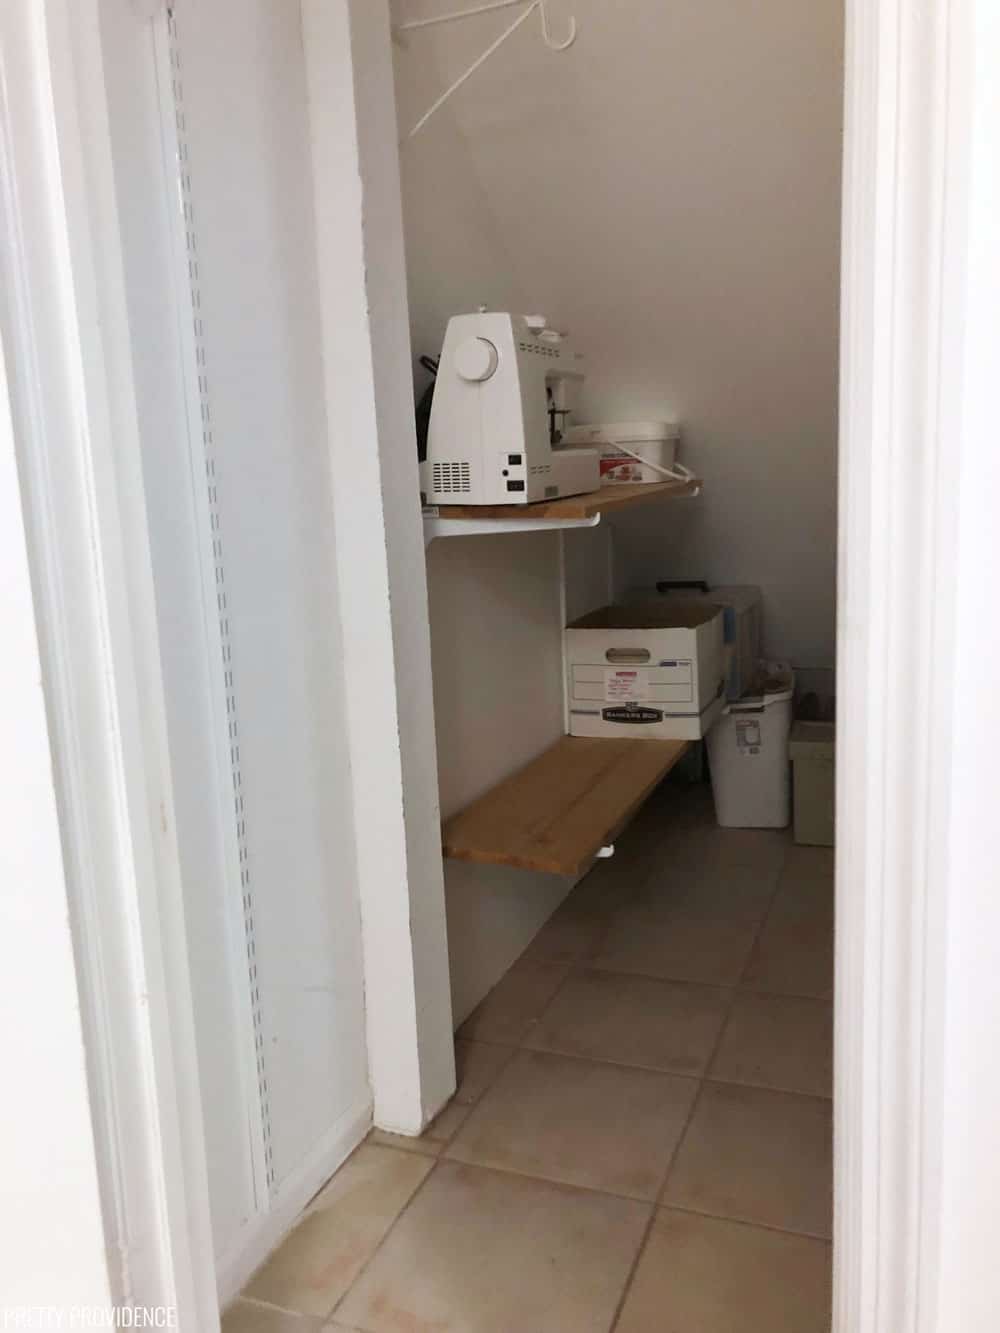
Here is my craft storage closet NOW. It makes me so happy to see how far this closet has come!
Turning my Under Stairs Closet into Craft Storage
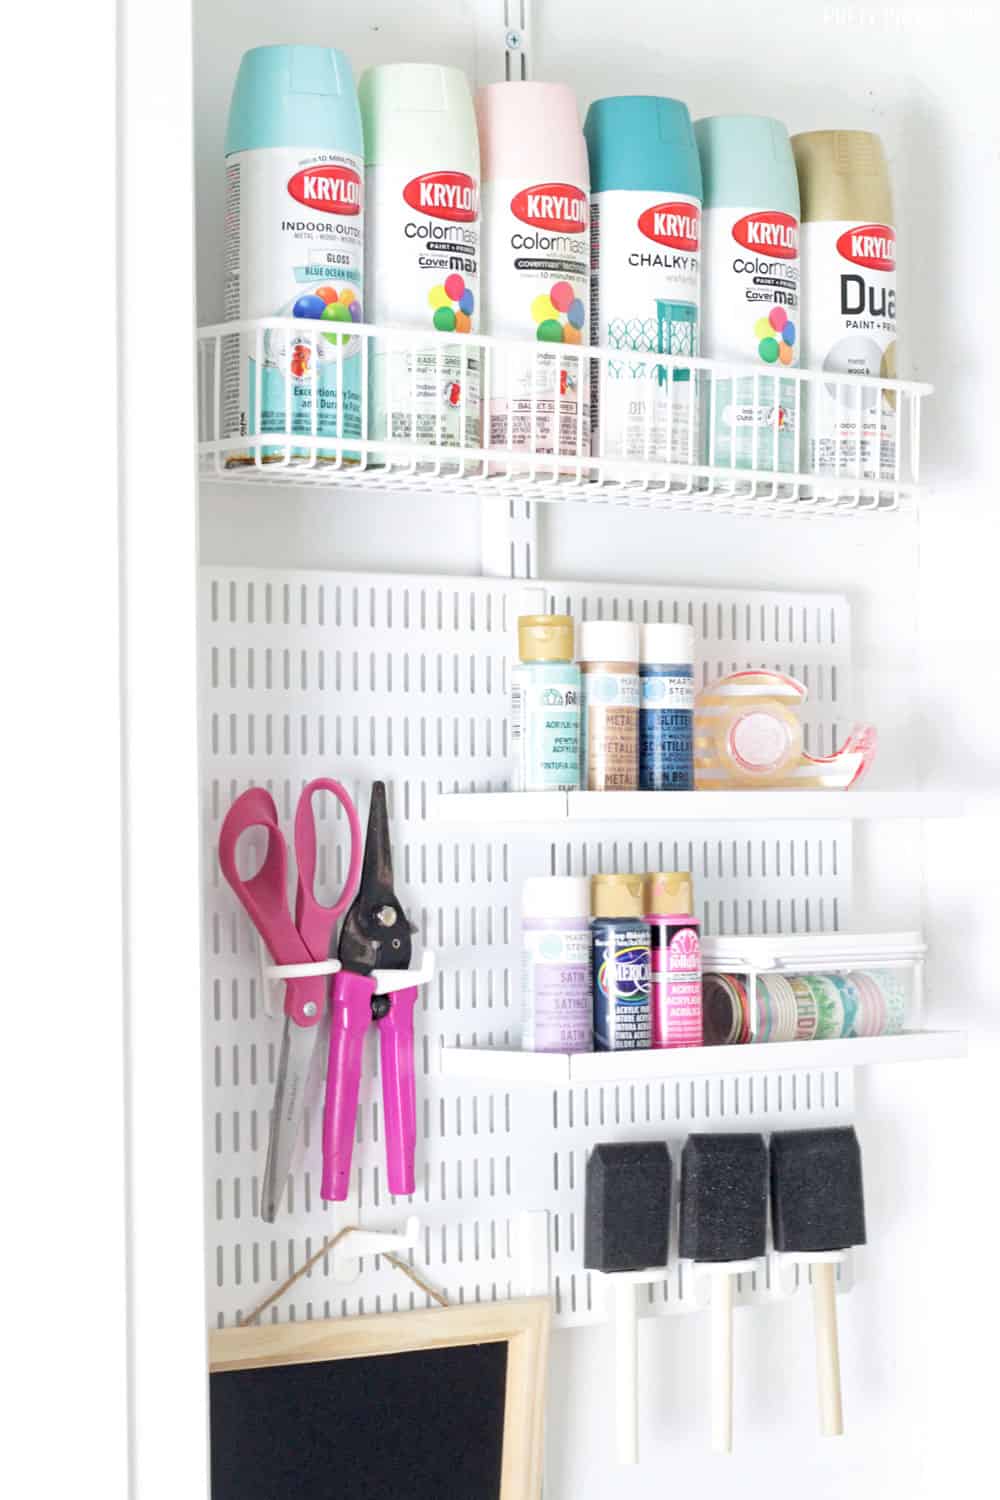
The elfa System
I knew that one of the keys to organizing this under stairs storage space was to have everything in plain sight, and nothing on the floor!
I went to my happy place, The Container Store, and found the elfa system.
It's organizing system that consists of wall mounts that you can customize perfectly to your needs; you can add baskets, pegboard, shelves, and more to it.
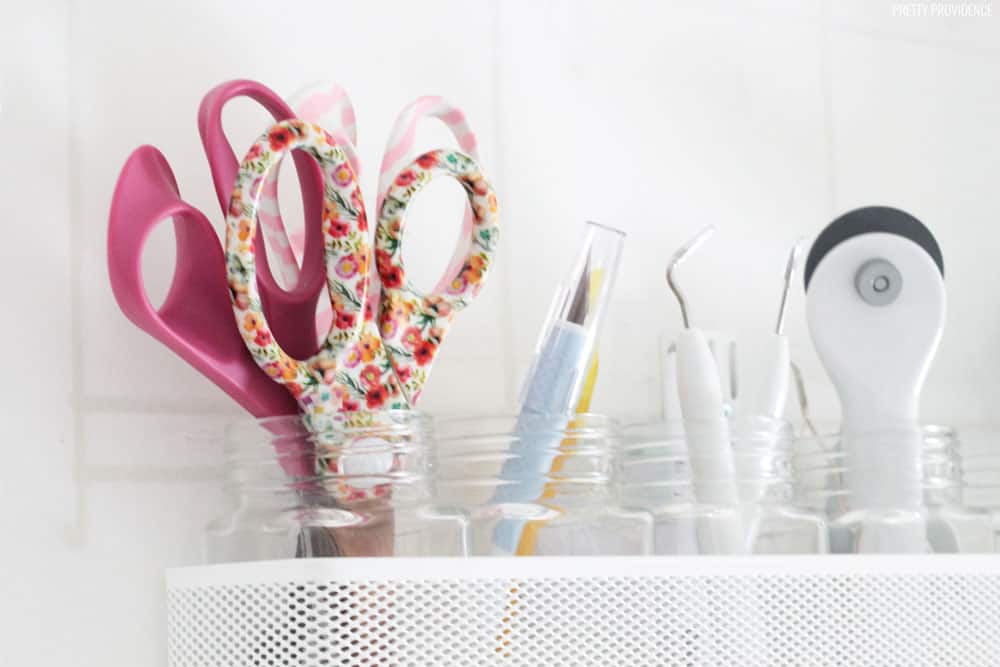
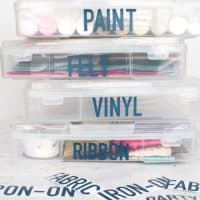
I mainly went with the baskets - and LOVING how they display my Cricut iron-on and vinyl so perfectly.
Also decided to get one utility pegboard, and one of their wrapping paper baskets which is honestly life-changing. I keep wrapping paper in it, as well as tall tools like paper cutters, rulers, a level, and my camera tripod!
One of the reasons I took so long to finish this project is because I did the elfa in installments. It's not cheap, but super worth the investment because of the lack of storage space in my house.
I bought the first wall-mount and baskets in July, then I added more in September, January and now, March. Waiting in between was so hard, but you've got to do what you've got to do!
Now, I always know where my scissors, tape, Cricut tools, and materials are! It's the best, you guys!
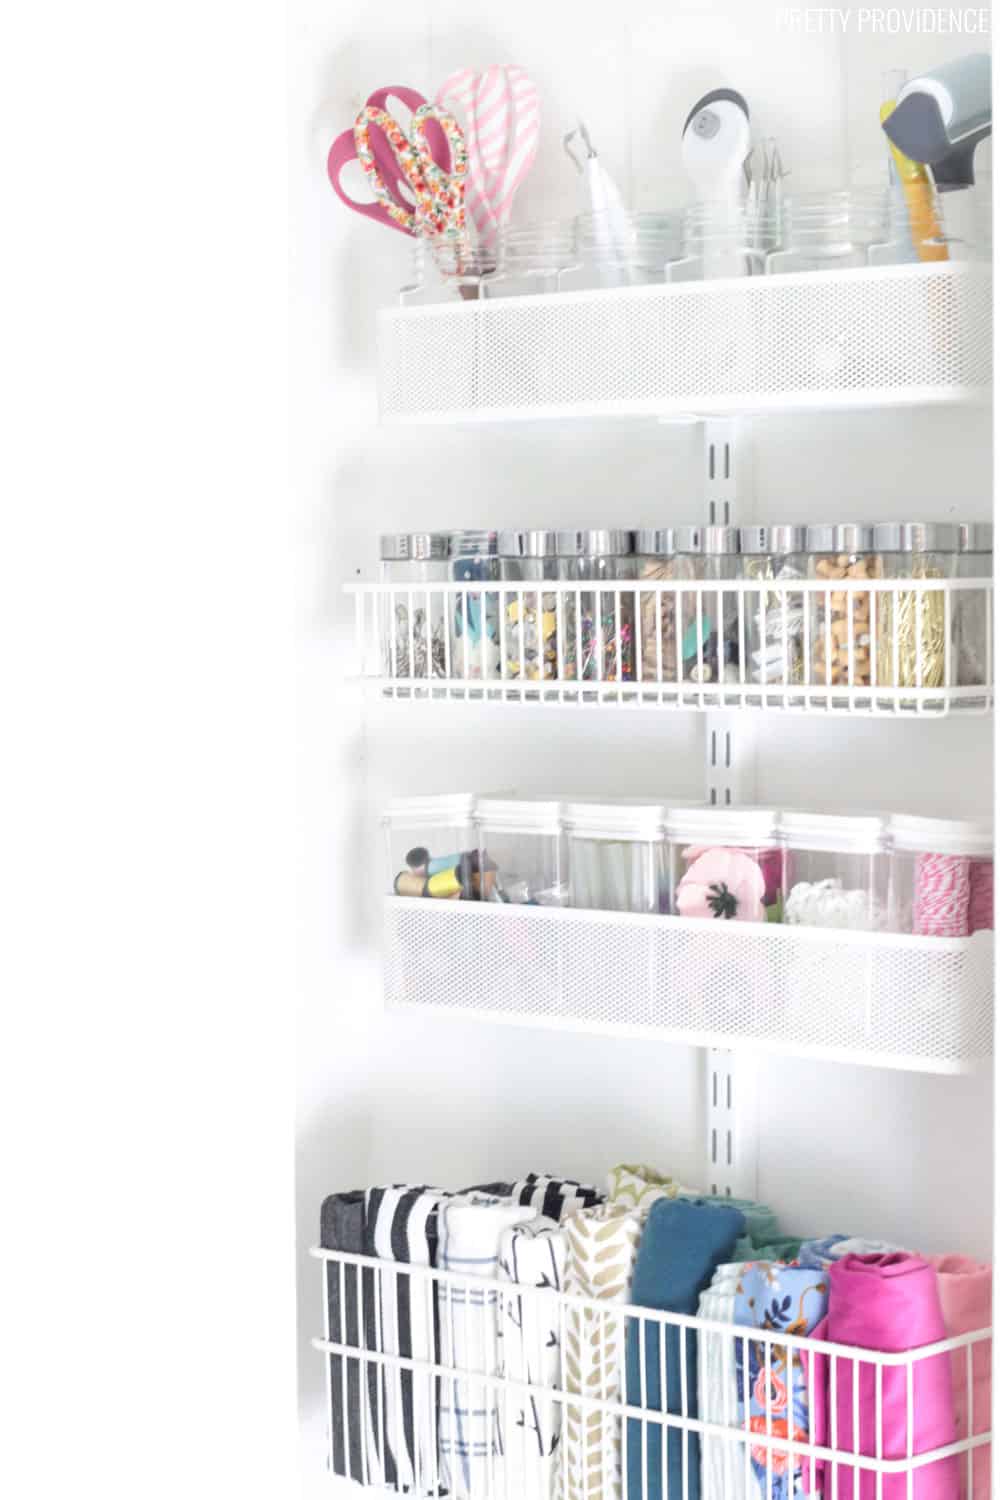
I love being able to keep my scissors and sharp tools at easy-access but still up VERY high so my littles can't get to them!
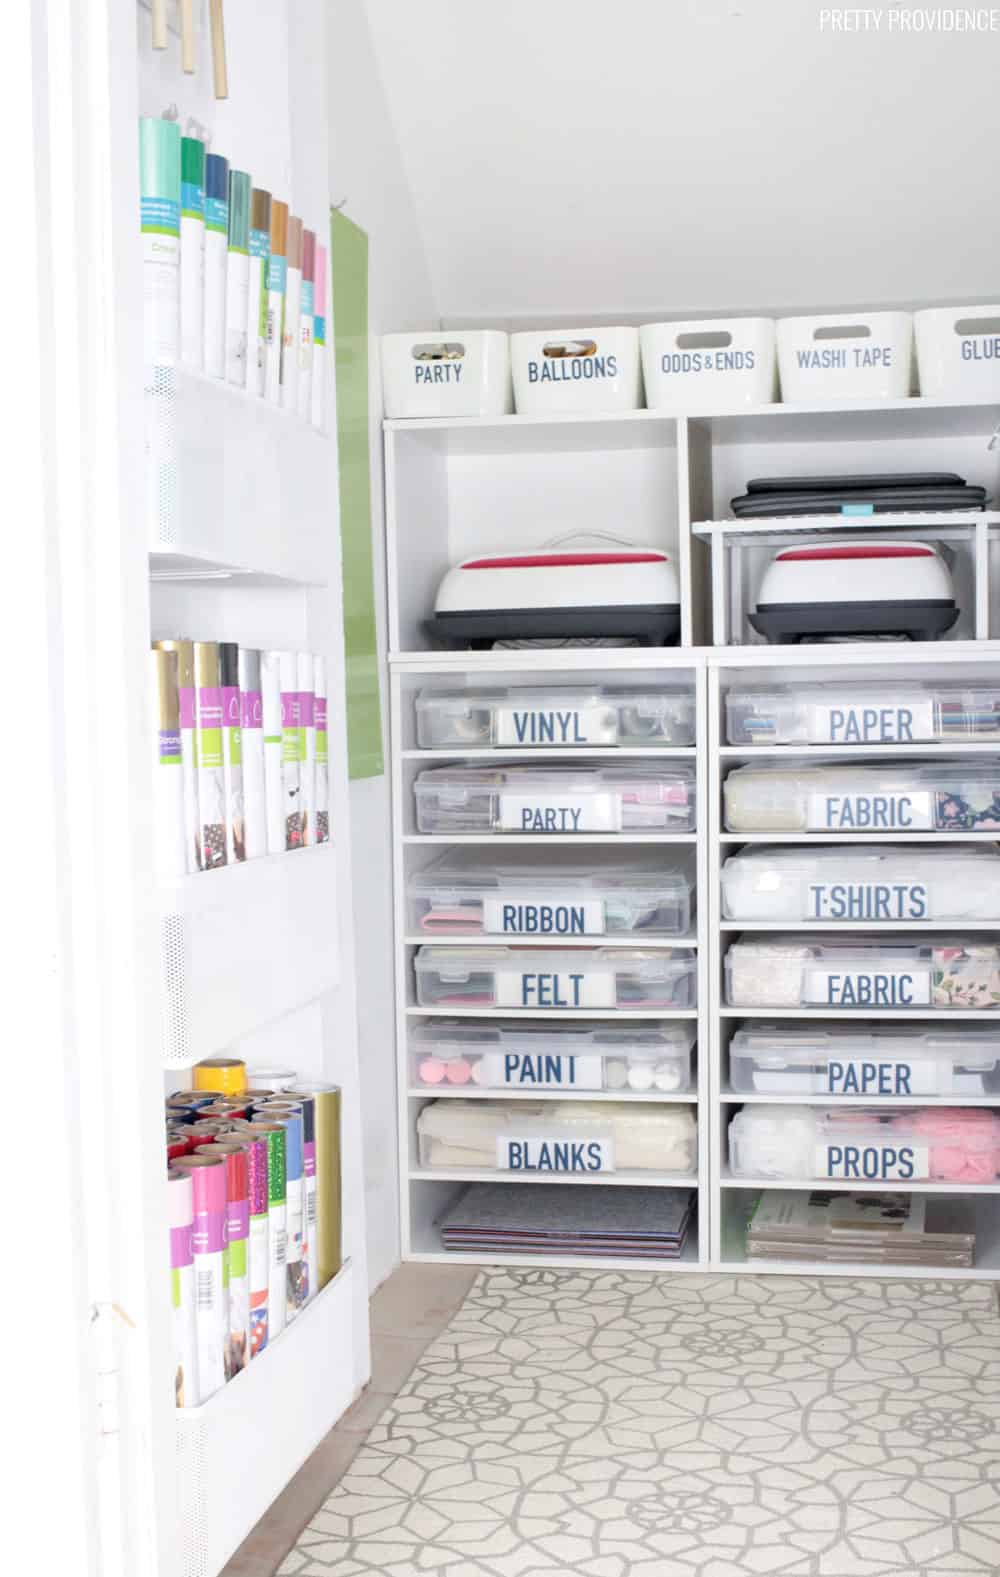
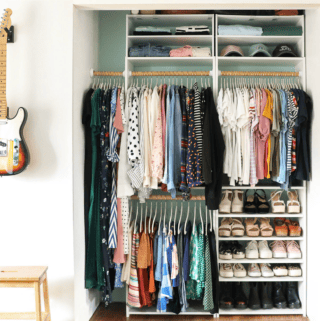
Craft Storage Shelves
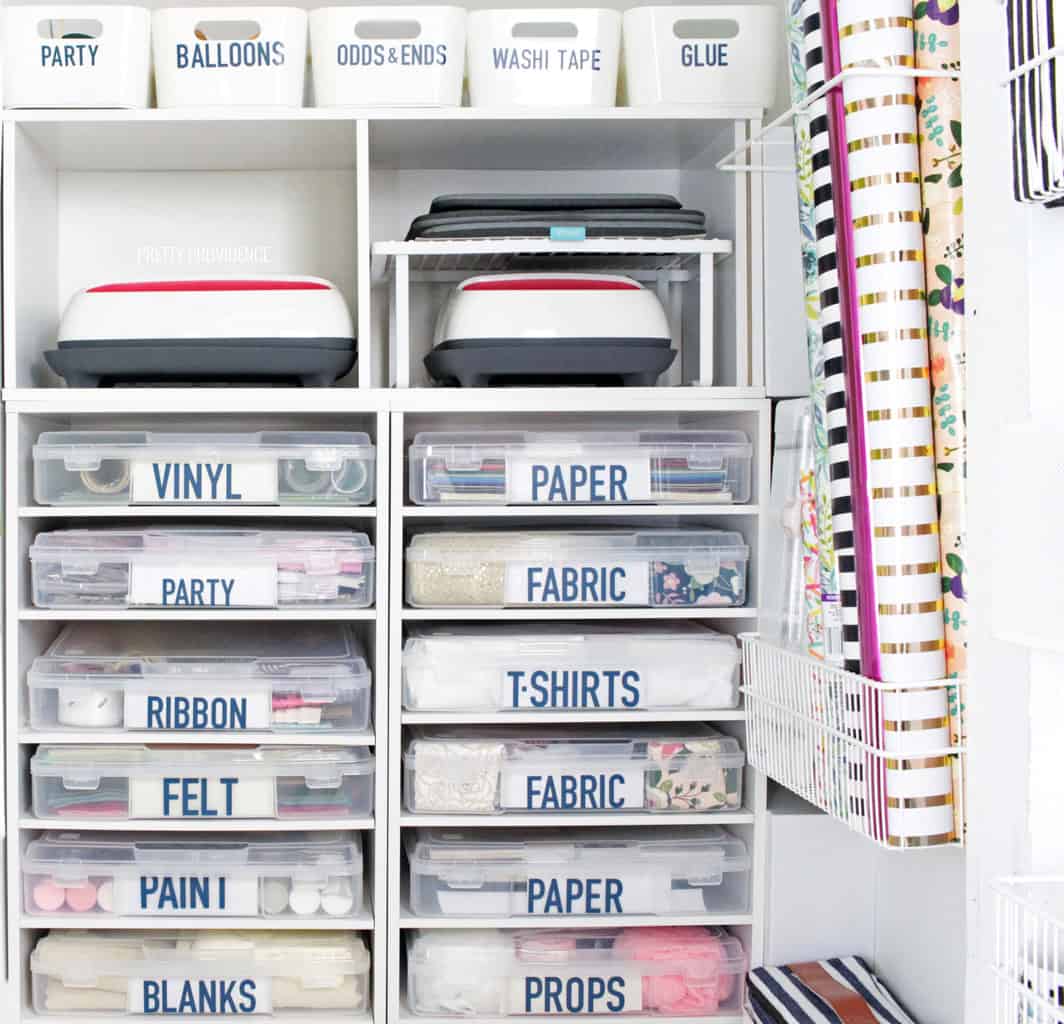
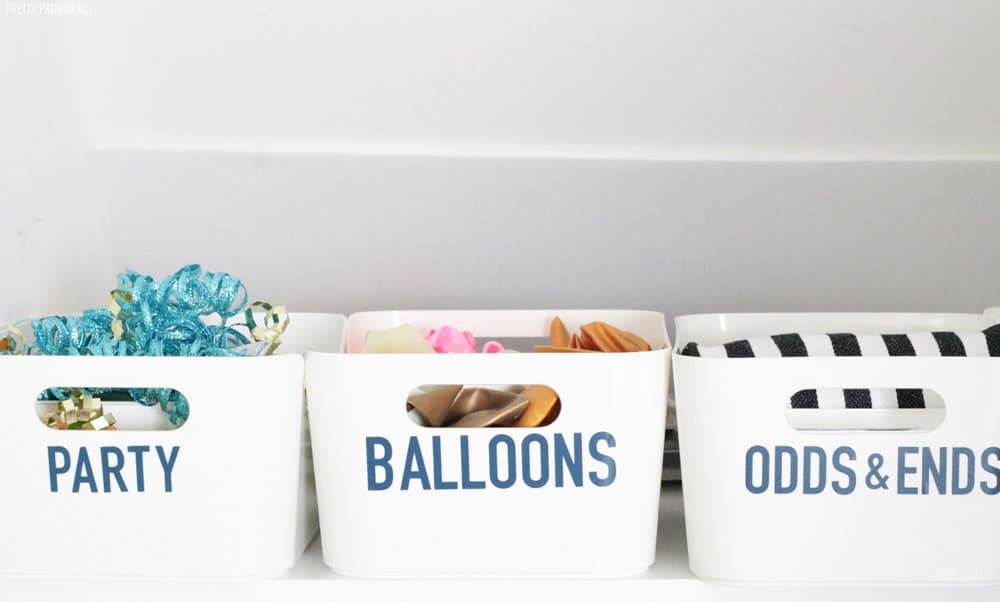
Aside from the wall-storage, I decided to get some shelving and craft storage bins for the back of the closet. I actually kind of blocked off the very back corner, but that was always impossible to get to through the mess anyway. So, I decided to store things back there that I literally never need to access until we move, and just put the shelves in front.
The two craft shelves are from Michael's and the top one is actually a sideways ClosetMaid shelf.
It is perfect for holding my both of EasyPresses and EasyPress mats!
The clear 12x12 bins fit like a glove into my shelves and they are great for storing 12x12 paper, felt, vinyl, and a LOT of acrylic paint.
Label all the things
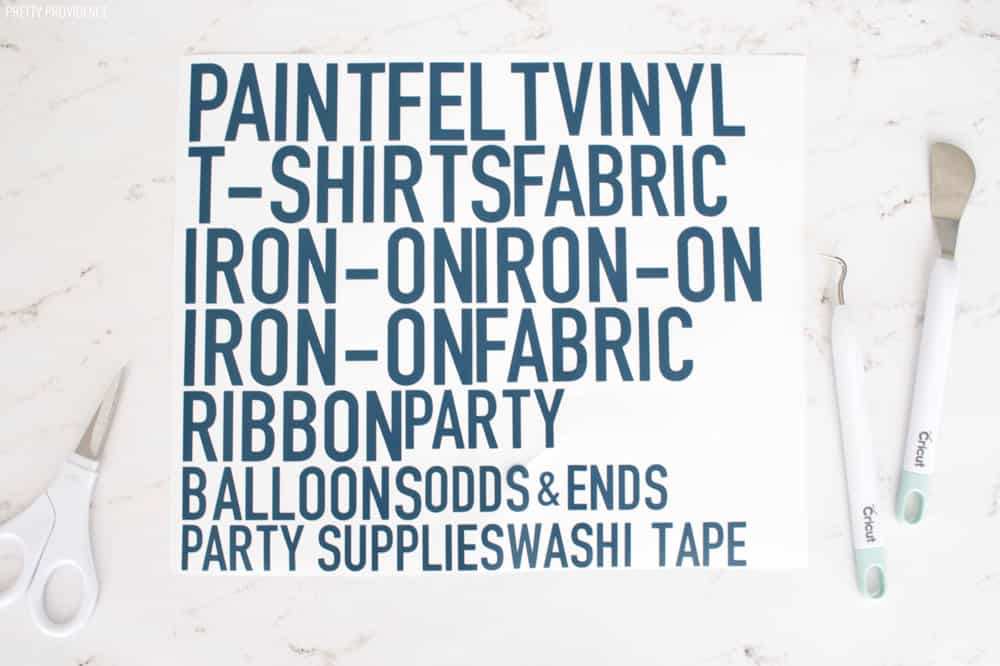
How to Make DIY Labels for Craft Storage
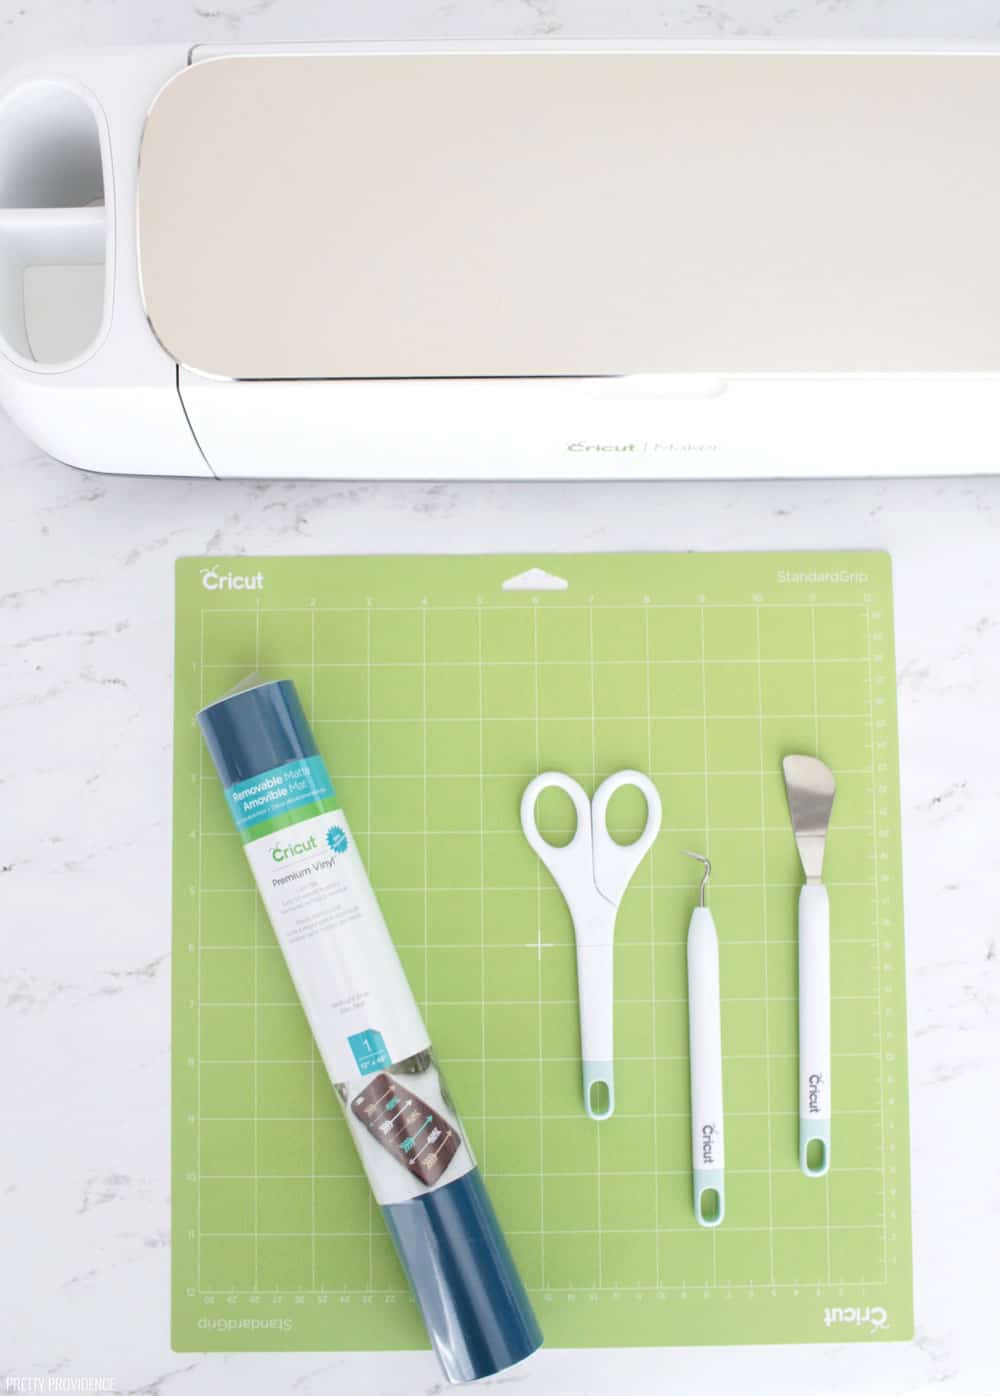
I made all my labels with Cricut Maker and Cricut removable vinyl in this beautiful Midnight Blue color with a matte finish. I am obsessed with this color. Removable vinyl is perfect for organizing projects, because it can be removed easily and leaves no residue.
Materials:
Tools:
Instructions:
- First, decide what labels you need. Everyone has different needs. You can use my canvas in Design Space to get started and customize it to your needs. Simply remove the words you don't need, and add those that you do.
- Measure the area on your bins and size your words or phrases appropriately.
- I used one of my favorite bold fonts, DIN Condensed, to make these craft storage labels.
- When you add a new word, make sure to select the word, then 'attach.' so that the word will stay together when you go to cut your vinyl.
- After you have all the labels designed, put your material on your mat and load it.
- Follow the prompts in Design Space to cut the vinyl.

So, after your labels are cut, you will weed. This removable vinyl is really easy to weed, so even with a lot of words it doesn't take too long. (Party emoji!)
Next, you will need Cricut transfer tape to apply the labels to plastic bins. Transfer tape allows you to keep words or images together while you move them from their original vinyl sheet, onto the plastic bin. It's really cool stuff! Check out my full tutorial on how to use Cricut transfer tape.

FAQ: Do I have to have a Cricut Maker to cut vinyl?
Nope. I used the Cricut Maker, but you can do this project with other cutting machines. You can't go wrong with Cricut Joy or Cricut Explore Air 2 either!
More Craft Storage Ideas
I put a few small white plastic bins on the top of my bookshelf to hold smaller items as well. I love these!
Ribbon Storage
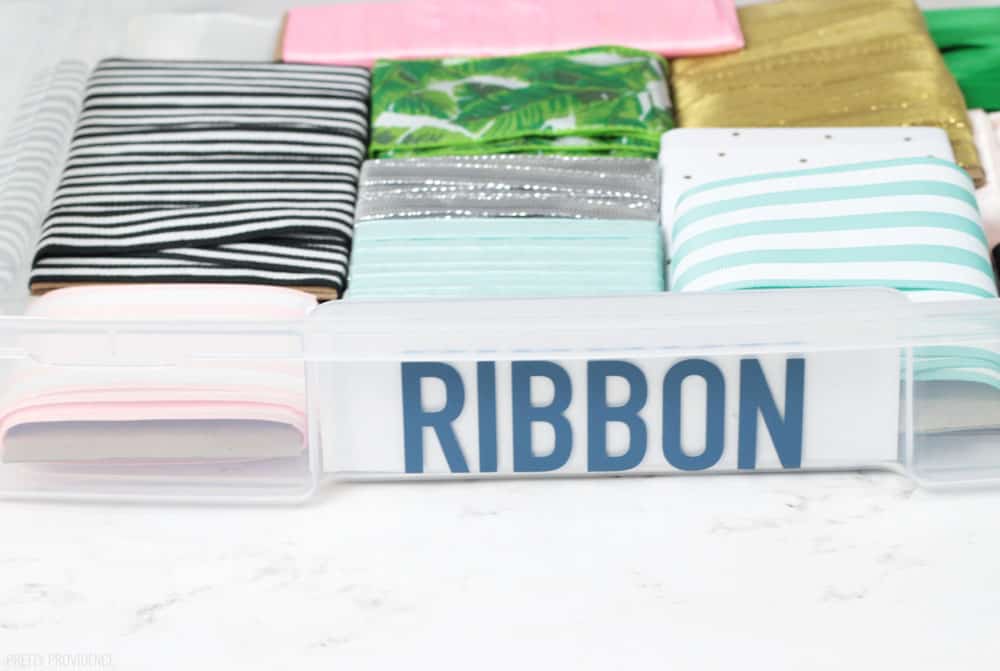
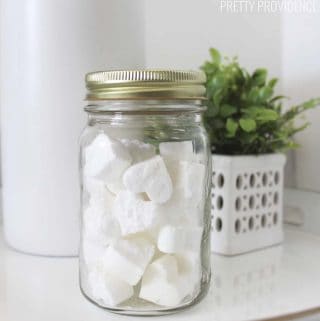
I know I am not the only one who has been looking for ribbon storage ideas. This is the best solution I've found to save space. Take ribbon off of the spool and wrap it around a small cardboard rectangle. This way, your ribbon can easily lay flat in a storage bin, drawer, or basket. I honestly can't believe how big some of the ribbon spools are that I had. They can take up a full five or six inches of space! This is so much better!
Use a Cricut TrueControl Knife to cut pieces of cardboard for this.
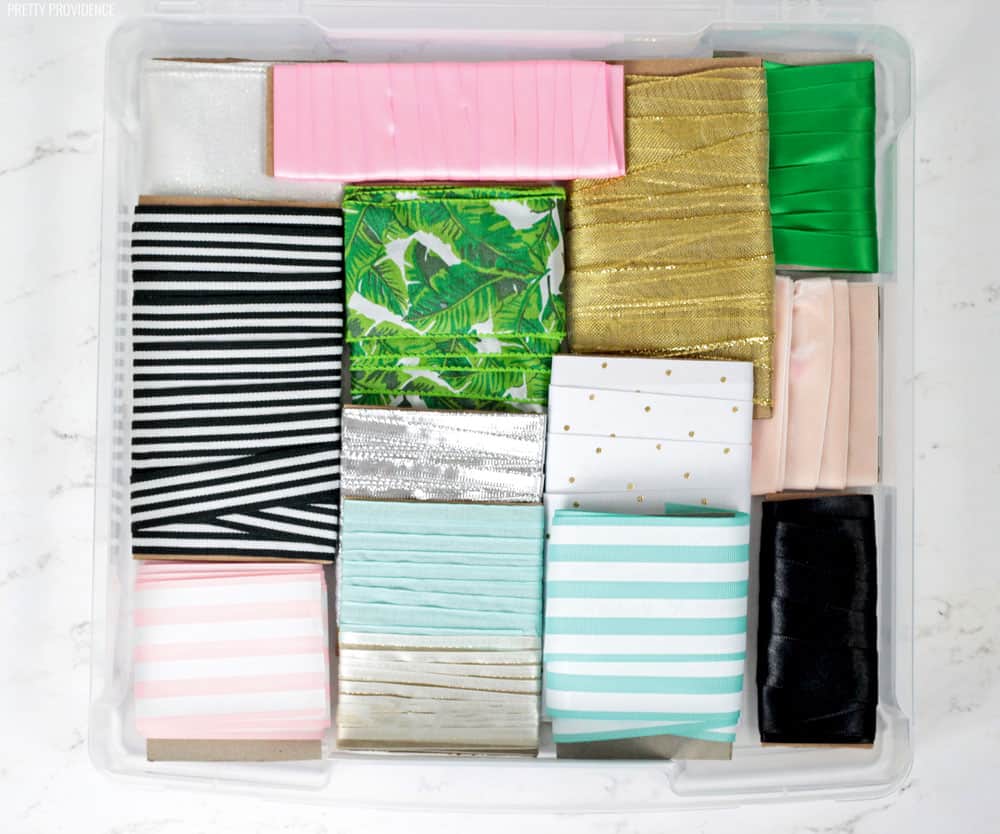
I used scotch tape to hold the ribbon on the spool! Even if I take the bin and shake it up, the ribbon will stay wrapped nicely.
Quick Links to all the things I use for Craft Storage:
- Elfa System
- Craft Storage Shelf
- Clear 12x12 Bin
- White Plastic Bin
- Spice Jars
- Small Containers with White Lids
- Cricut Maker
- Removable Vinyl for Labels
- Cricut Tool Set
- Label Maker
So, if you have a small space to work with for craft storage, I hope you will find some of these ideas helpful! It's SO worth it to organize everything so you have more time to CRAFT!
More Organization Ideas
- Closet Makeover (Target Bookshelf Hack)
- My Previous Craft Room
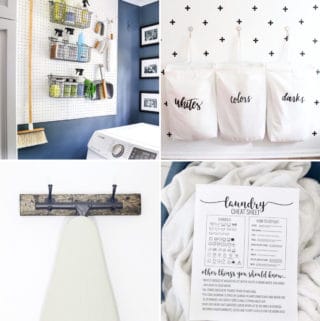
- DIY Laundry Organization Bags
- Walk-in Closet Ideas
- Tiny Mud Room
DIY Labels for Craft Storage
Equipment
- Cricut Tool Set
Instructions
- First, decide what labels you need. Everyone has different needs.
- Measure the area on your bins and size your words or phrases appropriately.
- I used one of my favorite bold fonts, DIN Condensed, to make these craft storage labels.
- When you add a new word, make sure to select the word, then 'attach.' so that the word will stay together when you go to cut your vinyl.
- After you have all the labels designed, put your material on your mat and load it.
- Follow the prompts in Design Space to cut the vinyl.
- After your labels are cut, you will weed. This removable vinyl is really easy to weed, so even with a lot of words it doesn't take too long. (Party emoji!)
- Next, you will need Cricut transfer tape to apply the labels to plastic bins. Transfer tape allows you to keep words or images together while you move them from their original vinyl sheet, onto the plastic bin. It's really cool stuff! Check out my full tutorial on how to use Cricut transfer tape.

Hello,
Can you share the specific pieces that you bought from the container store? Thank you.
They're Elfa system wall racks and door racks, with different mesh baskets, wire baskets, and pegboard. I found it best to buy each piece separately so I could have exactly what I needed to maximize the space.
Hi, I may have missed it. What font is it that you used?
DIN 1452!
Where did you get the white bins that store your vinyl?! It’s such a nice clean look - you knocked this craft closet out of the park!
Thank you so much! They are from The Container Store - it's part of the Elfa system they have there.
could you pop a link to the exact item i cant find it :(
Hi, here is the Elfa wall rack I used! The system is easy to mix and match to fit your space. https://rstyle.me/+SOcDMM444lRFawyCL0BhvA
I love this! We have a small hall closet (linen closet) that’s in my sons’ hallway and we use it for all things craft, coloring and writing. What is the white storage shelf that houses all of the 12x12s? That’s exactly what I’m looking for to go below the current shelves that would sit on the floor. Thanks for sharing!!
Yay for craft closets! This is the link to the shelf I used - I didn't put the wheels on it though! https://www.amazon.com/Ashland-Mobile-Storage-Organization-Shelves/dp/B07KWVQLDG/ref=as_li_ss_tl?ie=UTF8&linkCode=sl1&tag=prettprovi-20&linkId=14391111bf7a1f0be0dbd0bc15f61282&language=en_US
You said your shelving for the 12x12 cases came from Michael's but the link you give is for a product on Amazon that does not look like your shelving. Amazon product has 2 drawers, a shelf, and a sectioned top. I can't seem to find anything at Michael's that looks like your shelving for the 12z12 cases.
That is so weird! The link used to point to the right thing. Sometimes amazon changes listings to different items so that nothing goes to a dead end. I can't find the shelf I have there or on Michaels website right now either. :(
I love how pretty and organized your containers and labels make this small space look! Great job!!!
Thank you so much!!
This makes me so happy!! Love anything that can help me stay more organized! It looks great!
Thanks Kristyn!! :)
What an absolutely gorgeous space! I love how you've made it all so accessible - but clean and orderly. Love so much!
Thank you! It's working so well! :)
This is amazing! I love my Cricut too!
I've been working to organize my new office and will definitely use some of your ideas!
Thanks!
Woohoo! The process/journey is long but fun!
You are so organized and you are inspiring me!
Thank you! I'm not always this organized ;) it's feeling good though!
Wow! What a transformation! Such a smart use of the under the stairs space!
Thank you SO much friend!