DIY Harry Potter Christmas Ornaments
Make these Harry Potter Christmas Ornaments to add some magic to your tree! This is a Harry Potter DIY that you can enjoy year after year.
 *This post contains affiliate links.
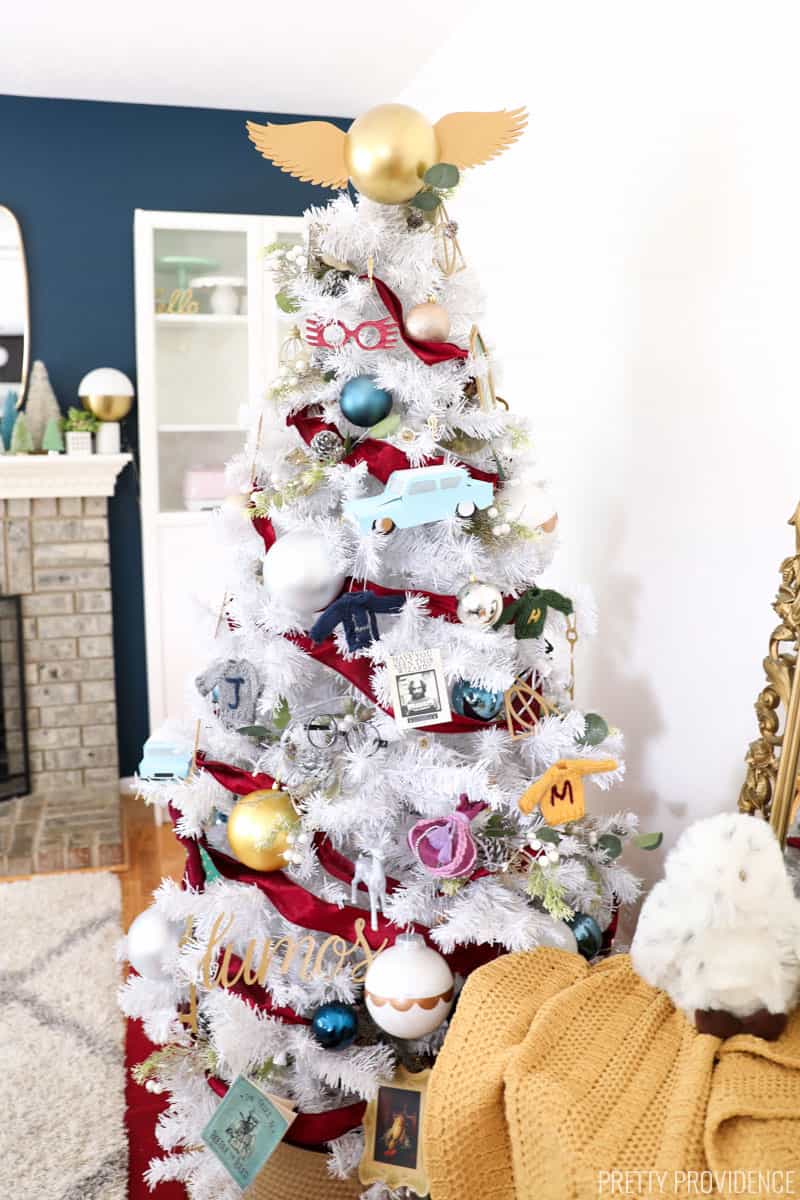
This year I finally made my dream Harry Potter Christmas Tree happen, and I'm still so happy every time I look at it. Making all of the ornaments was time consuming, but WORTH IT. And let's be honest it was the distraction that I needed from an especially overwhelming few months. (2020 y'all.) These gold ornaments made with my Cricut Maker were actually pretty simple and they are some of my favorites!
All of these ornaments are made out of a material called chipboard, which is a thick cardboard-like material. This chipboard is 2mm thick so it is sturdy which is what I wanted. They are made to last so that we can use them year after year! I used my Cricut Maker and the knife blade to cut the shapes out. Here is another example of DIY Christmas ornaments I have made with the Cricut Maker. Check out all of our Christmas ideas here!
 How to Make Harry Potter Ornaments out of Chipboard
 How to Make Harry Potter Ornaments out of Chipboard
If you've never cut chipboard with the Cricut Maker before, here are a few things that you need to know:
- You will need a knife blade. The knife blade does not come with the Cricut Maker, but it is totally worth getting! Read our post all about the knife blade with FAQ's.
- You should also use masking tape to tape all of the corners of your chipboard down onto the ma before cutting.
- Chipboard cut time is a lot longer than with cutting vinyl or paper. Depending on how much you are cutting and how intricate, it can take anywhere from 30 minutes to... 8 hours! Yes, true story. But don't worry, you don't have to sit by the machine the whole time it's cutting.
- Some of the ornaments I designed using free Cricut images or Cricut Access images. Those designs are available to you to purchase individually, or at no extra cost if you're a Cricut Access subscriber.
- Lastly, I made a video showing the process of how to make the portrait ornaments (which are the most complicated in this post) so make sure to watch that!
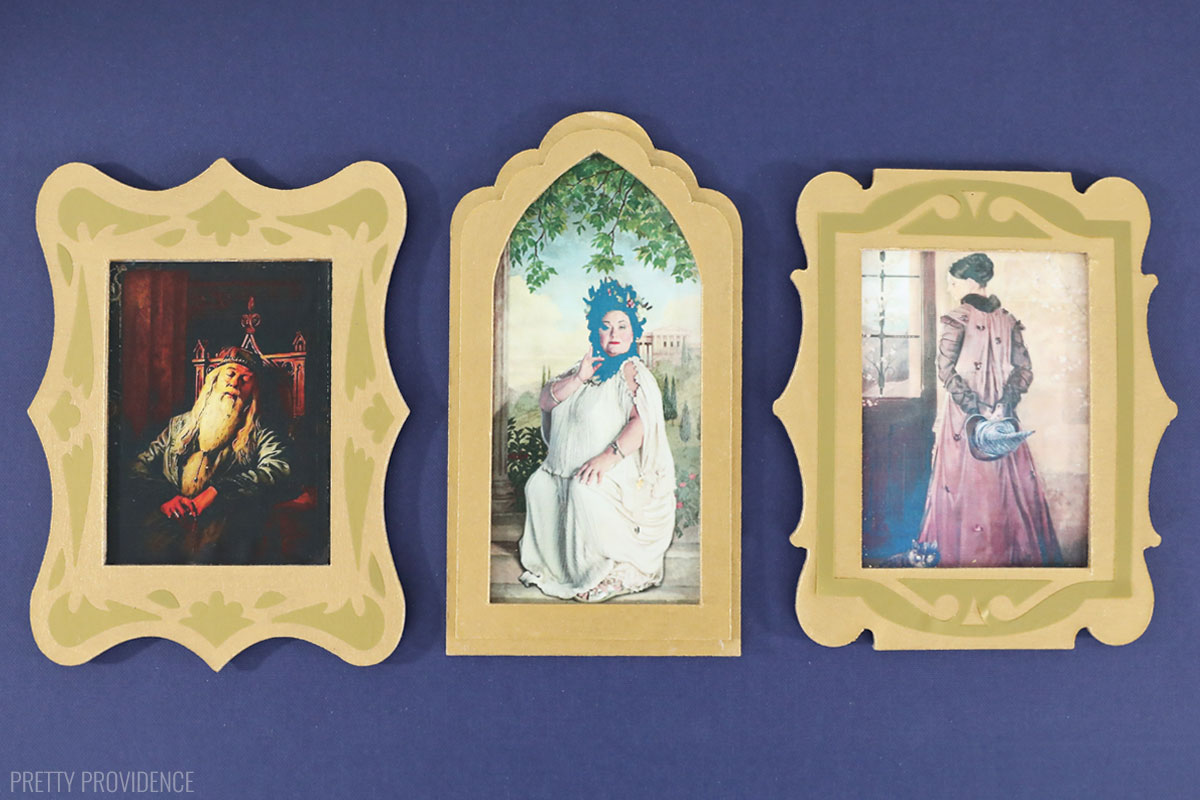
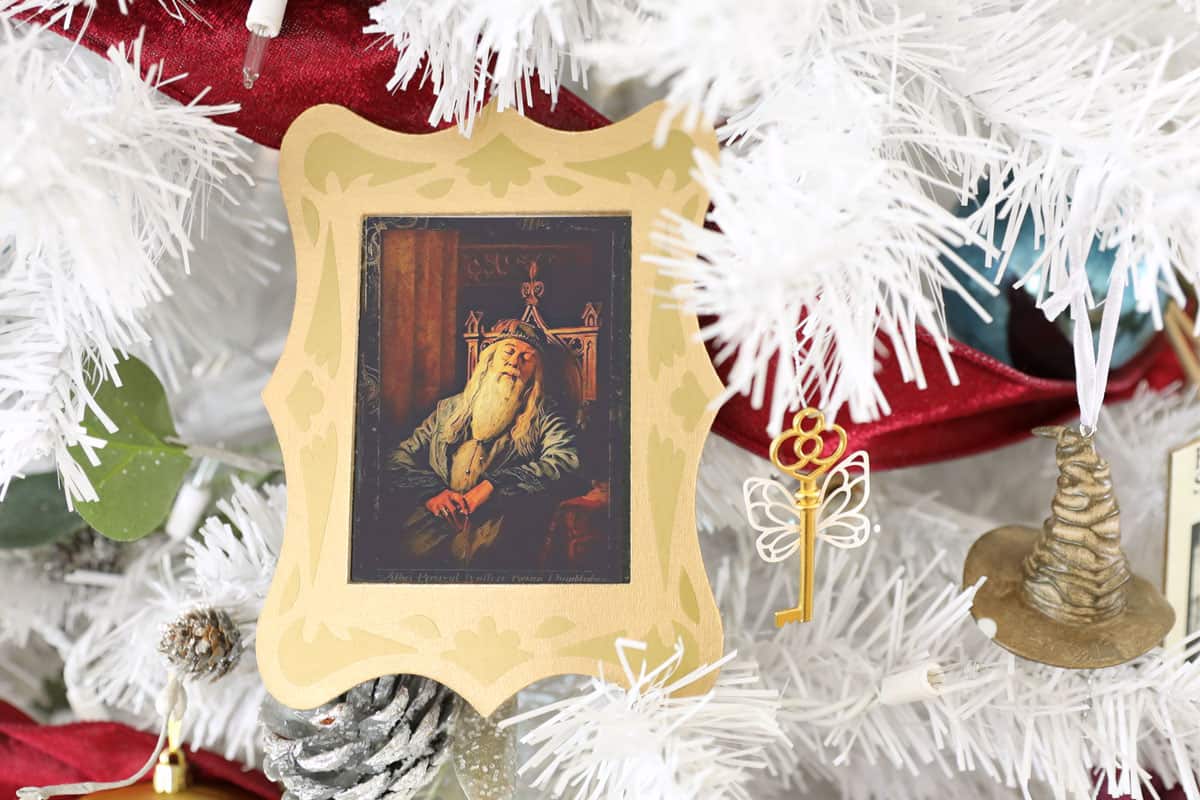
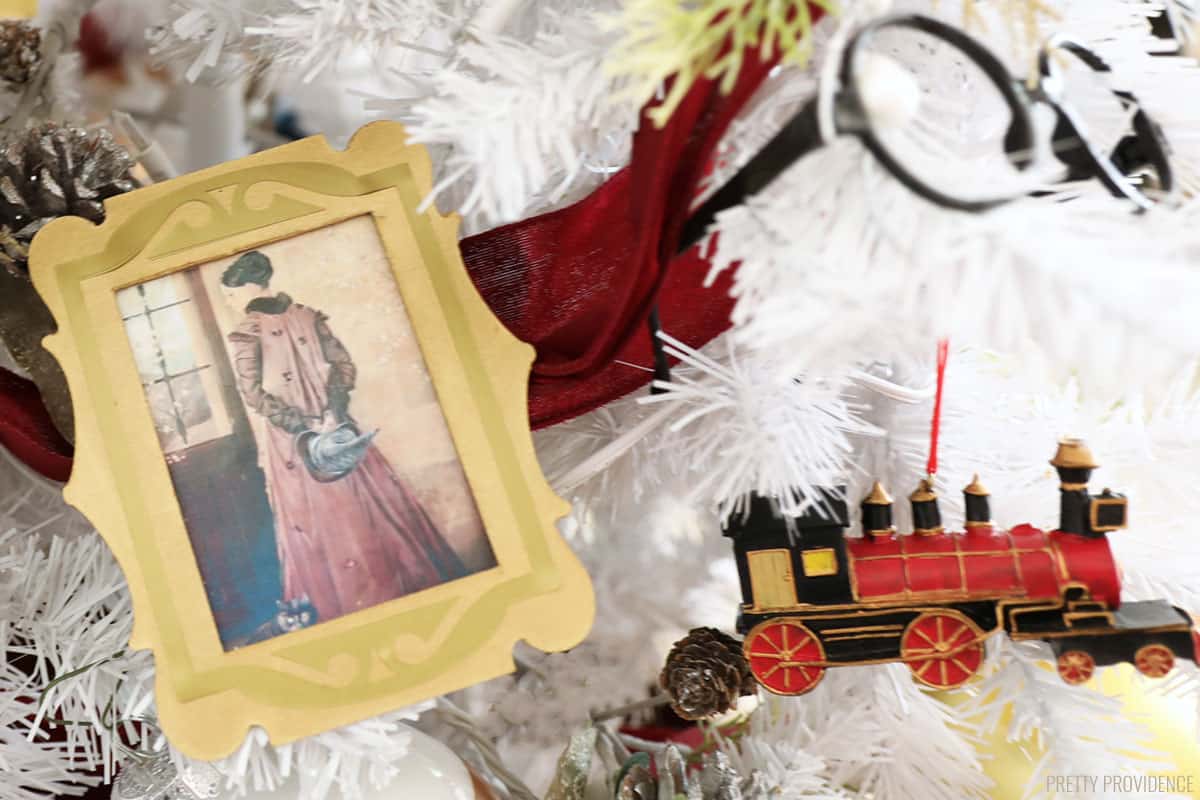
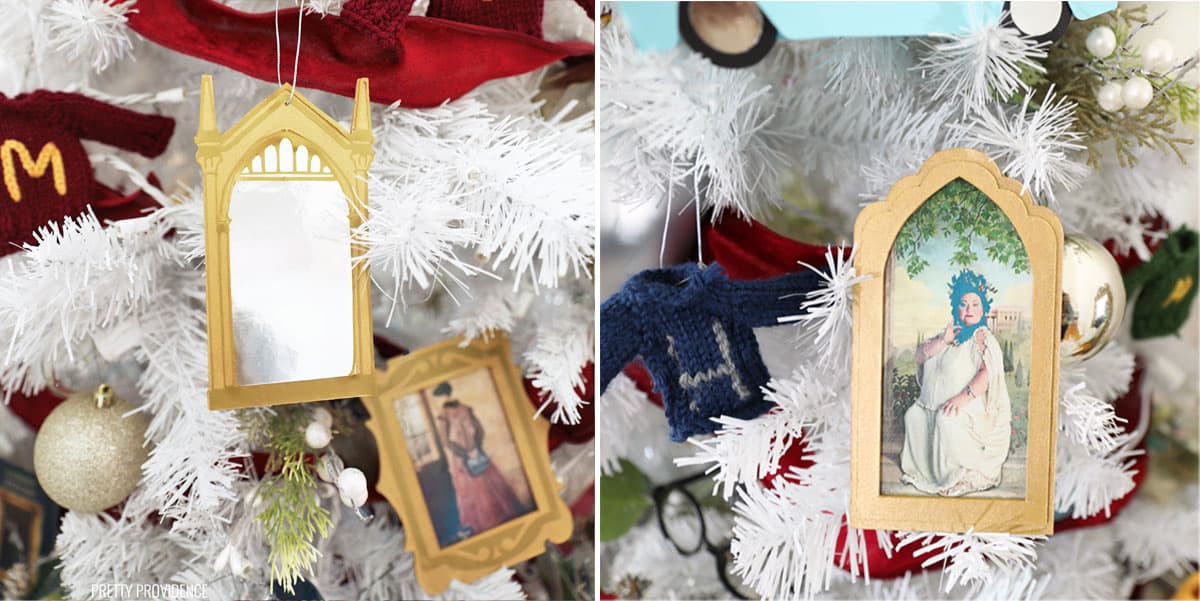
Harry Potter Portrait Ornaments
Materials Needed:
- Cricut Maker
- Knife Blade
- StrongGrip Mat
- Chipboard
- Masking Tape
- Gold Vinyl
- Gold Paint
- Mod Podge
- Color Printer
- Tacky Glue
Instructions:
1. Prepare your designs. If you're using a Cricut, you can use my designs in Cricut Design Space for free. Click here to access the portrait frames in Design Space.
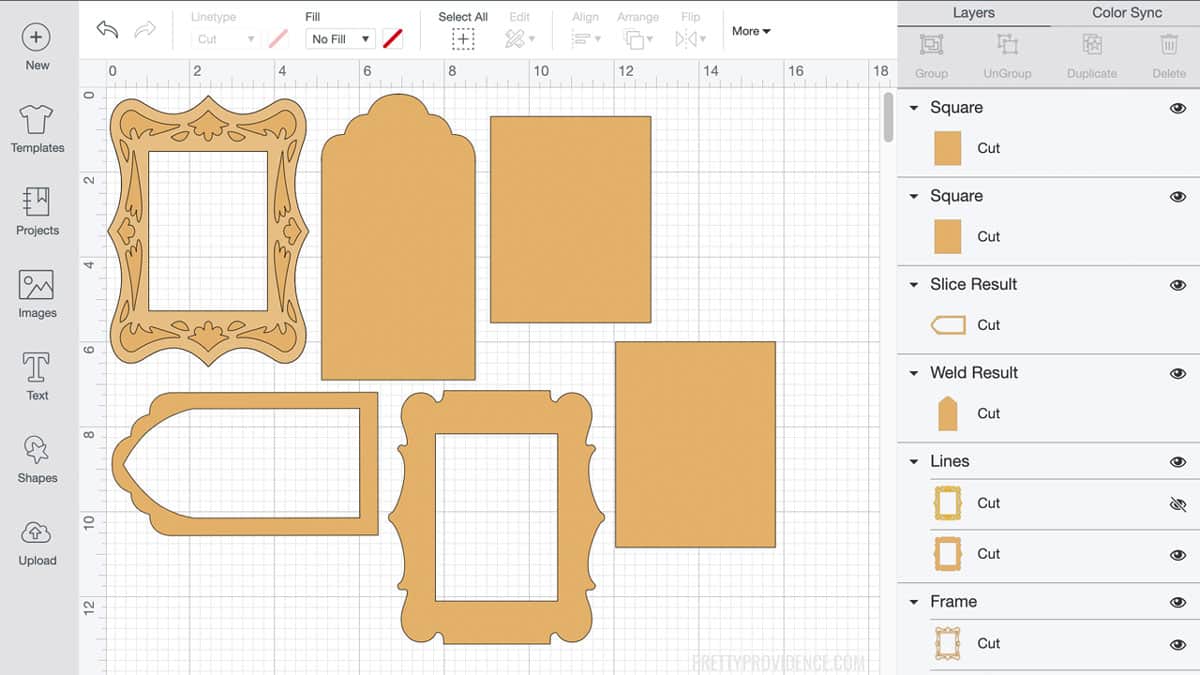
2. Put chipboard onto a StrongGrip mat and tape down the corners with masking tape.
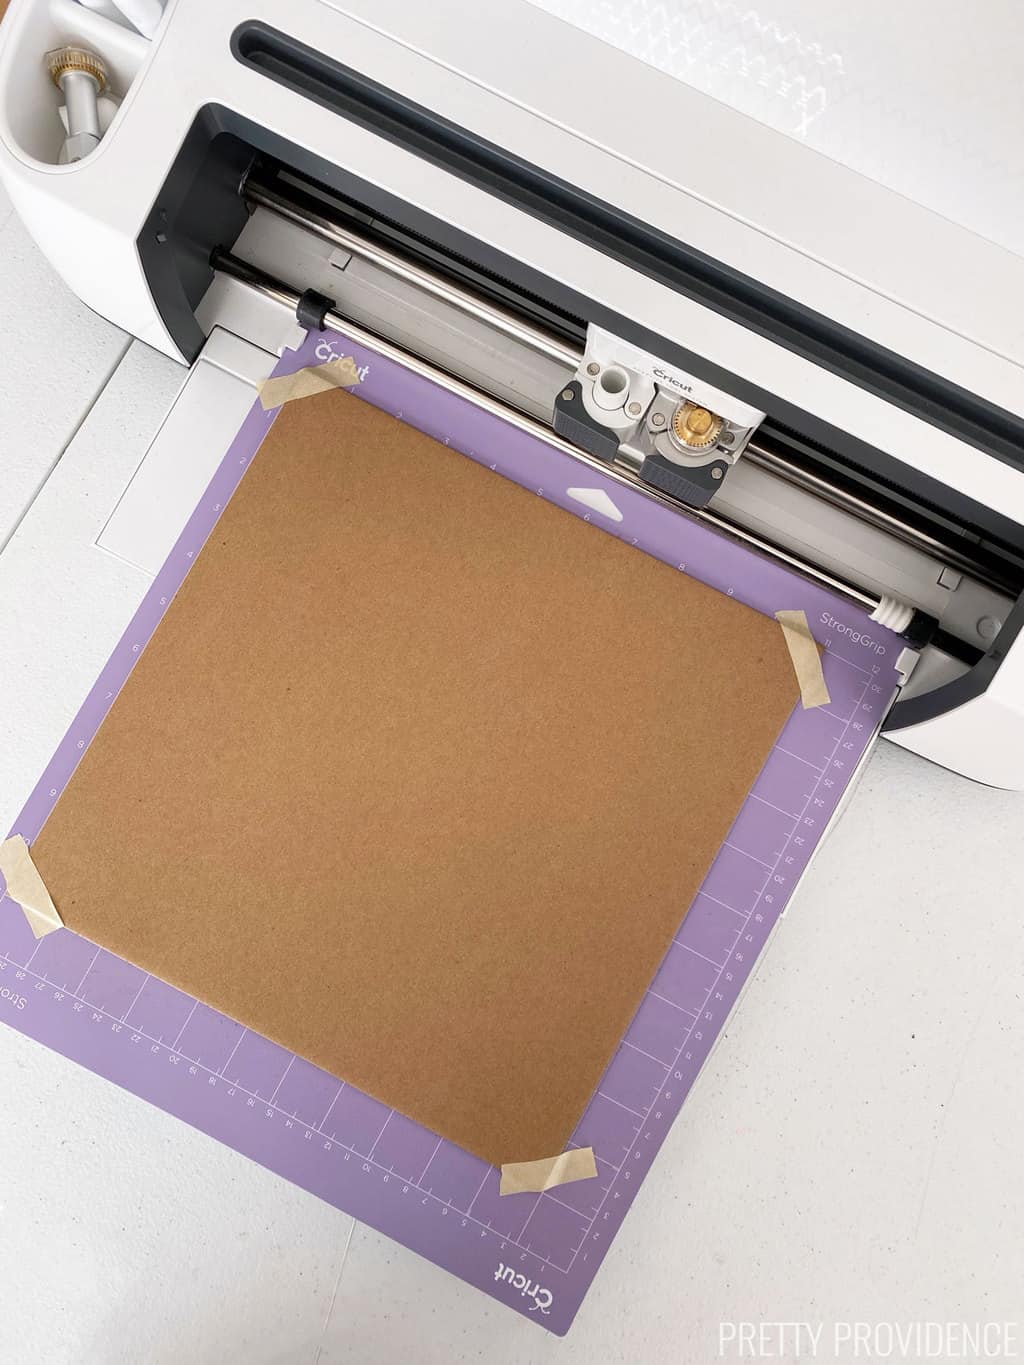
3. Follow the instructions in the Design Space software to cut the chipboard shapes out.
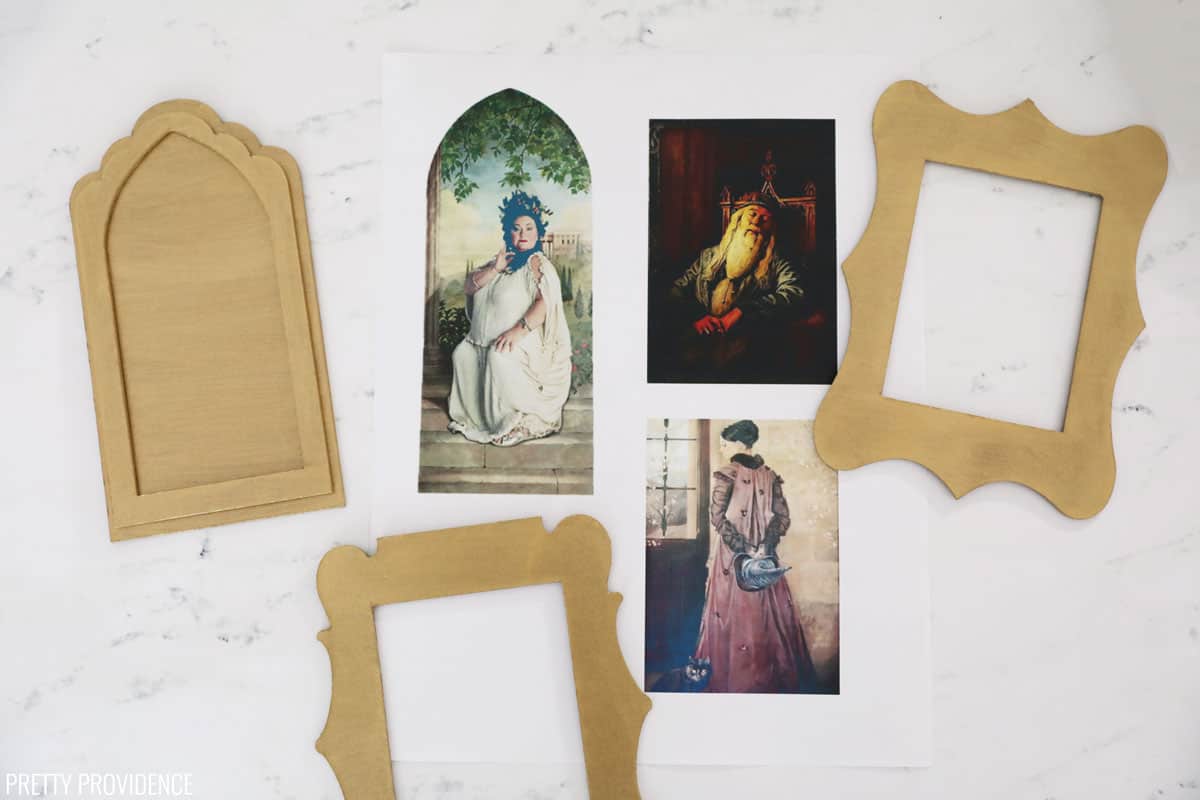
4. Paint both sides of each chipboard piece with gold acrylic paint.
5. Print portraits out with a color printer. Make sure you size them to fit the frames you are cutting.
Note: due to copyright laws, I cannot offer the portraits for you to print. I was able to find them easily through search. I used Photoshop Elements to resize the photos.
6. Cut the pictures out close to the edges and use Mod Podge to apply them to the back of the frame ornaments.
 7. Use tacky glue to glue to front part of the frames on.
8. Load gold vinyl onto a StandardGrip mat to cut the frame embellishments.
9. Follow prompts in the software to cut the vinyl.
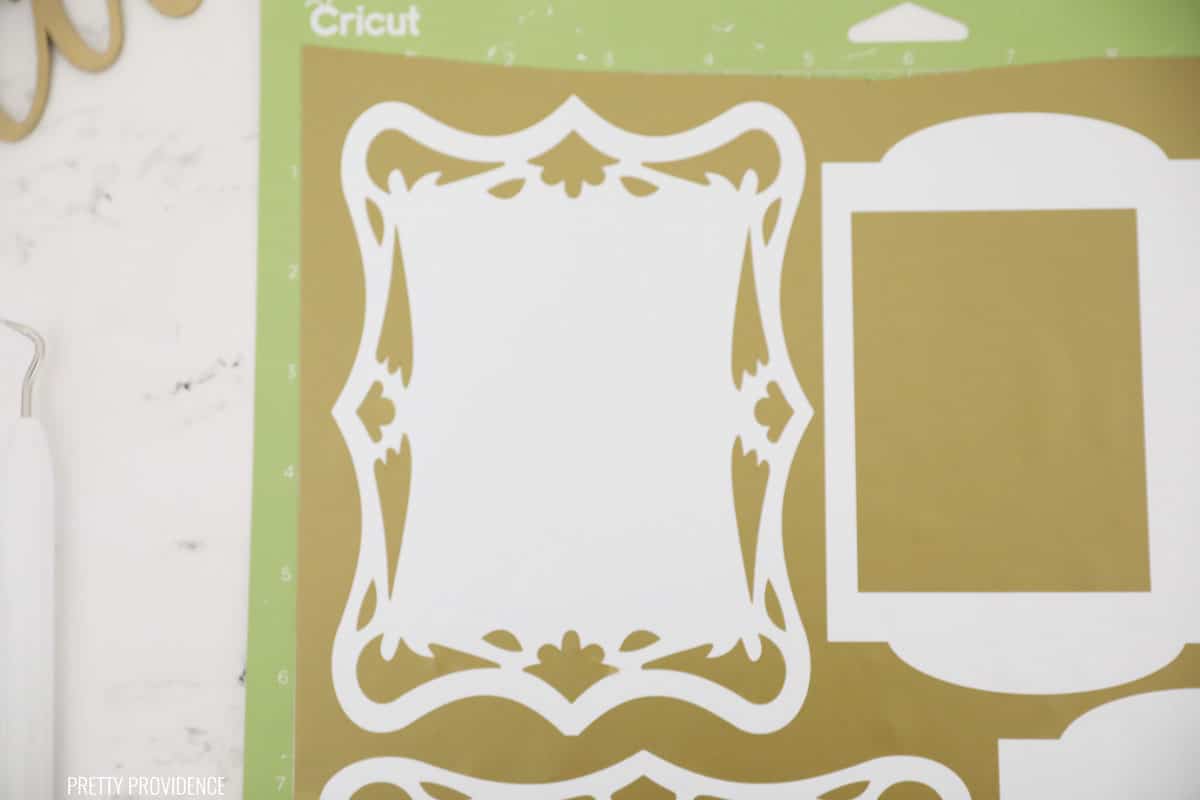
10. Use transfer tape to apply the vinyl to the front of the frames.
See: Tips and tricks for using Cricut transfer tape.
 Once that is done, you can put them on the tree! I made these kind of big and just placed them in between branches, but you can add hooks to them if you'd like. If you do that, I recommend using hot glue on the back of the frames instead of poking a hole through them.
Here is a look at how these Harry Potter Christmas ornaments look on my tree! I am obsessed!
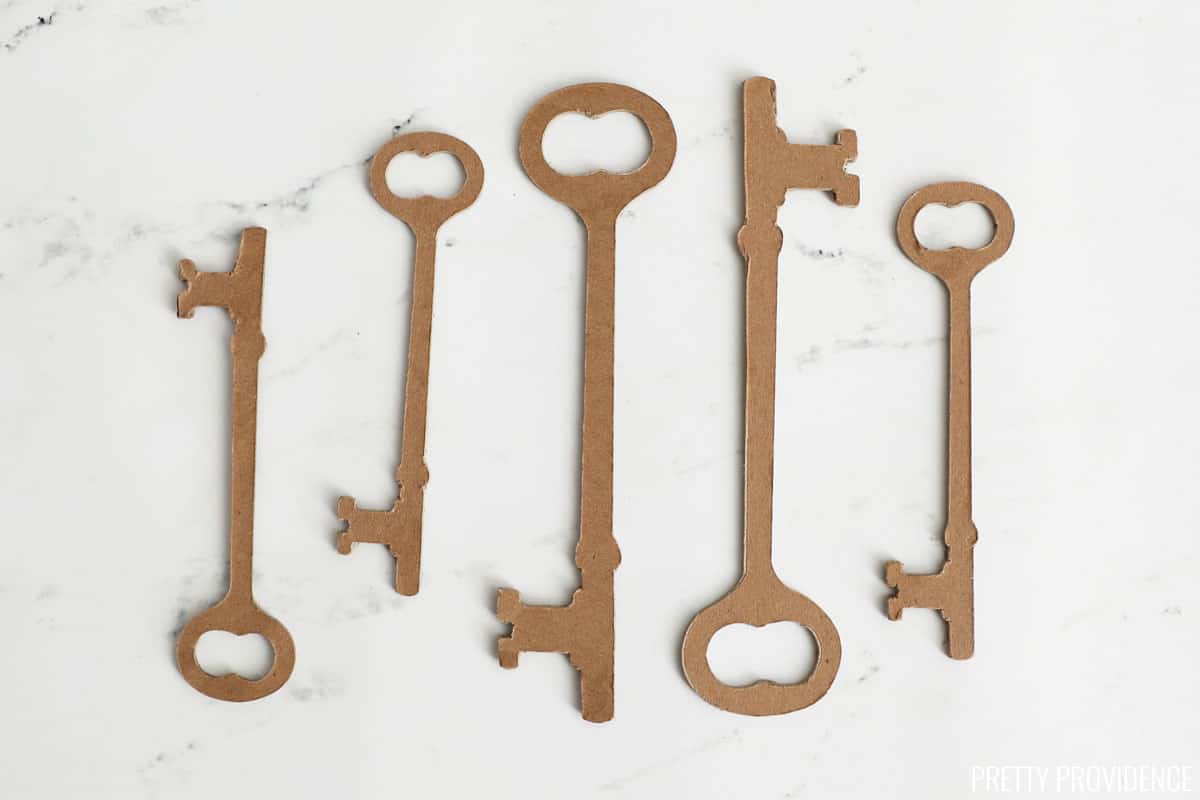
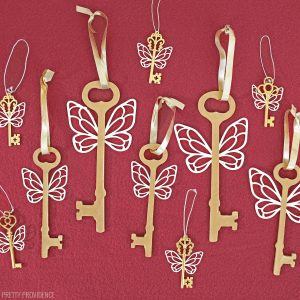
Flying Key Ornaments
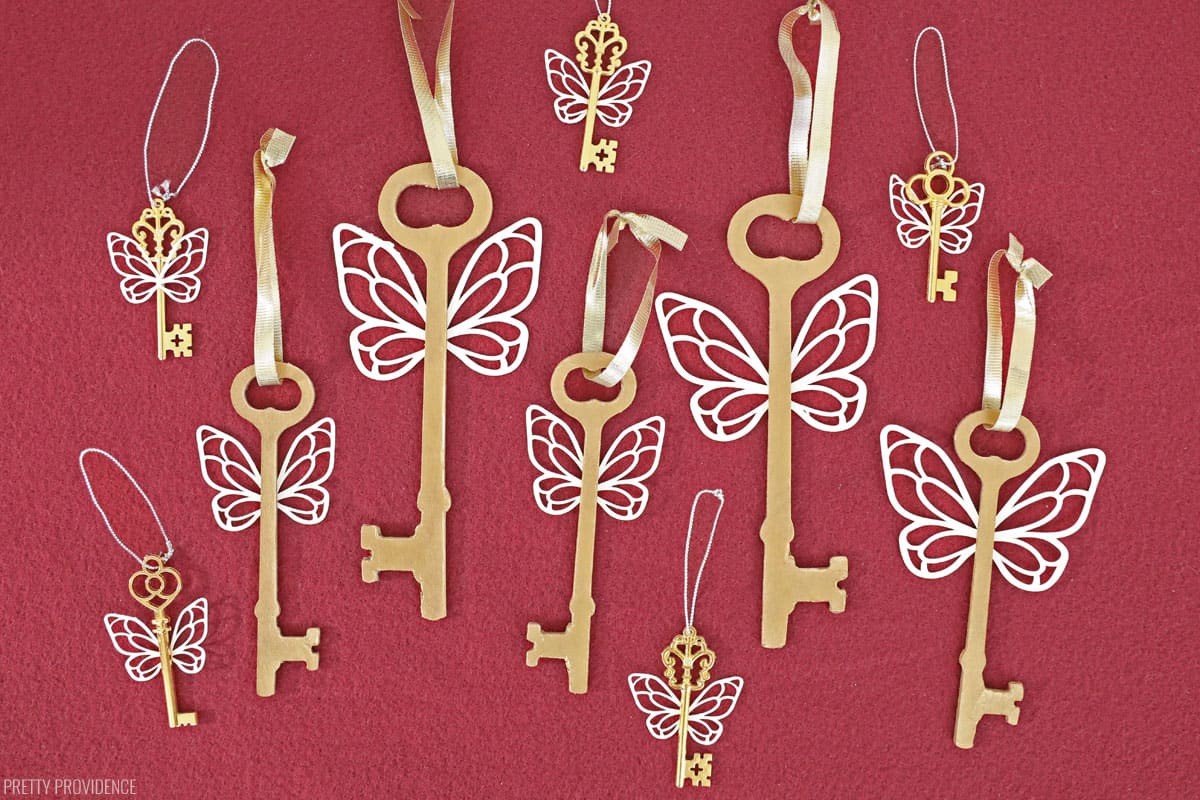
I made flying key ornaments with chipboard, and I also made some small ones with little gold keys I found on Amazon. I love both!
Materials Needed:
- Cricut Maker
- Knife Blade
- StrongGrip Mat (
- LightGrip Mat (for paper)
- Chipboard
- Masking Tape
- Cream Card stock
- Tacky Glue
Instructions:
- Place chipboard onto StrongGrip mat and use masking tape to secure all four corners down on the mat.
- Follow prompts in Design Space to cut the chipboard into key shapes.
- Paint keys with gold acrylic paint and let the paint dry.
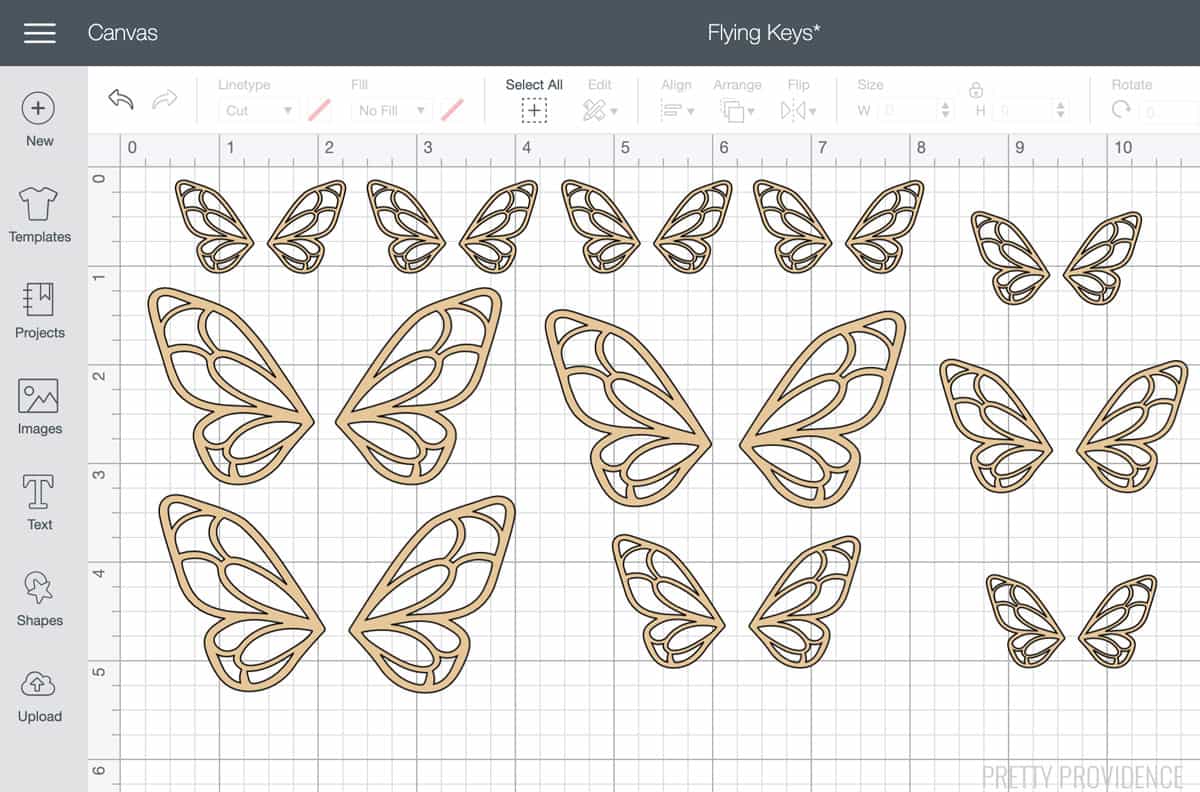
- Open wings design in Cricut Design Space and size the wings to fit your chipboard keys.
- Press a piece of cream card stock down onto a LightGrip mat.
- Follow the prompts in Design Space to cut the card stock.
- When the wings are cut out, use tacky glue to glue them to the back of the keys.
- Add ribbon or string to the top of the keys so they can hang on the tree.
More Harry Potter Christmas Ornament Designs:
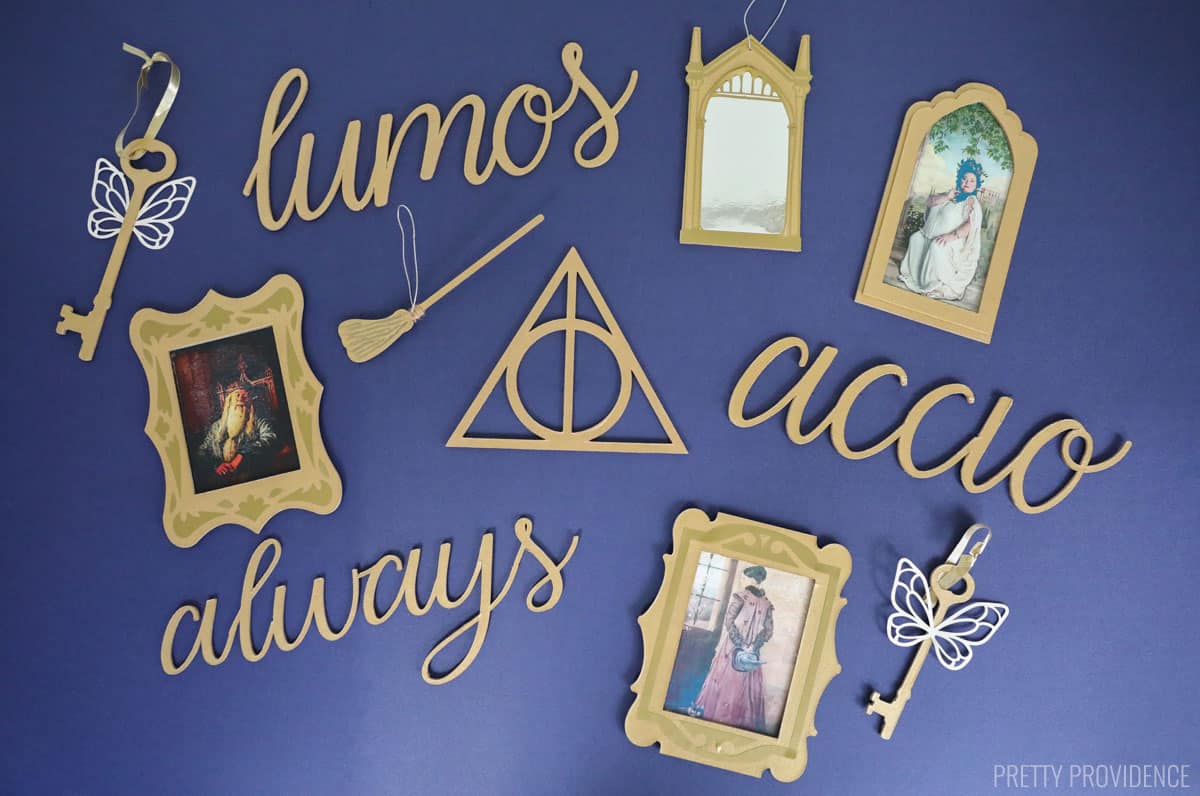
Always, Lumos and Accio: made with chipboard and gold paint. Click here to access the words and broomstick designs in Cricut Design Space.
Broomstick: chipboard, gold paint, black paint, plus a little bit of twine. (This shape is included in the canvas with Always, Lumos and Accio.)
The Deathly Hallows Symbol: also made with chipboard and gold paint. You will need to upload your own image of the symbol, but you can still follow my tutorial for how to cut chipboard ornaments.
The Mirror of Erised: made with Chipboard and gold paint, silver foil card stock, and gold vinyl. You will need to upload your own image of the Mirror of Erised, but you can follow my tutorial for how to cut chipboard ornaments.
If you make any of these ornaments, please leave us a comment and a positive review. Then make sure to tag us on instagram because we LOVE to see what y'all are making!

Harry Potter Christmas Ornaments
Video
Equipment
- Color Printer
Materials
- Chipboard
- Masking Tape
- Gold Paint
- Mod Podge
- Tacky Glue
Instructions
- Prepare your designs. If you're using a Cricut, you can use my designs in Cricut Design Space for free.
- Put chipboard onto a StrongGrip mat and tape down the corners with masking tape.
- Follow the instructions in the Design Space software to cut the chipboard shapes out.
- Paint both sides of each chipboard piece with gold acrylic paint.
- Print portraits out with a color printer. Cut them out close to the edges and use Mod Podge to apply them to the back of the frame ornaments.
- Use tacky glue to glue to front part of the frames on.
- Load gold vinyl onto a StandardGrip mat to cut the frame embellishments.
- Follow prompts in the software to cut the vinyl.
- Use transfer tape to apply the vinyl to the front of the frames.
Here are printable instructions for the flying keys. These can be used as Christmas tree ornaments, or hung up as decorations for a Harry Potter themed party!
Flying Key Ornaments
Instructions
- Place chipboard onto StrongGrip mat and use masking tape to secure all four corners down on the mat.
- Follow prompts in Design Space to cut the chipboard into key shapes.
- Paint keys with gold acrylic paint and let the paint dry.
- Open wings design in Cricut Design Space and size the wings to fit your chipboard keys.
- Press a piece of cream card stock down onto a LightGrip mat.
- Follow the prompts in Design Space to cut the card stock.
- When the wings are cut out, use tacky glue to glue them to the back of the keys.
- Add ribbon or string to the top of the keys so they can hang on the tree.
Long Live Harry Potter, and have a magical Christmas!